Every framework that touches your security program has an opinion about how long you keep data — and, just as importantly, when you delete it. ISO 27001:2022 puts it in A.5.33 (protection of records) and A.8.10 (information deletion). GDPR makes it a principle: Article 5(1)(e) says personal data is kept “no longer than is necessary,” and Article 17 gives people the right to have it erased. SOX §802 demands seven years for audit records. HIPAA and PCI DSS each set their own floors. SOC 2 auditors want to see that you have a retention schedule and that you follow it.
Most teams “handle” this with a wiki page nobody reads and a quarterly reminder to “clean up old data” that never happens. Data accumulates forever — which is both a storage bill and a liability, because the data you no longer need is exactly the data a breach exposes. Talarity turns the wiki page into a running system: you set a retention period per class of data, and the platform schedules the deletions, routes them through an approver, freezes anything under legal hold, and writes down every step for the auditor.
Everything lives at Settings → Data Retention (/app/settings/data-retention), across six tabs. This article walks all of them.
Who’s involved
- Compliance lead / DPO — sets the retention period for each data class to match the framework, and decides which deletions need a second sign-off.
- Data owner / admin — reviews what’s scheduled for deletion and approves it, or cancels if something still matters.
- Legal counsel — drops a legal hold the moment litigation or an investigation is reasonably anticipated, freezing the relevant data against any retention rule.
- Auditor — pulls the retention schedule, the audit-log retention config, and the deletion-approval trail. Confirms the policy exists, is enforced, and that nothing under hold was destroyed.
Step 1 — Start from a preset, not a blank page
Open the Configuration tab. The first decision is a posture, not a number: four presets seed sensible defaults across every data class.

- Regulatory Minimum — the shortest retention that still meets common requirements. Pick this when storage minimization (and GDPR’s “no longer than necessary”) is the priority.
- Industry Standard — the recommended middle ground for most organizations. The default.
- Extended Retention — longer windows for regulated industries that expect to produce records years later.
- Custom — set every category by hand.
The preset is a starting point, not a straitjacket. Pick the posture that matches your risk appetite, then tune the handful of categories where your framework is specific. You are never locked into a preset’s numbers.
Step 2 — Tune retention per data class
Below the presets, every class of data Talarity manages gets its own card — Audit Logs, Assessment Data, Generated Reports, Evidence Files, Risk Assessment Data, Vendor/TPRM Data, User Activity Data, Export Files, Security Incidents, and Policy Documents. Each card carries the regulatory tags that drive its defaults (SOC 2, HIPAA, PCI DSS, ISO 27001, GDPR…) so you can see why a number is what it is.
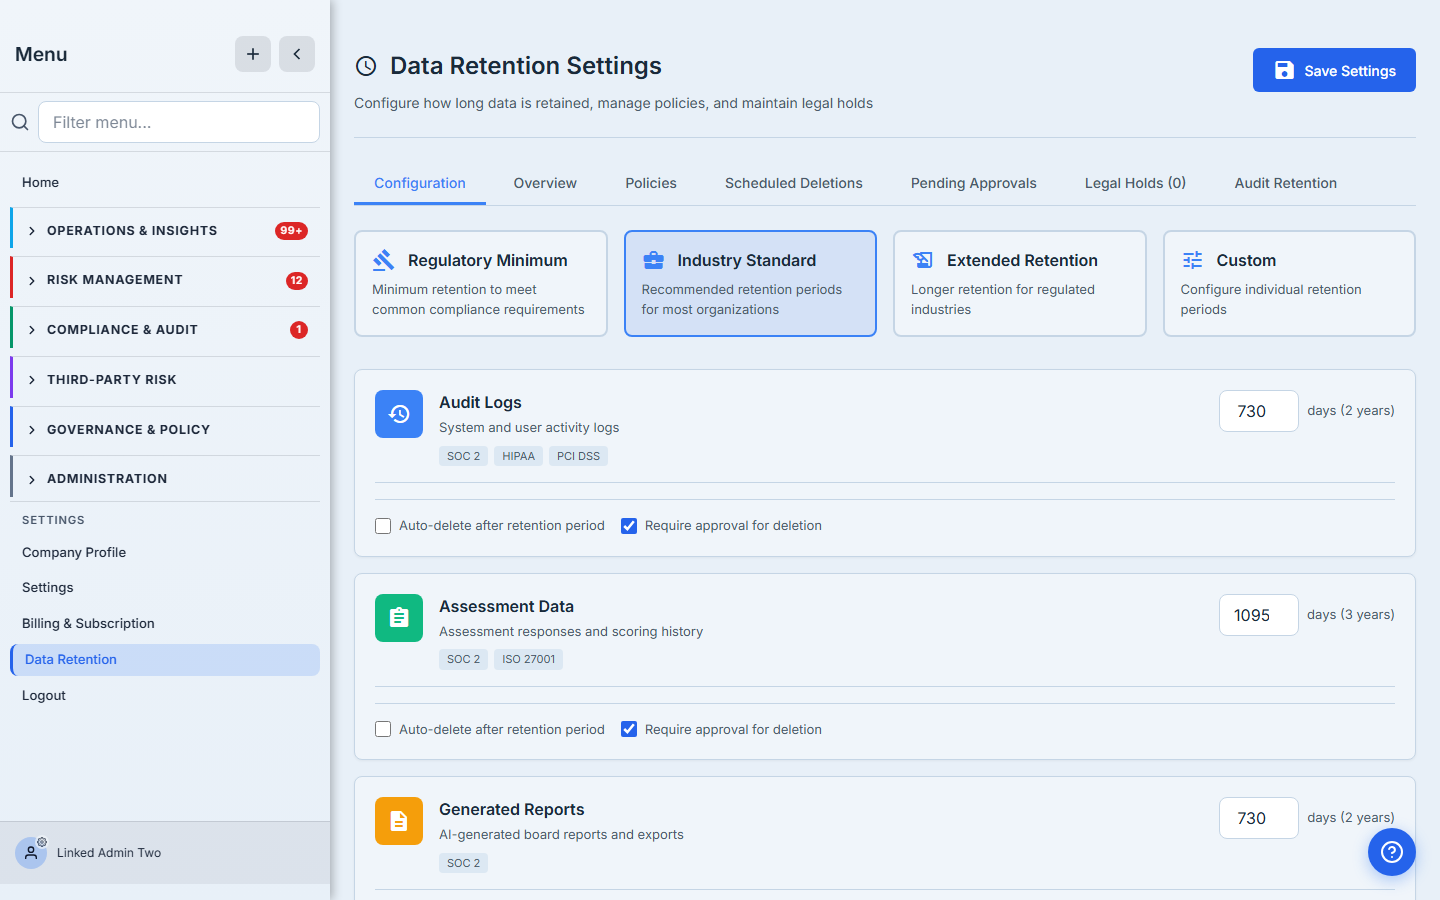
Each card has three controls:
- Retention period (days) — typed in days, echoed as a human period (“1095 days (3 years)”). Each category enforces a floor and ceiling — you can’t set Security Incidents below three years or Audit Logs below ninety days, because those are the regulatory minimums. The bounds are the guardrail.
- Auto-delete after retention period — when on, items past their window are picked up automatically by the scheduler. When off, the policy still flags what’s due, but a human pulls the trigger.
- Require approval for deletion — when on, every scheduled deletion waits on the Pending Approvals tab for a second person. This is the two-person control auditors love; leave it on for anything you’d hate to lose by accident.
Step 3 — Set archive retention and protect evidence in flight
Scroll to the bottom of Configuration for two settings that operate at a different layer than the per-category policies.
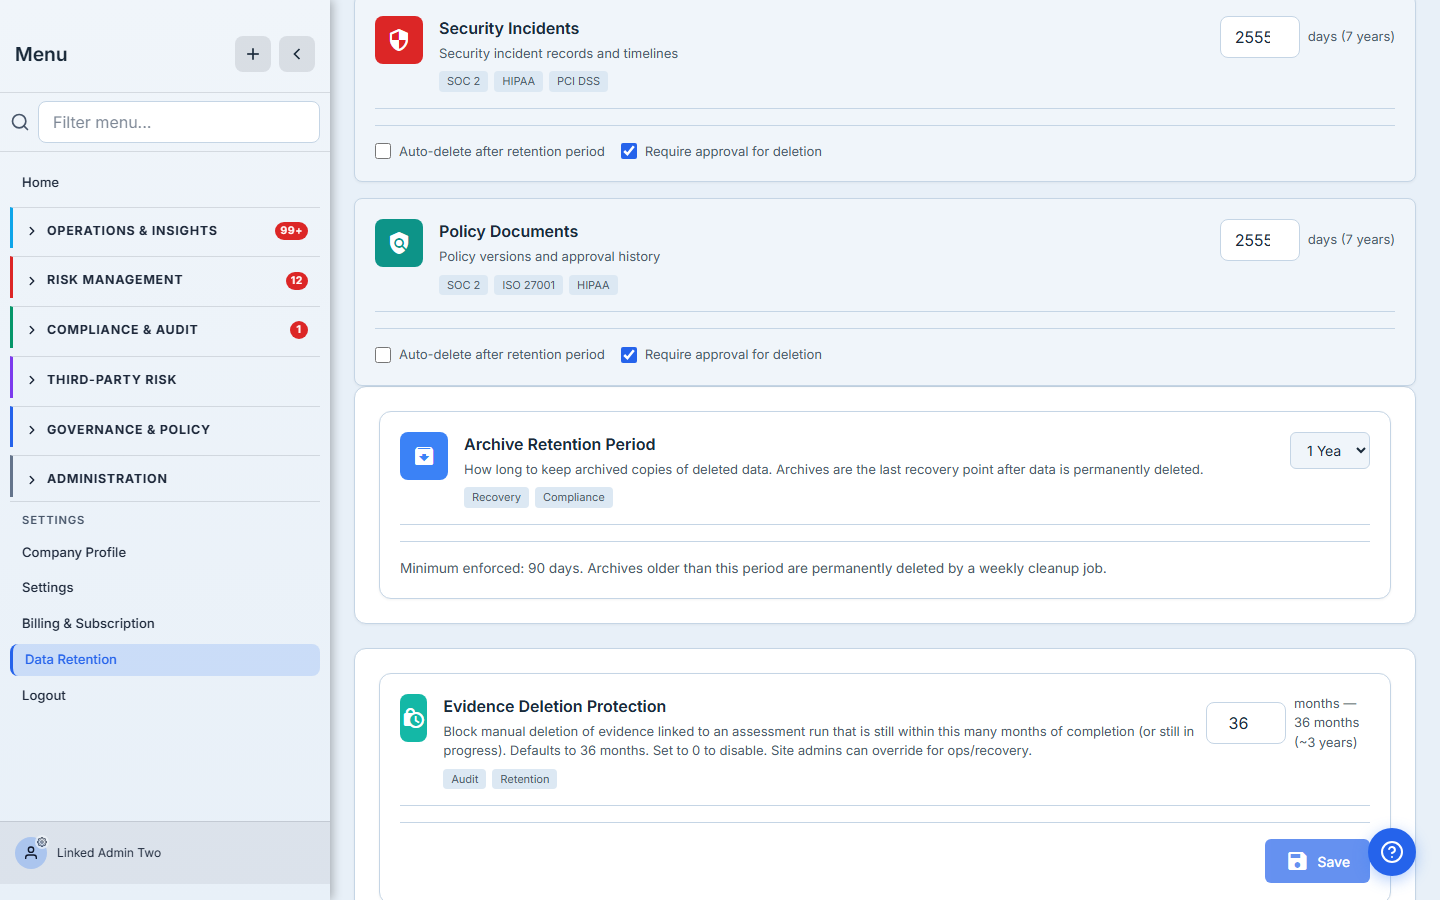
- Archive retention period — when data is archived rather than hard-deleted, this is how long the archive lives before a weekly cleanup job removes it. Choose from 90 days to 7 years; the floor is 90 days.
- Evidence deletion protection — a guardrail expressed in months (default 36). It blocks the manual deletion of any evidence file still linked to an assessment run inside the window. It’s independent of the auto-delete policies: those schedule deletions on a clock; this one refuses a delete that would orphan an in-scope assessment. Set it to 0 to disable.
When everything looks right, click Save Settings. Talarity writes your configuration and turns it into live, named retention policies — one per category — in a single pass.
Step 4 — Saved settings become live policies
Open the Policies tab. Every category you configured is now a policy card: its data type, its retention period in plain language, whether approval is required, and how many items are currently due.
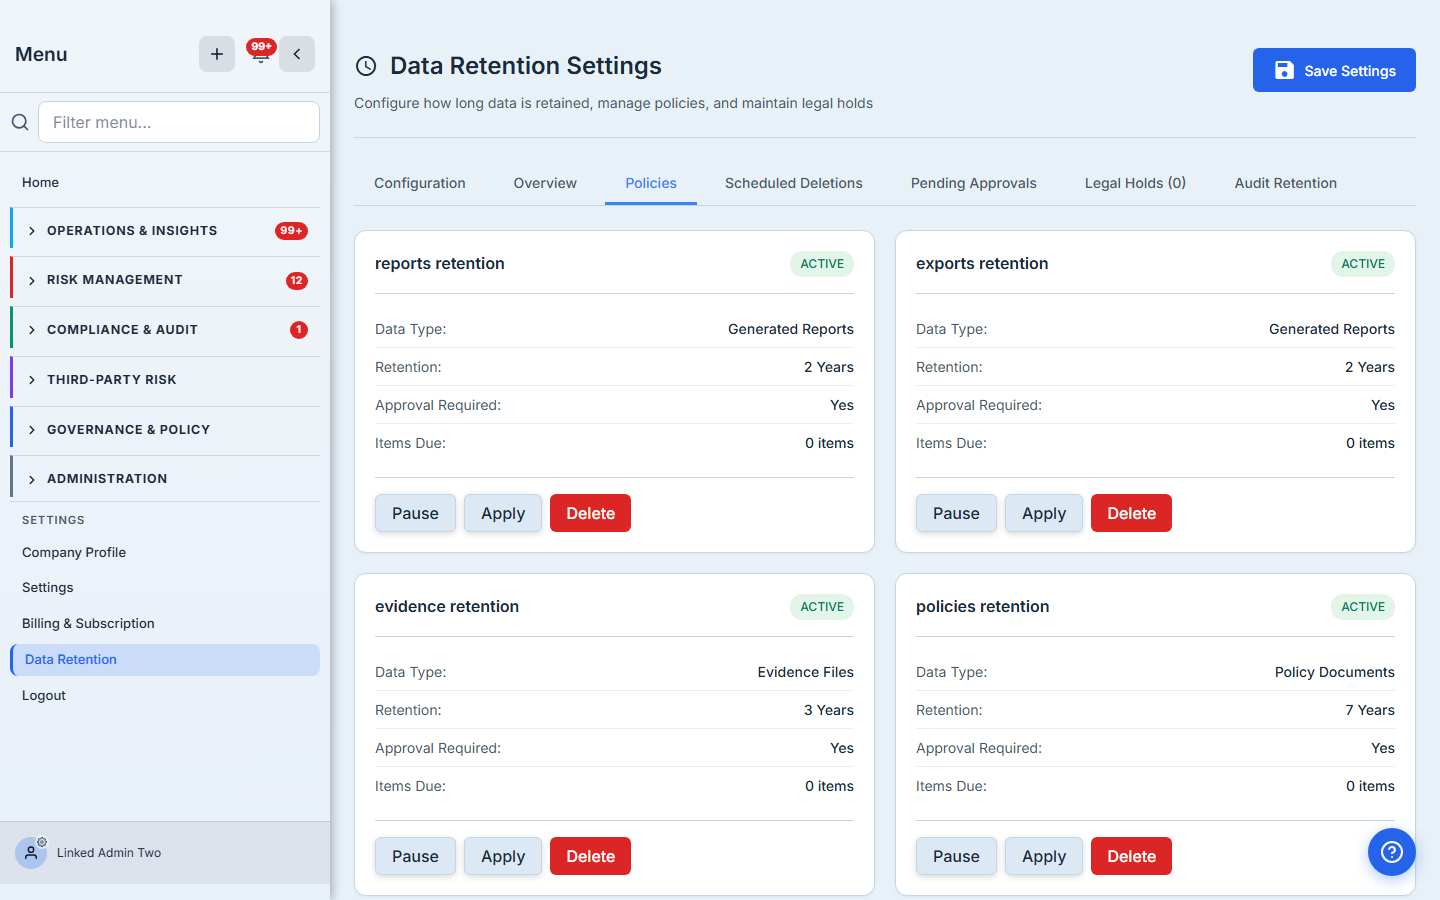
Each policy carries three actions:
- Pause / Activate — toggle a policy off without deleting it. A paused policy stops scheduling deletions; activate it to resume. Useful while you settle on the right number.
- Apply — run the policy now (covered next).
- Delete — remove the policy. Talarity also cancels any deletions that policy had scheduled, so retiring a policy never leaves orphaned deletions behind.
Behind the scenes, Save doesn’t just store ten numbers — it reconciles ten policies, creating, updating, or pausing each so the Policies tab is always a faithful mirror of the Configuration tab.
Step 5 — Apply a policy — but preview first
This is the step where “retention policy” stops being a setting and starts deleting things, so it’s the step that deserves a safety net. Click Apply on a policy and Talarity runs a dry run first: it scans the data class, counts what’s actually past the window, and shows you the blast radius before anything is scheduled.
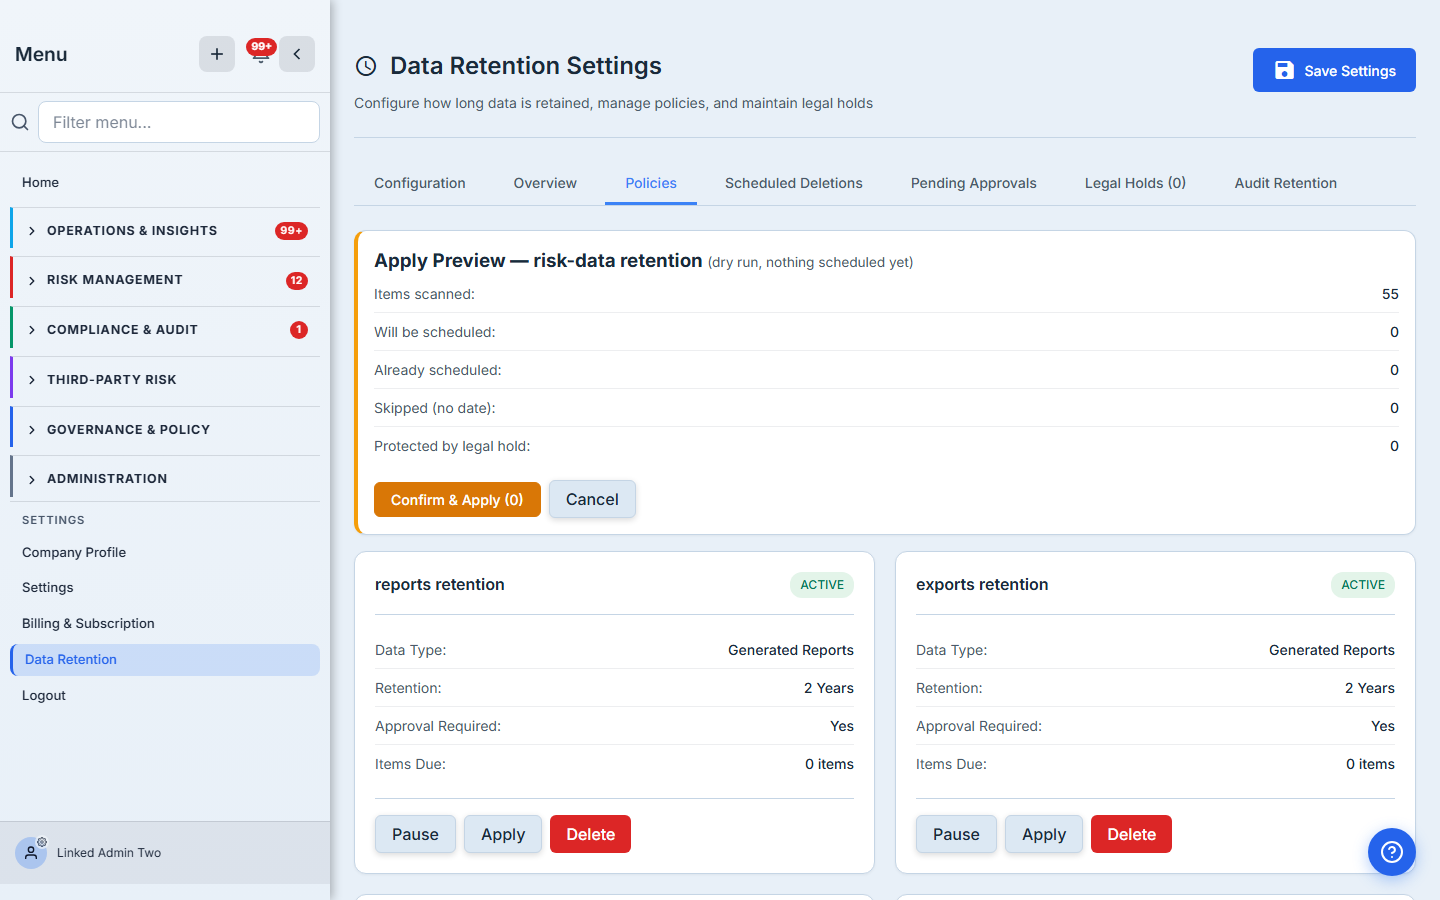
The preview breaks down exactly what the real run would do:
- Items scanned — everything in the data class the policy looked at.
- Will be scheduled — items past their retention window that this run would queue for deletion.
- Already scheduled — items a prior run already queued (so you never double-count).
- Skipped — items with no usable date to age against.
- Protected by legal hold — items the policy would have scheduled, except a hold is freezing them. This number is the proof that your legal holds actually work.
Only when you click Confirm & Apply does Talarity write the schedule. Each due item gets a deletion date set after a quarantine window — a grace period during which the item is flagged but recoverable — and, if the policy requires approval, it lands in the approval queue rather than the delete path.
The dry run is the difference between “I think this policy is safe” and “I can see exactly what it will touch.” Run it every time you change a retention number. The preview costs nothing and commits nothing.
Step 6 — Watch what’s scheduled
The Scheduled Deletions tab is the running list of everything queued, split into two sections: Overdue for Deletion (past the date, flagged) and Upcoming Deletions (counting down). Each row shows the item, its data class, the days until deletion, and its approval status — with a legal-hold marker on anything frozen.
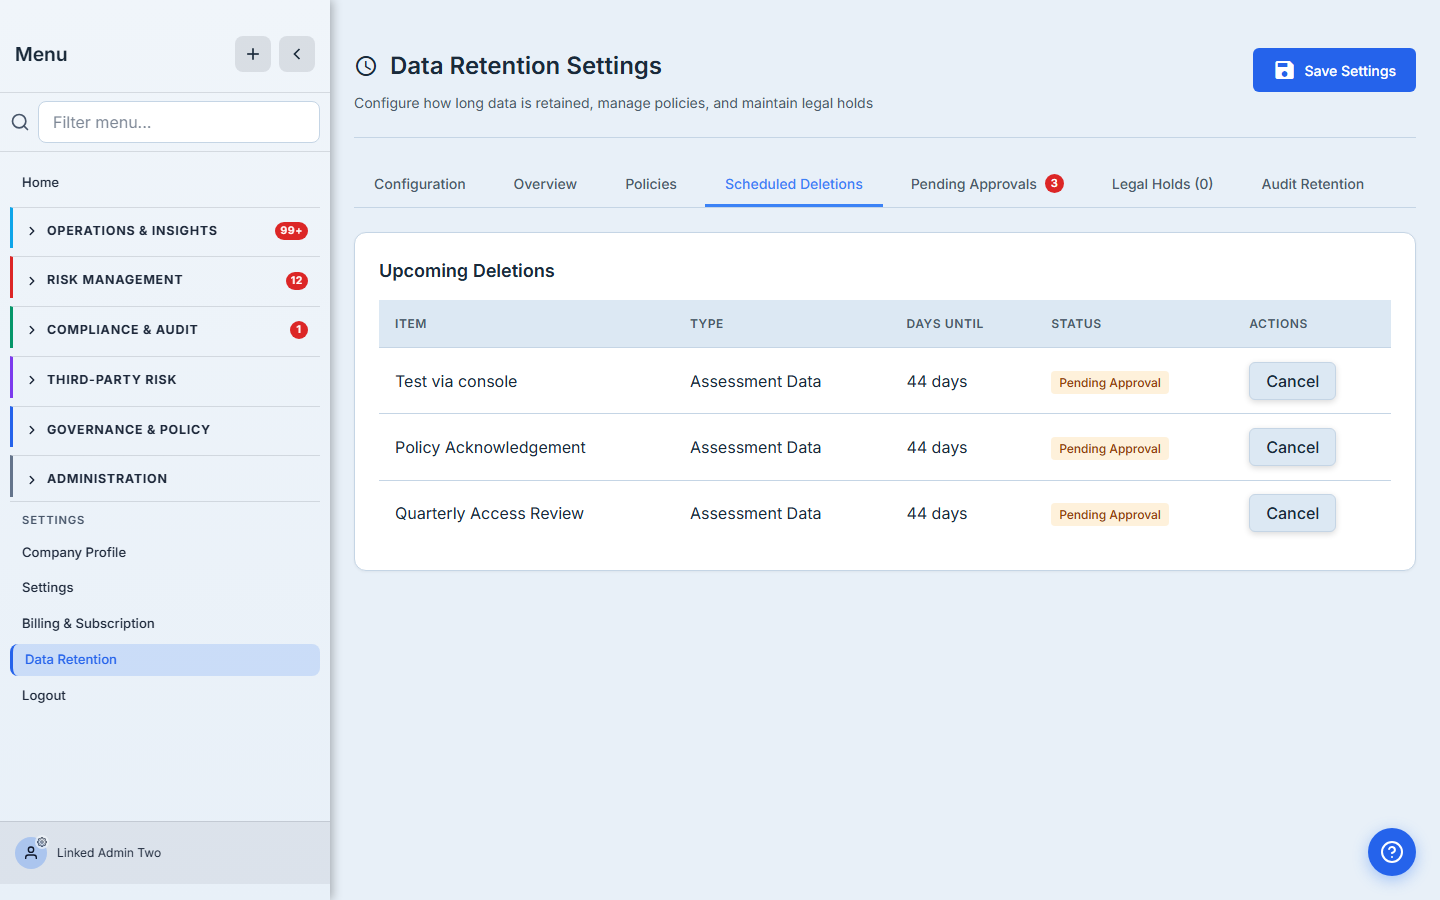
Every row has a Cancel action. Cancelling clears the retention flag and returns the item to normal life — the escape hatch for “actually, keep that one.” Nothing on this tab is gone yet; it’s the window between “due” and “deleted.”
Step 7 — Approve deletions — the two-person control
If a policy has Require approval on, its due items don’t delete on the scheduled date — they wait here, on Pending Approvals, for a second person. Each row shows the item, its type, the scheduled date, and which policy queued it.

Two actions per row:
- Approve — sign off. The item proceeds to permanent deletion after its scheduled date.
- Cancel — stop the deletion entirely and return the item to normal retention.
This is separation of duties made concrete: the person who sets the policy and the person who approves a specific deletion can be two different people, and the approval is recorded. When an auditor asks “who authorized destroying these records,” the answer is a name and a timestamp, not a shrug.
Step 8 — Freeze data with a legal hold
The moment litigation or an investigation is reasonably anticipated, retention schedules have to stop for the affected data — destroying records on a routine schedule once you’re on notice is spoliation. The Legal Holds tab is that brake. Click Create Legal Hold.
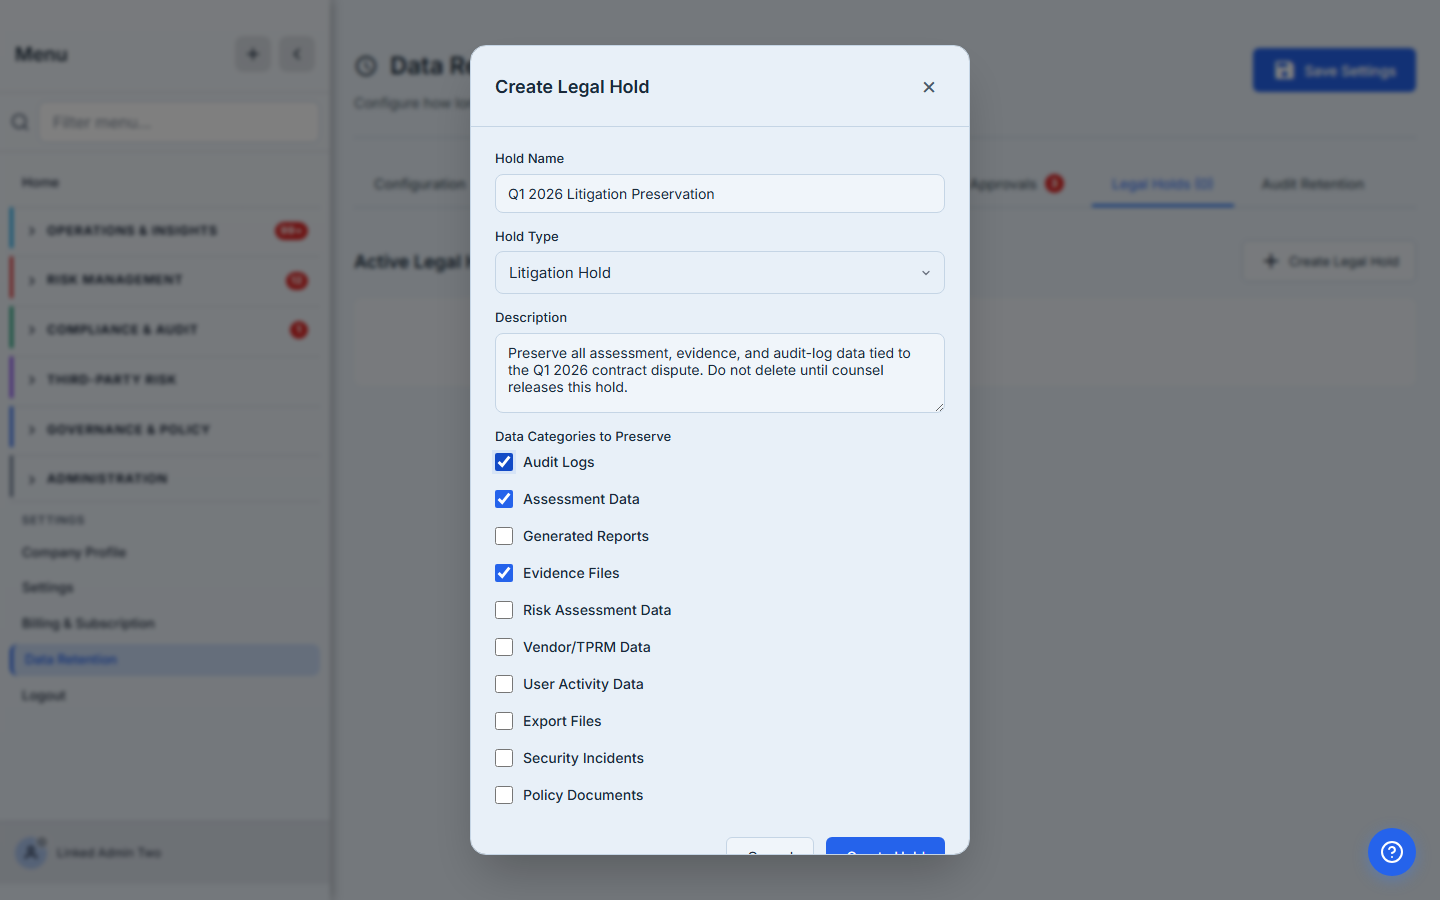
The form is small and deliberate:
- Hold name — what this hold is about (“Q1 2026 Litigation Preservation”).
- Hold type — Litigation Hold, Regulatory Investigation, Audit Preservation, or Internal Investigation. The type is the story the audit trail tells later.
- Description — the scope and the reason, in your words.
- Data categories to preserve — check every class of data the hold should freeze.
Once created, the hold is absolute against retention: any policy that would schedule a held item skips it instead and counts it under “Protected by legal hold” (the number you saw in Step 5). A hold outranks every retention rule.
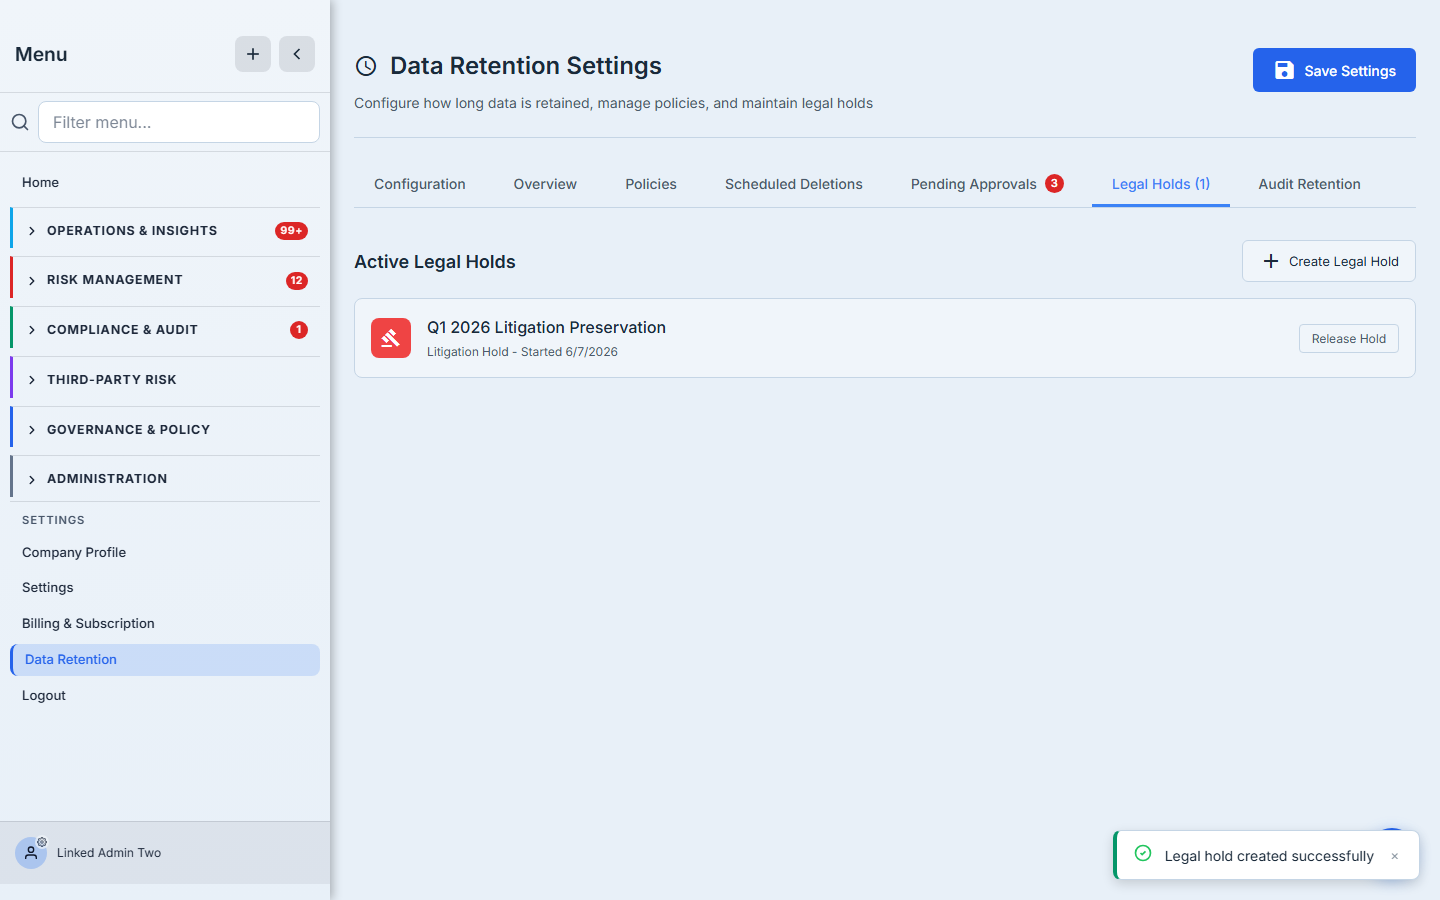
The proof is in the Apply preview. With the hold covering the Assessment Data category, the very same dry-run that earlier reported three items due for deletion now reports all three as Protected by legal hold — and zero to be scheduled. The retention policy is still active; the hold simply outranks it.

When counsel releases the hold, the affected data resumes its normal retention schedule — and the release, like everything else here, is recorded.
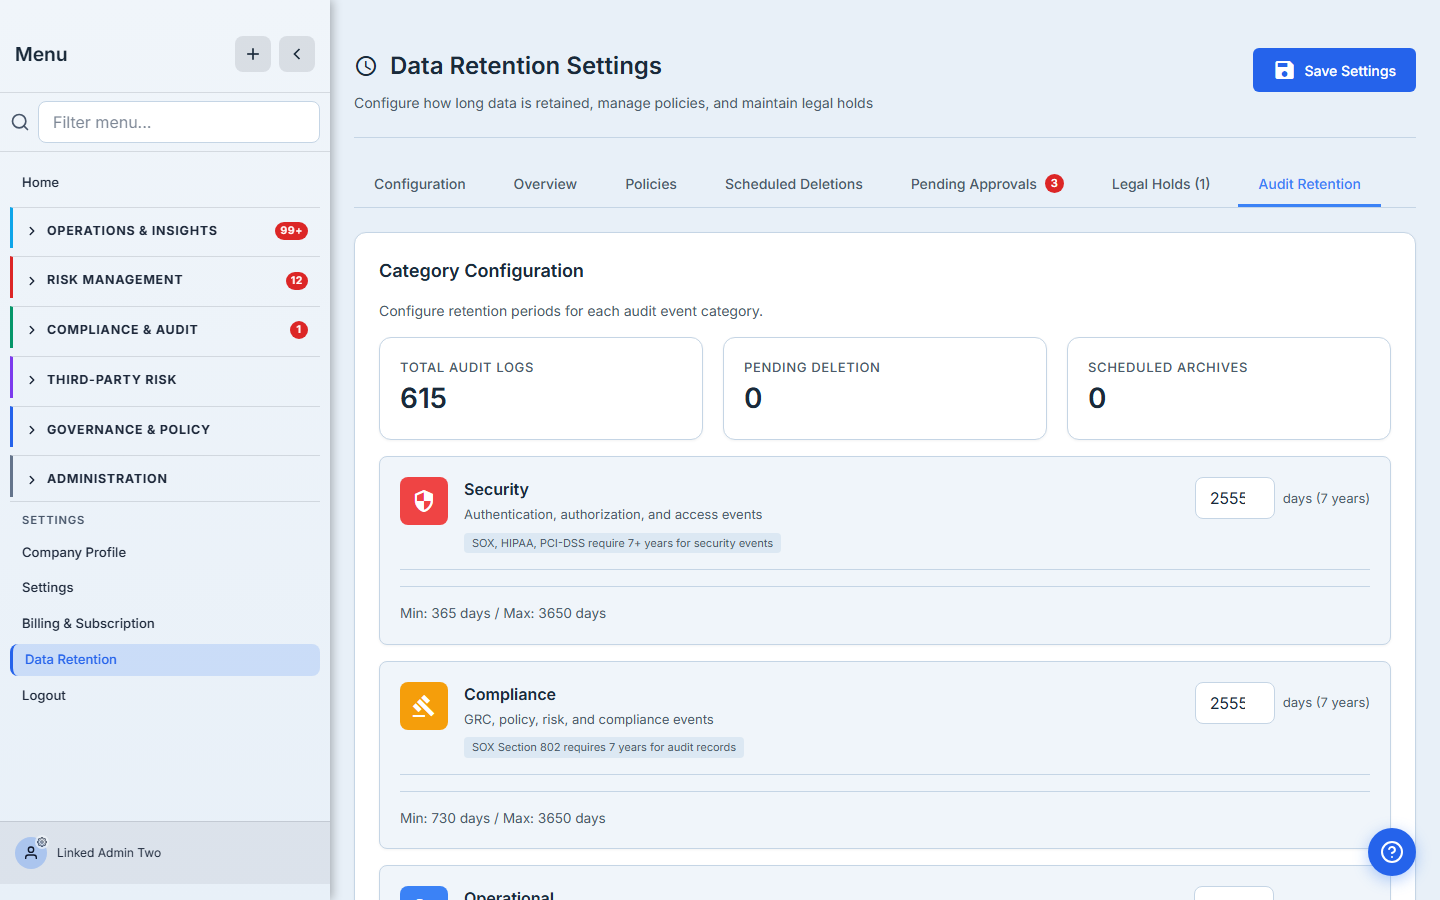
Step 9 — Audit-log retention is its own engine
Audit logs get their own tab, because they have their own rules: SOX §802 wants seven years for security and compliance events, while operational and system logs can roll off far sooner. The Audit Retention tab splits your audit trail into four categories — Security, Compliance, Operational, System — each with its own window, its own regulatory floor, and a note explaining the requirement.
Below the categories sits the Retention Queue: audit-log batches working through the same lifecycle — pending archive, pending approval, pending delete, archived, deleted — with a status filter and pagination.
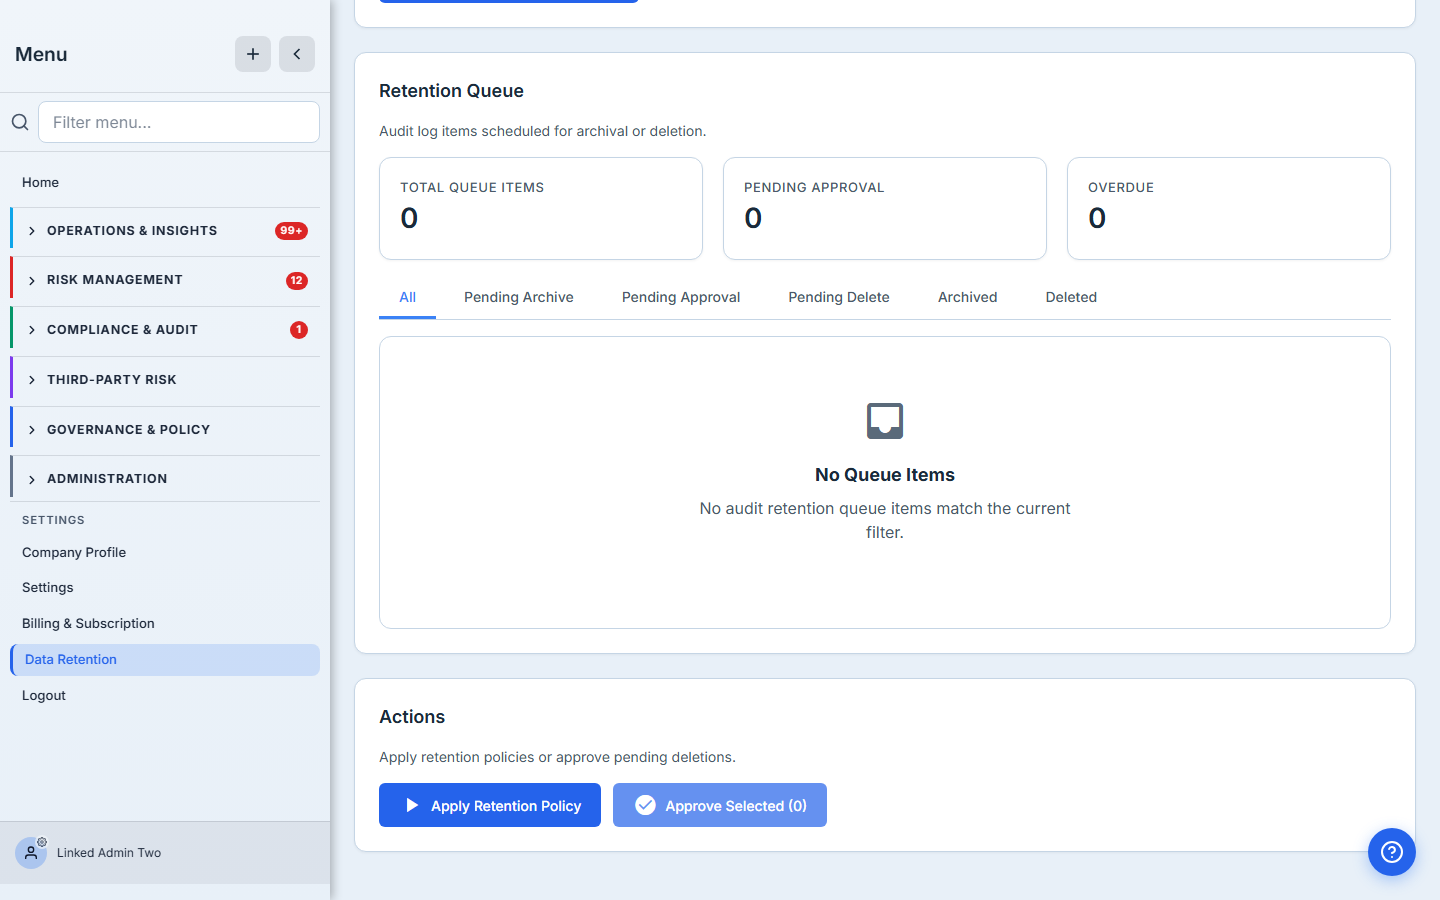
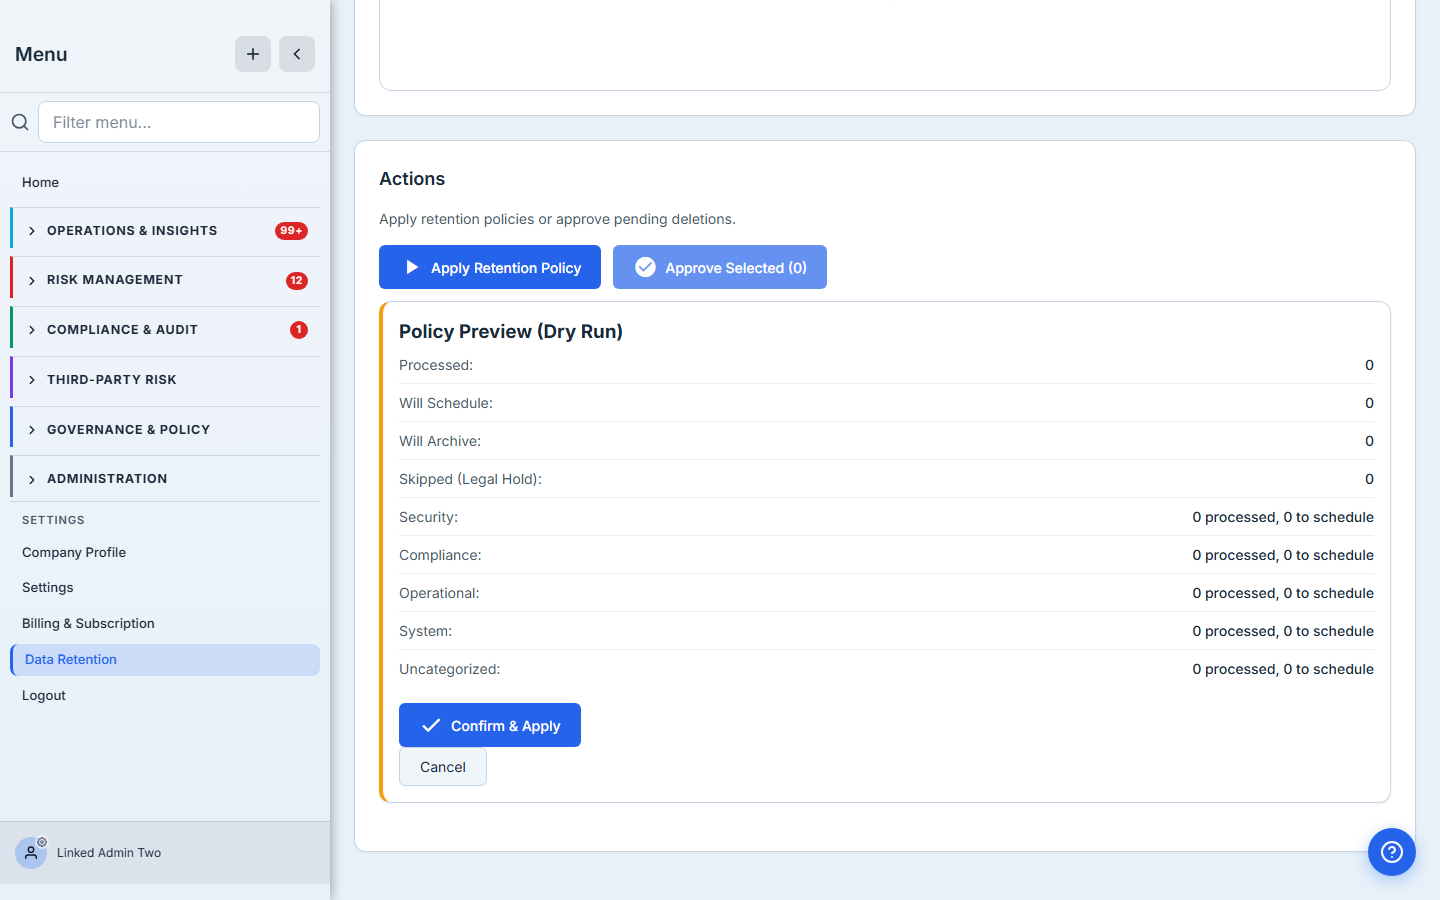
The Apply Retention Policy button runs the same dry-run-then-confirm pattern as the data policies: a preview tells you how many log entries each category would schedule or archive, broken down per category, before you commit. Items requiring approval are selected by checkbox and cleared in bulk with Approve Selected.
Step 10 — The Overview is your at-a-glance proof
The Overview tab is the dashboard you’ll glance at between audits: retention health, how many policies are active, how many deletions are scheduled and awaiting approval, and how many items are protected by legal hold.
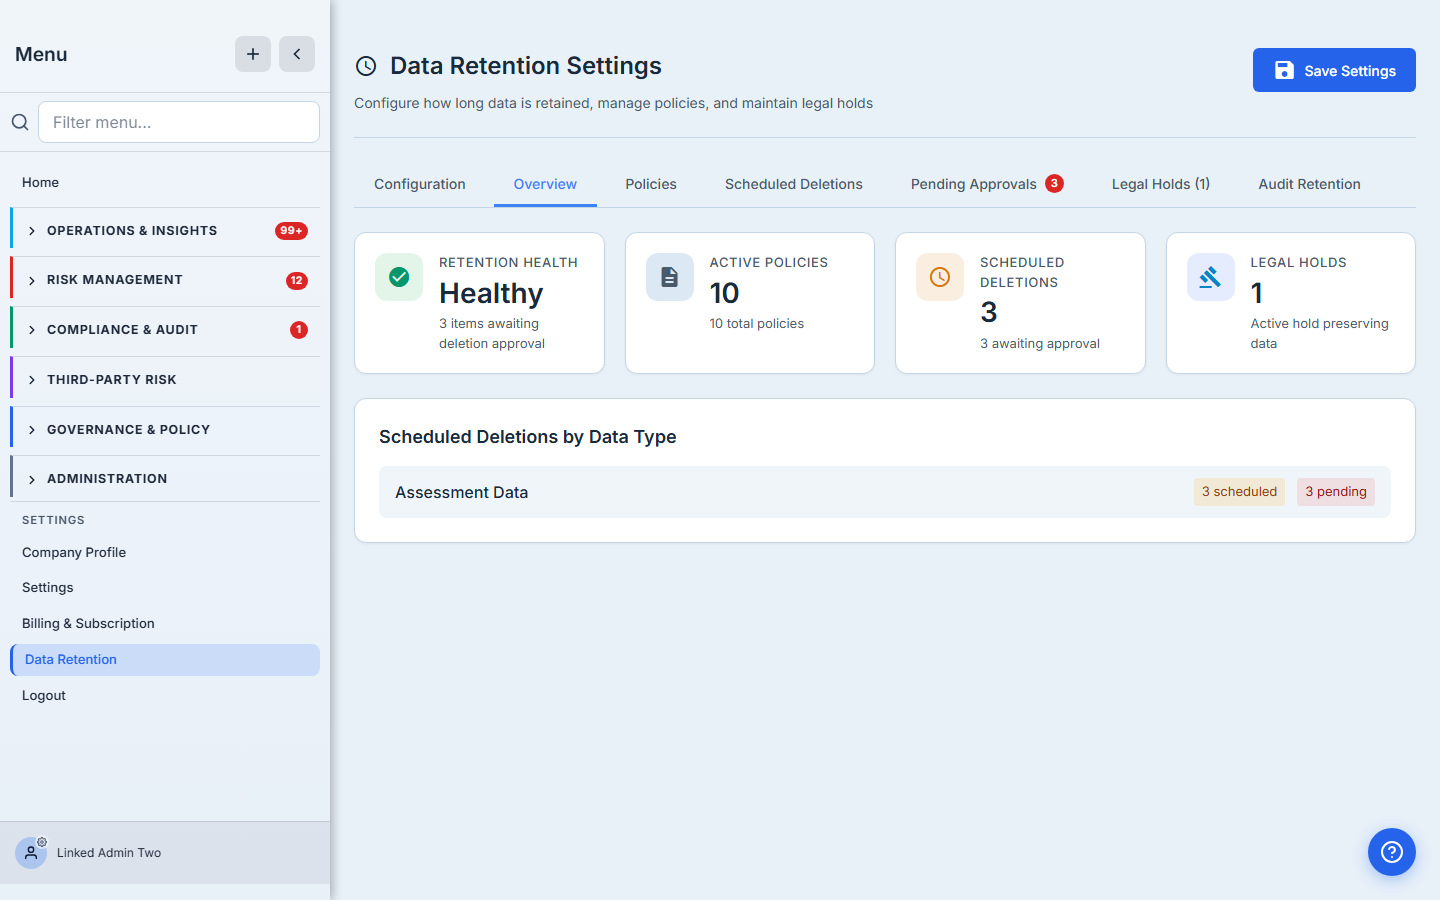
When something needs attention — a backlog of approvals, a spike in scheduled deletions — the health card says so. It’s the thirty-second answer to “is our retention program actually running?”
What you walk away with
- A retention period for every class of data, seeded from a preset and bounded by the regulatory floor for each one — no policy can be set below its legal minimum.
- Scheduled deletions with a quarantine grace period, so “due for deletion” and “actually gone” are never the same instant.
- A two-person approval control on anything you flag — the deletion of records is authorized by a named person, on the record.
- Legal holds that outrank every retention rule, freezing data the moment you’re on notice and proving it with a per-policy “protected” count.
- A separate seven-year engine for audit logs, split by event category so security records outlive operational noise.
- A full trail — who set the policy, who approved each deletion, what was held and released, and when — which is exactly the receipt an auditor asks for.
Set yours this afternoon. Open /app/settings/data-retention, pick a preset on the Configuration tab, and tune the two or three categories your framework is specific about. The first pass takes about ten minutes. After that, Talarity keeps the schedule — and the proof — so you don’t have to.