The most expensive word in a risk program is “done.” Someone closes a remediation, the register turns green, and everyone moves on — except the patch was applied to staging and never promoted, or the encryption was enabled on one server and not the other, or the access review covered the prod account but not the three behind it. The control reads “remediated”; the exposure is still live. When the auditor pulls the sample, the gap between marked done and actually fixed is exactly what they find.
Real programs separate the two. ISO 27001:2022 Clause 10.1 doesn’t just ask you to act on a nonconformity — it asks you to review the effectiveness of the corrective action you took. SOC 2 expects every exception to be remediated and the remediation evidenced. Separation of duties says the person who implemented a fix shouldn’t be the only one who blesses it. Talarity builds that discipline into the work item itself: a remediation moves from done → verified → signed-off → closed, and each arrow is a different person doing a deliberate, recorded act.
Who’s involved
- Remediation owner — does the work and marks the item done. They cannot verify or approve their own work.
- Verifier — an independent reviewer who tests the fix and records a pass or fail, attaching evidence. The platform blocks them from verifying anything assigned to them.
- Approver — signs off on closure. Different from whoever requested it; no self-approval.
What’s on the page
Everything below lives on one screen — Remediation Verification, under Risk & Resilience → Close Gaps — organized as the four stages of that lifecycle.
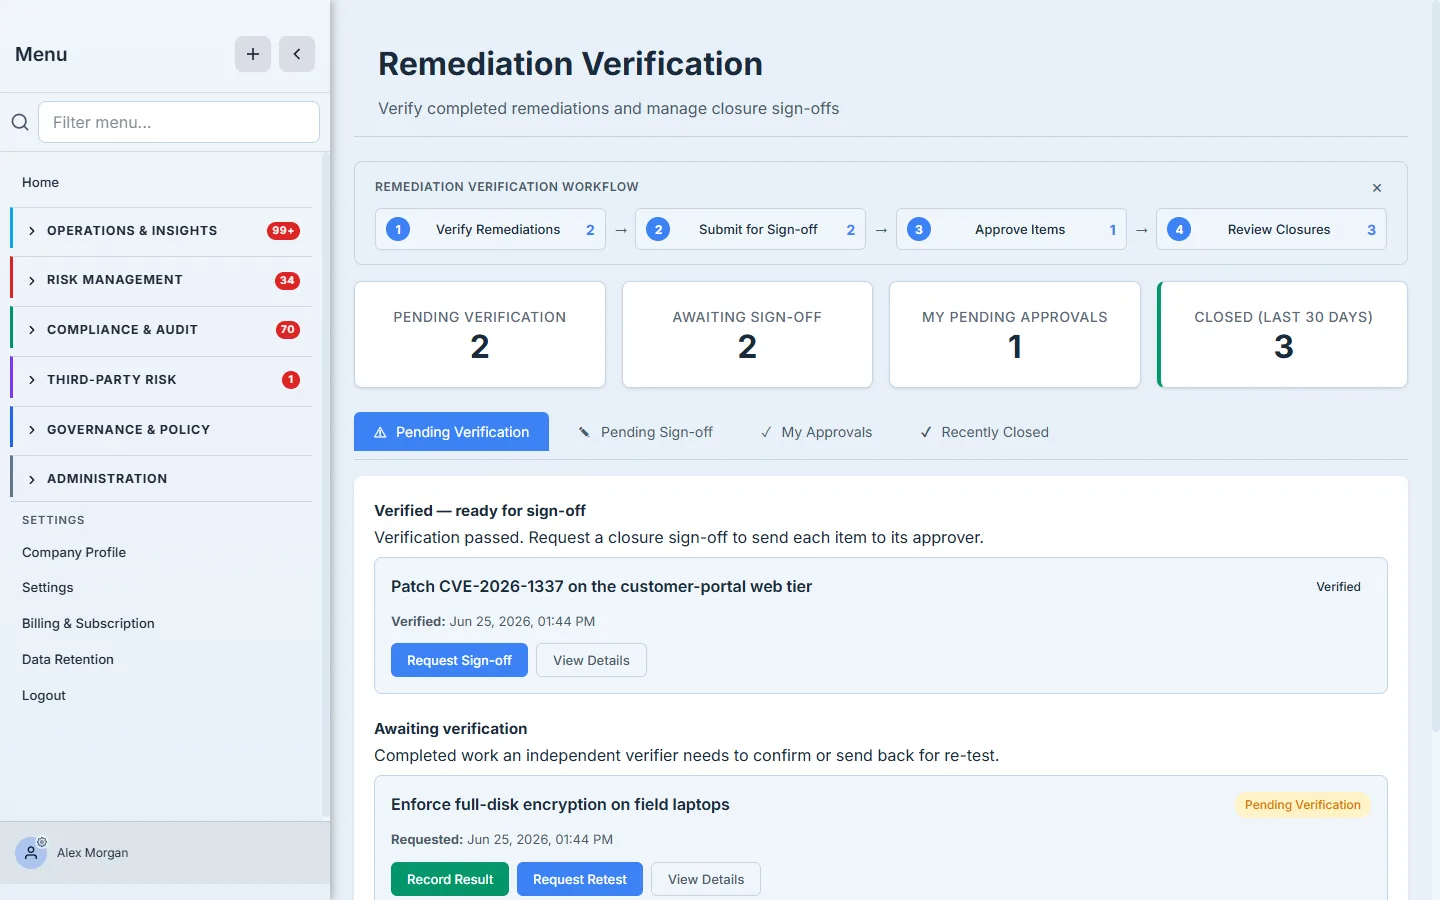
The four tabs are the workflow: Pending Verification → Pending Sign-off → My Approvals → Recently Closed. The stat cards tell each role how much is waiting on them.
Step 1 — The verifier’s queue
When an owner marks a remediation done, it doesn’t close — it lands in Pending Verification for someone else to confirm. Each card shows the remediation, when it was submitted, and the actions a verifier can take: record the result, send it back for a re-test, or open the full details first.
This is the segregation-of-duties boundary in action. If you’re the person the item is assigned to, the platform will not let you record its verification — the verifier and the implementer must be two different people. That single rule is what turns a self-reported “done” into independent assurance.
Step 2 — Record a pass or a fail, with evidence
Open Record Result and you make one decision: did the remediation work? Choose Verified — Remediation Successful, add the test notes that say how you confirmed it, and attach evidence — the rescan output, the screenshot, the config diff.
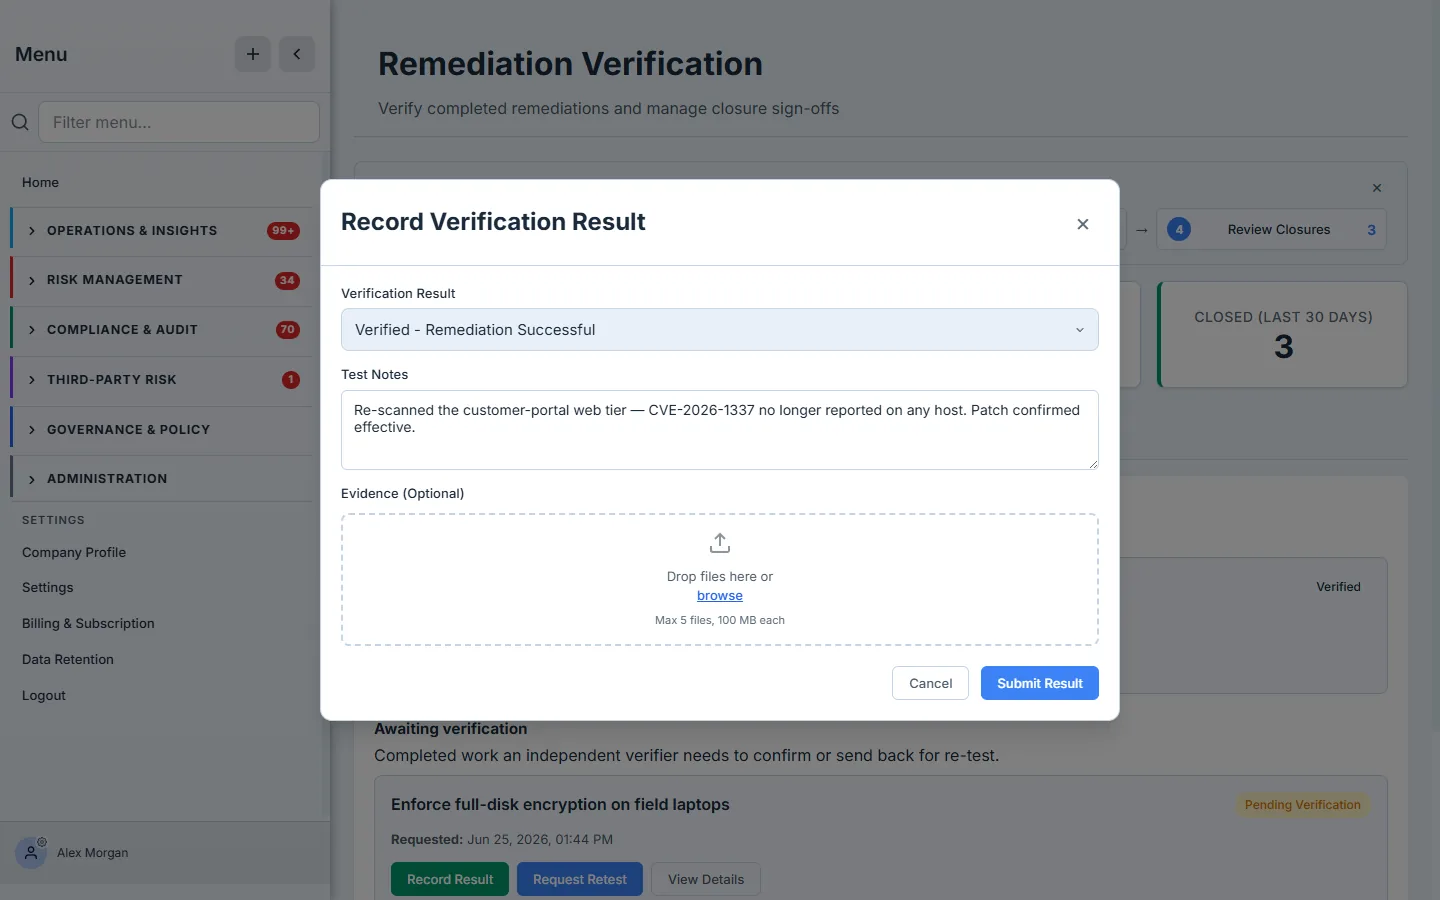
The notes and the attached files are the audit trail. When an examiner later asks “how do you know this was fixed?”, the answer isn’t “we marked it done” — it’s the verifier’s procedure, the evidence, and the timestamp, all on the record.
If the fix didn’t hold, choose Failed — Requires Additional Work. A Failure Reason field appears, and it’s required: you can’t fail a remediation without saying why.
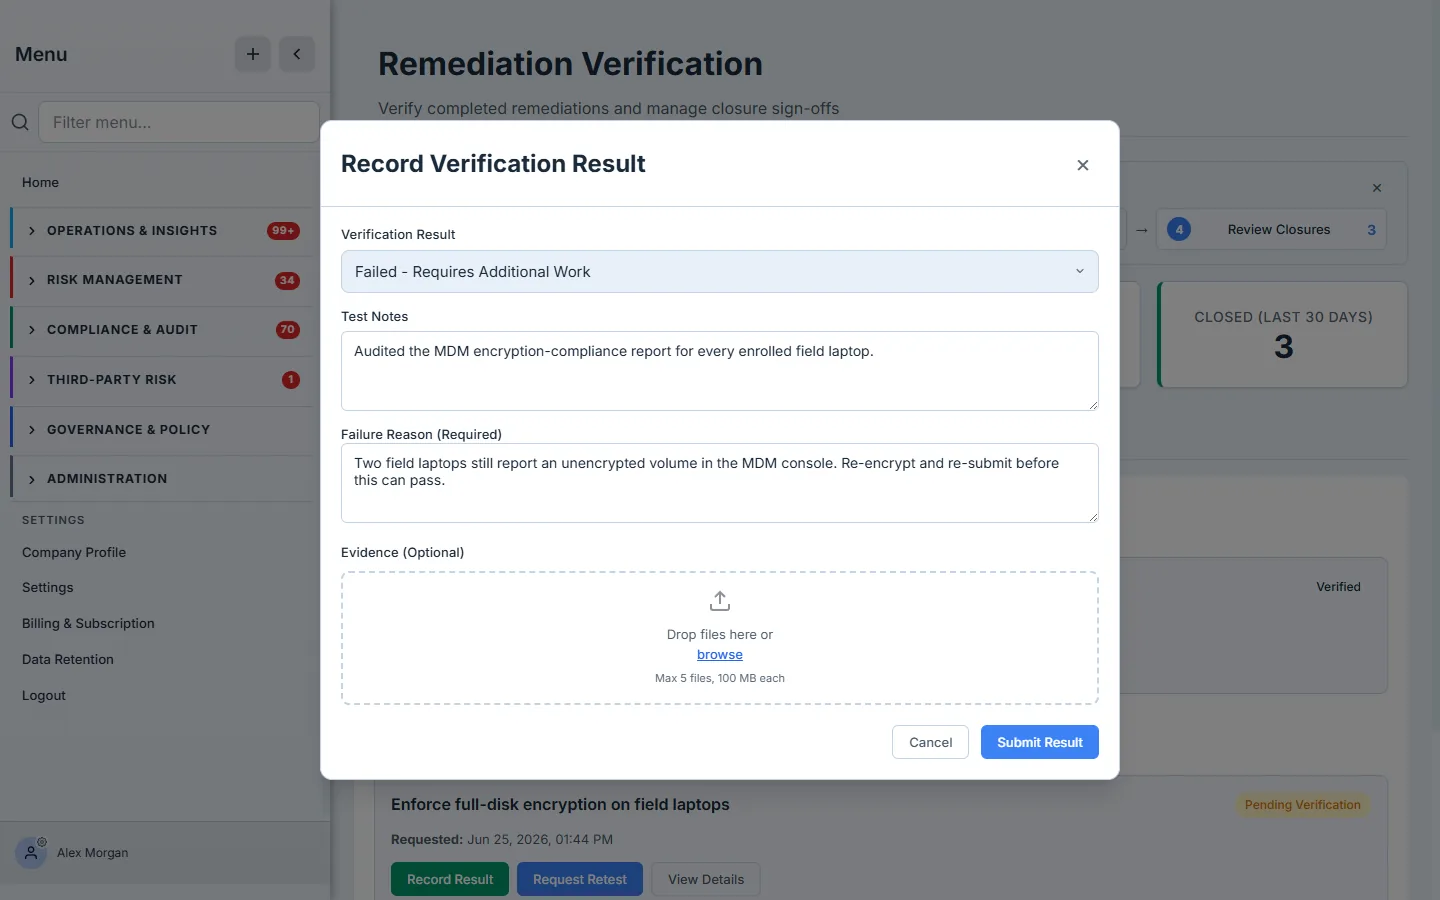
A failed verification doesn’t close the item and it doesn’t quietly vanish — it sends the work item back to in progress so the owner can address the specific gap the verifier named, then resubmit. Nothing is lost; the loop is explicit.
Step 3 — Send it back for a re-test
Sometimes the right call isn’t pass or fail yet — it’s “test this again, properly.” Request Retest resets the item to pending verification and lets you hand it to a specific tester with a defined procedure.
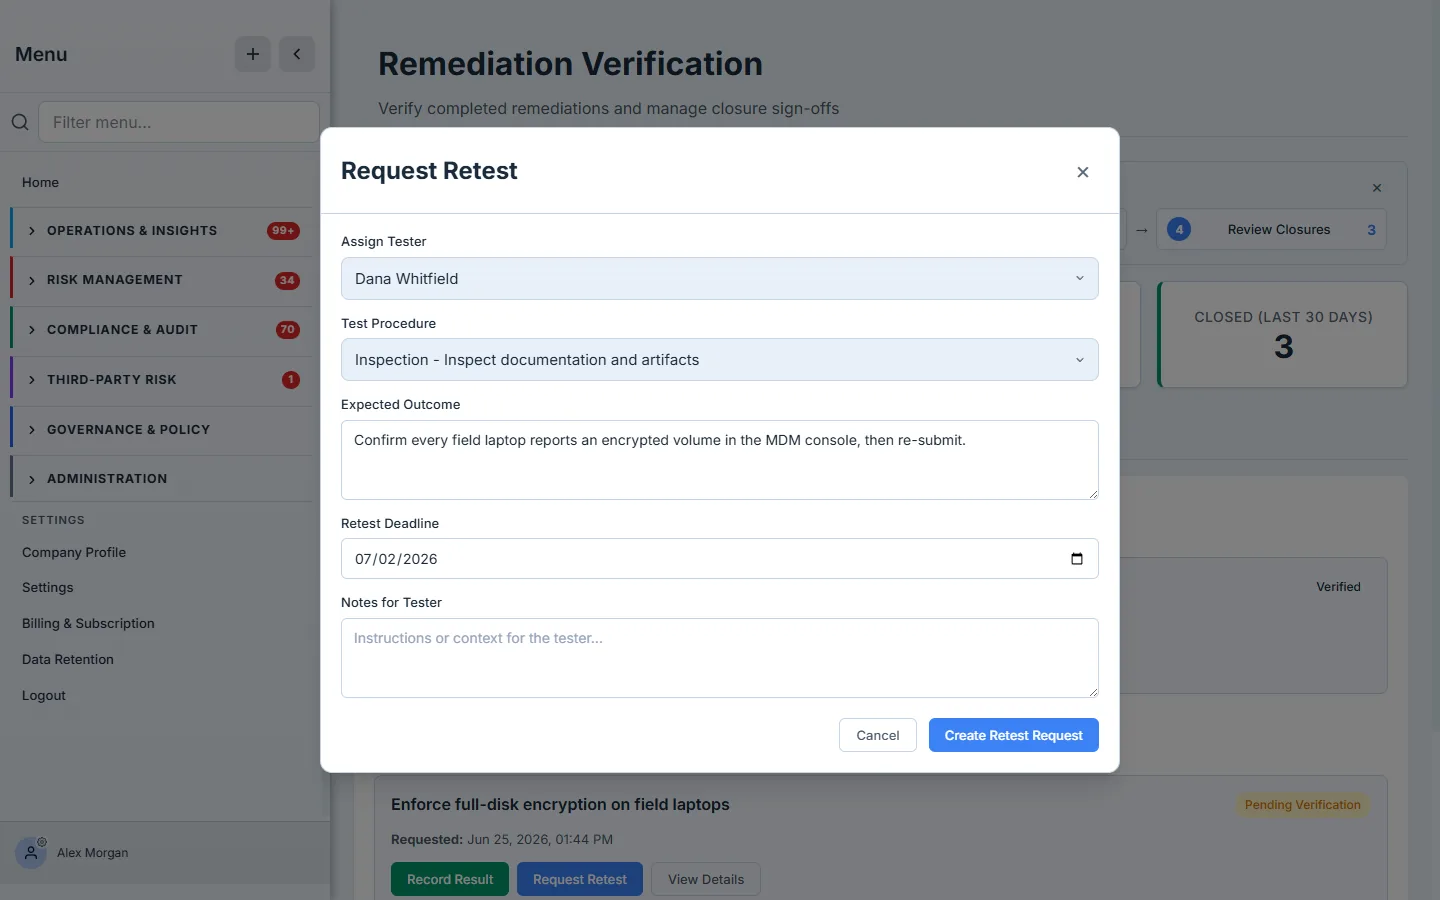
The Test Procedure list mirrors how auditors actually gather evidence — inquiry, observation, inspection, reperformance, sample testing, automated scan, configuration review, log analysis. Naming the procedure up front means the re-test produces the kind of evidence the control needs, not just a second opinion.
Step 4 — Verified isn’t closed: request the sign-off
A passed verification moves the item into Verified — ready for sign-off at the top of the queue. This is the deliberate gap most tools miss: verification confirms the fix works; closure is a separate, accountable decision that someone with authority accepts the risk as resolved. The verified item sits here, plainly, until you request that sign-off — it does not close itself.
Click Request Sign-off and you assemble the closure case: pick the approver, tick the closure criteria that were actually met, and add a note.
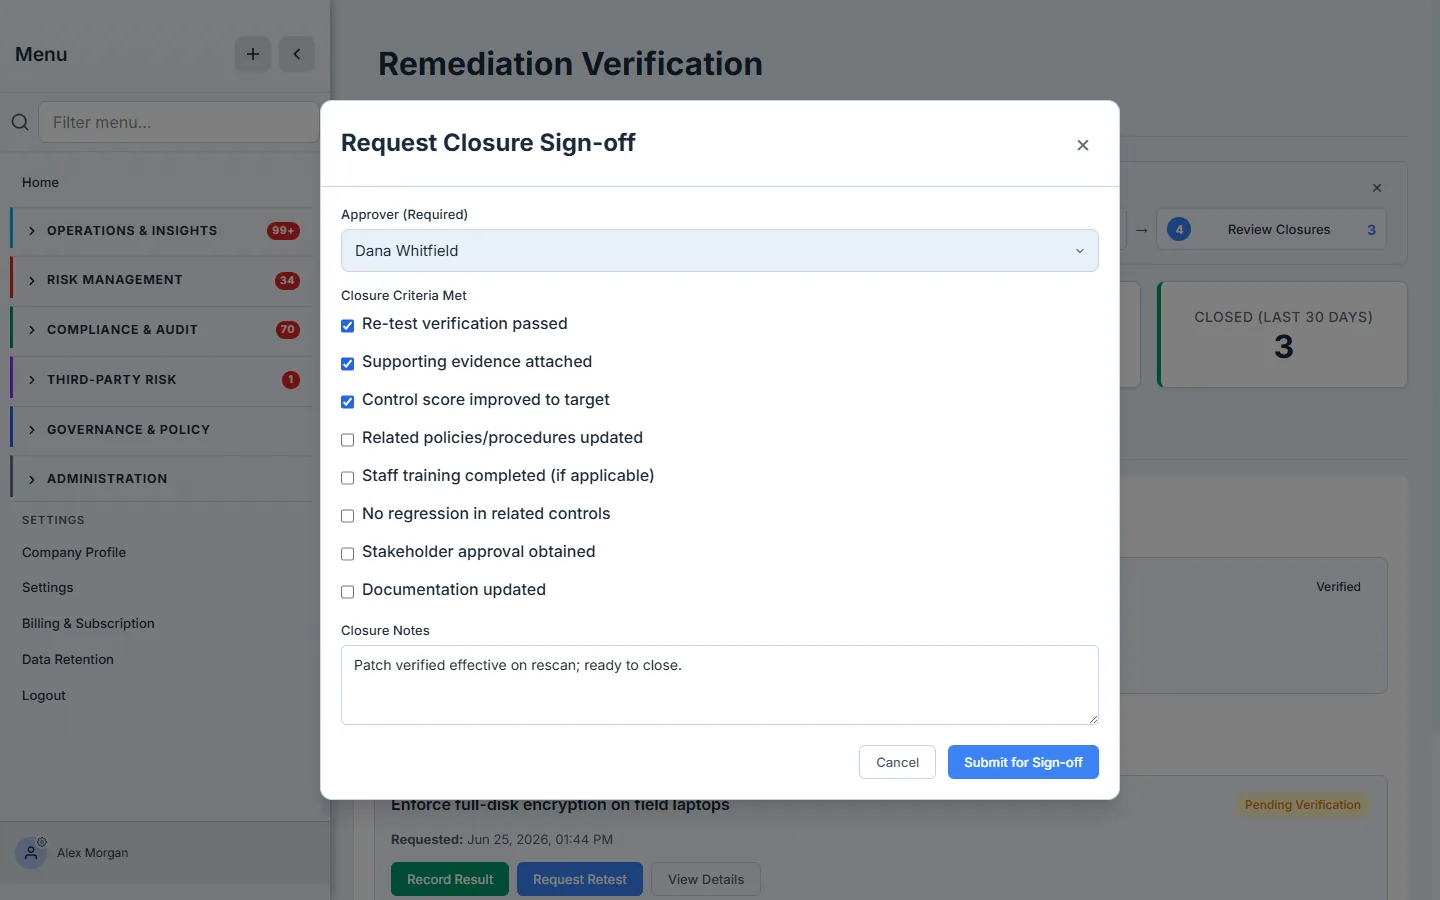
The criteria are a deliberate checklist, not a rubber stamp — re-test passed, supporting evidence attached, control score improved to target, related policies updated, no regression in related controls, stakeholder approval obtained, documentation updated. They’re the questions a good reviewer would ask anyway; the form just makes the answers part of the record. And you cannot name yourself as the approver — the request goes to someone else, by design.
Step 5 — The approver’s queue
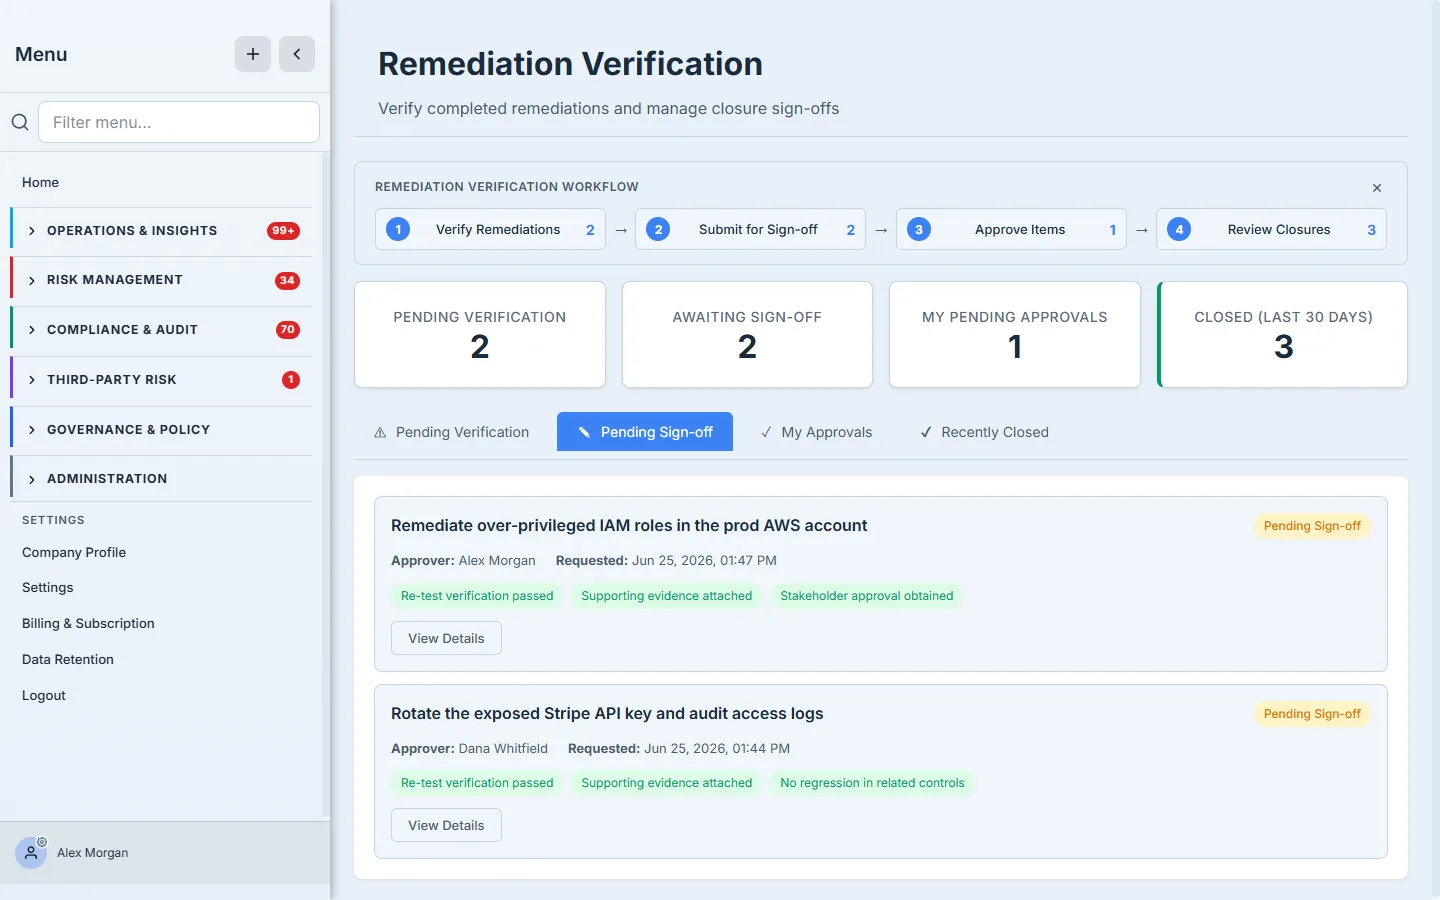
Once requested, the item appears in Pending Sign-off for everyone tracking closures, and specifically in the named approver’s My Approvals. The sign-off card carries the real remediation title, who requested it, and the closure criteria as tags — the reviewer sees the case before they act.
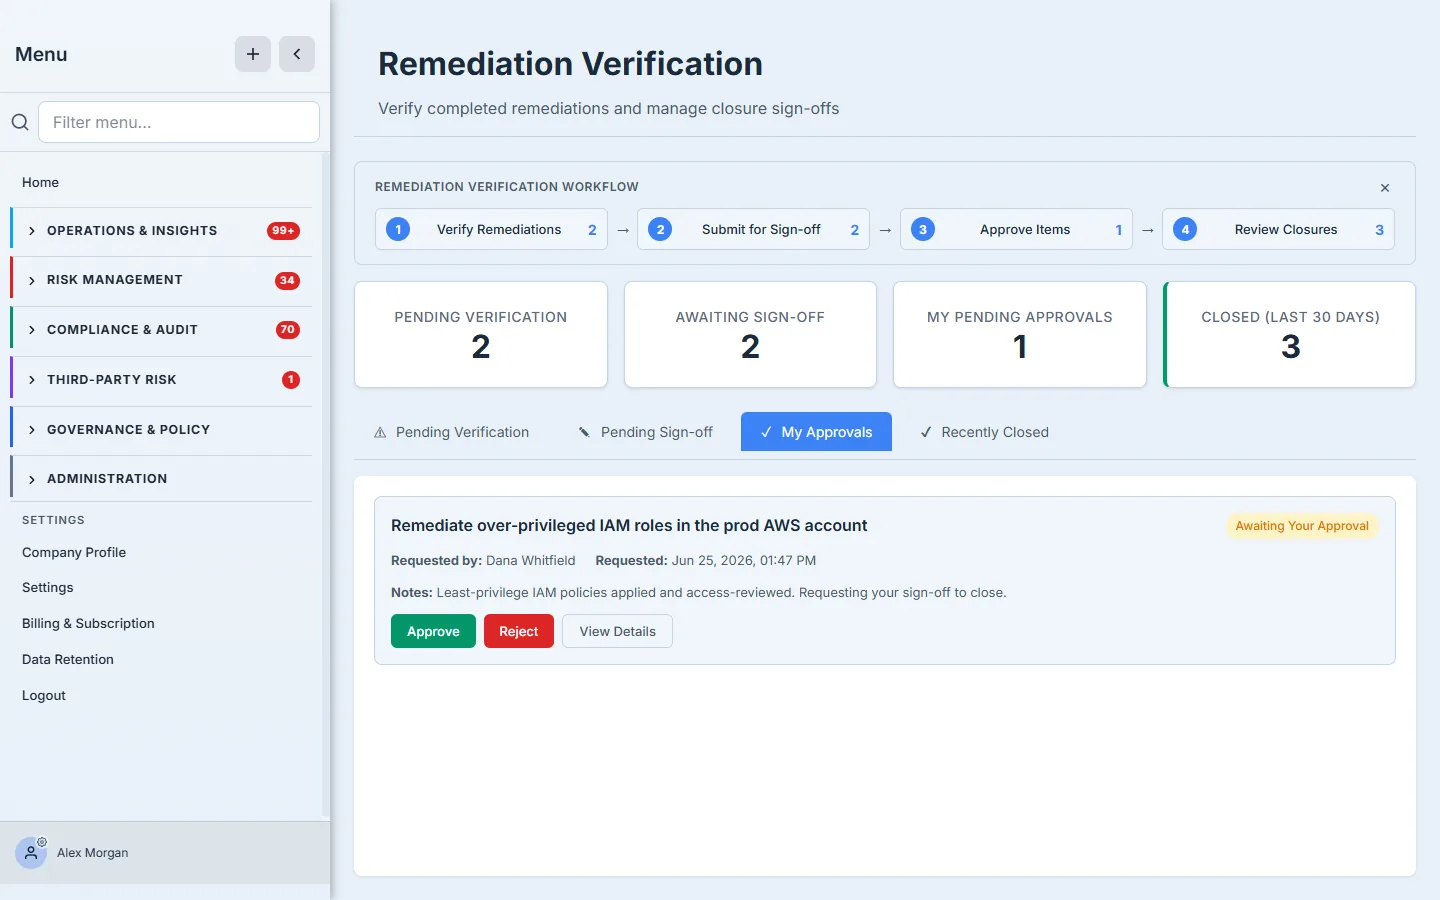
My Approvals is the approver’s personal inbox: only the items waiting on them, each with the requester, the closure notes, and three choices — Approve, Reject, or open the details.
Step 6 — Approve, or send it back
If the case holds, Approve closes the remediation and stamps the approver, the decision, and the time onto the record. If it doesn’t, Reject sends it back — and, like a failed verification, a rejection requires a reason.
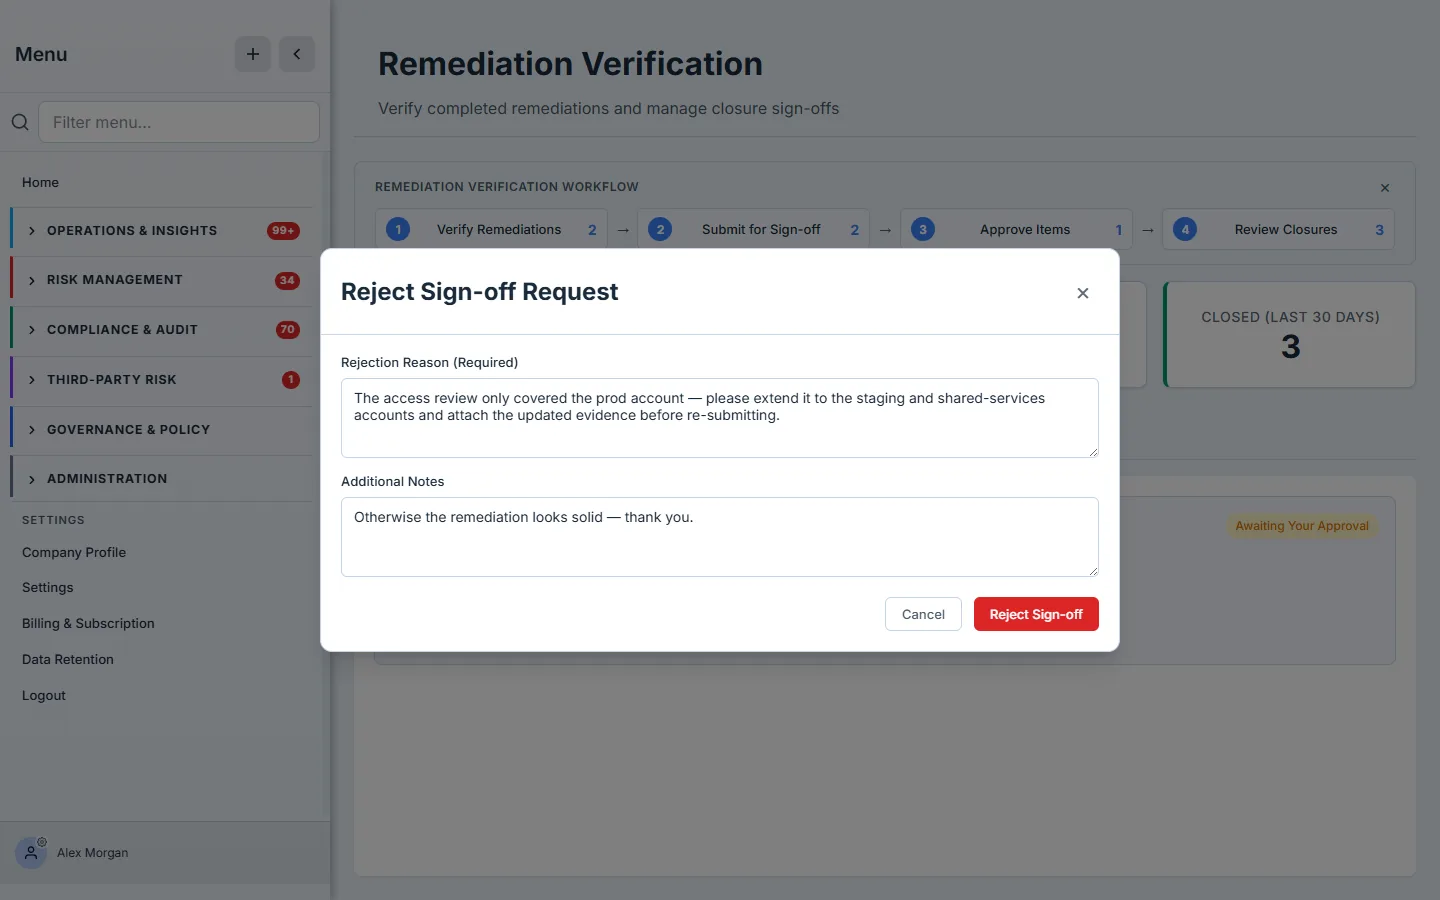
Rejection isn’t a dead end; it’s routing with feedback. The work item returns to the owner with the approver’s reason attached, the owner addresses it, and the cycle — verify, request, approve — runs again. Closure is something the program earns, not a checkbox anyone can tick.
Step 7 — A closed record that survives an audit
Approved items land in Recently Closed as a read-only history: each remediation with its real title, the date it closed, who approved it, and the closure criteria that were met.
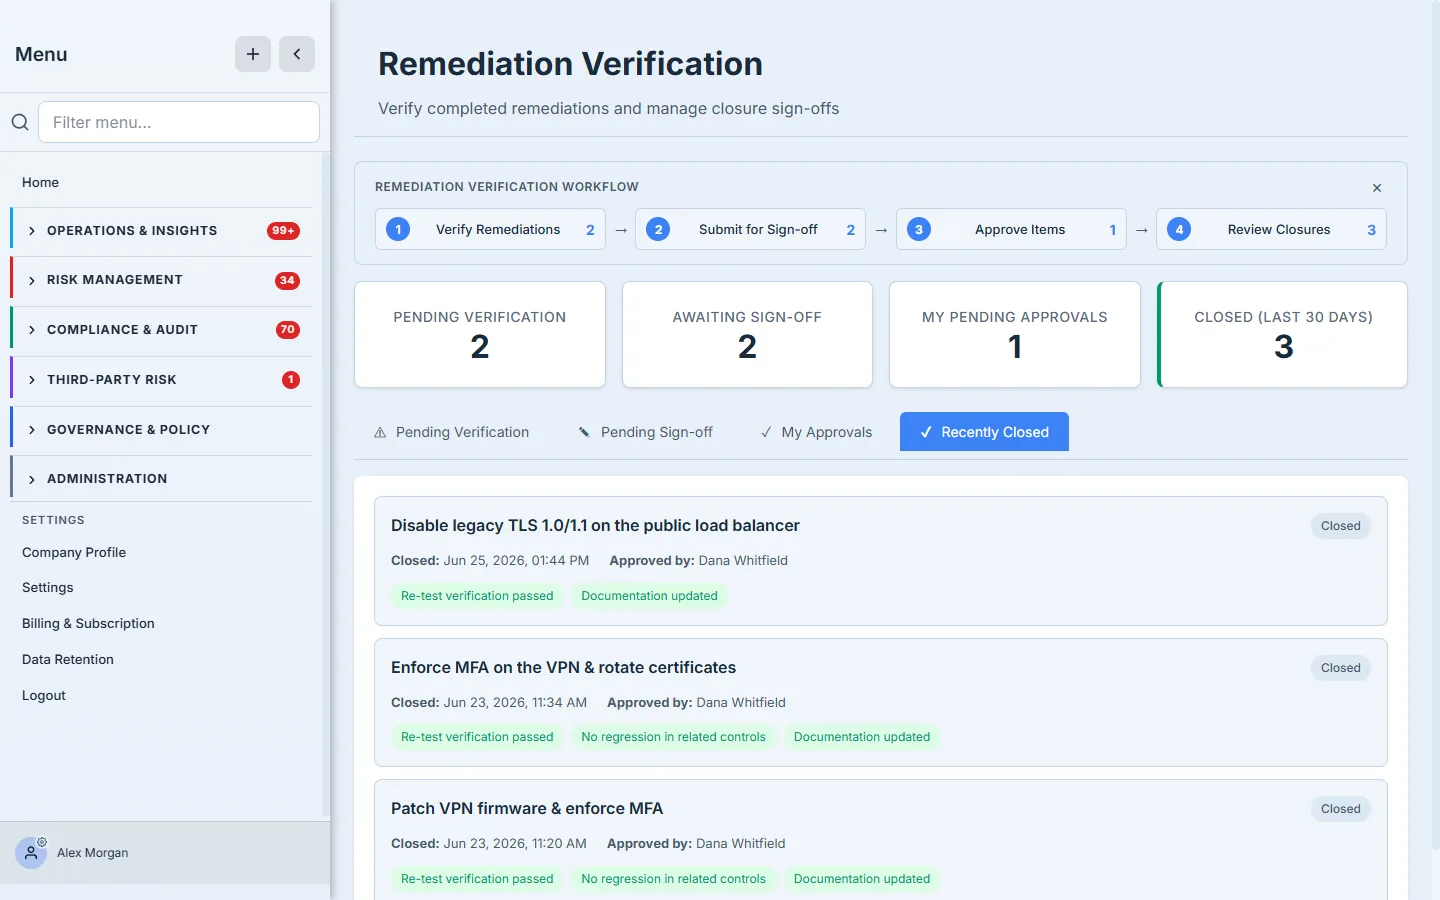
This is the artifact you hand an auditor. Not “the register says closed,” but a full chain: who did the work, who independently verified it and how, what evidence they captured, which criteria were met, and who accepted the closure — with names and timestamps at every step. That chain is the difference between asserting a control is remediated and proving it.
What you walk away with
- A real done-vs-verified boundary. Marking work done doesn’t close it; an independent verifier has to confirm the fix worked, with evidence, before it can advance.
- Separation of duties enforced, not just policy. The verifier can’t be the implementer; the approver can’t be the requester. The platform blocks self-verification and self-approval outright.
- Failures and rejections that route, with reasons. A failed verification or a rejected sign-off sends the item back to the owner with specific feedback — never silently closed, never lost.
- An audit-ready closure chain. Every closed remediation carries the verifier, the procedure, the evidence, the criteria, and the approver — exactly what ISO 27001:2022 Clause 10.1 effectiveness review and a SOC 2 exception-remediation sample expect to see.
Risk doesn’t end when someone fixes it. It ends when someone else confirms the fix held and an accountable owner signs the closure. Talarity makes that the only way to close.