Almost every framework that touches a security or compliance program starts with the same question: who works here, and how do we know? SOC 2 calls it out in CC6.2 (registration and authorization of internal users prior to issuing system credentials). ISO 27001:2022 carries it in A.6.1 (screening of personnel), A.6.5 (responsibilities at termination or change of employment), and A.5.16 (identity management). HIPAA’s Workforce Security rule (§164.308(a)(3)) requires documented authorization, supervision, clearance, and termination procedures. The auditor will pick a name off the wall, then expect you to answer where did this person come from, when did they show up, and what happens when they leave — without rifling through chat threads to find the answer.
Most teams handle workforce data by writing it in two places at once — an HRIS, a directory, a spreadsheet — and hoping the lists agree. They never do. Names that left months ago still show up in audits. New hires don’t appear until someone adds them. “Who is Sam Taylor?” turns into a half-hour search through chat and email. Talarity treats the workforce roster as a deduplicated view across the ingestion paths that actually feed it, and stamps every row with its source so the question takes one second.
Who’s involved
- HR / People Ops — owns the joiners, leavers, and changes; adds non-employee contractors who don’t have a Microsoft account.
- IT admin — owns the Microsoft directory connector; new hires Microsoft provisioned, and leavers Microsoft disabled, should both surface in Talarity without a hand-off.
- Compliance lead — pulls the roster at audit time, slices it by source to explain “who came from where,” and confirms terminated workers are actually terminated.
What’s on the page
Open the workforce roster (/app/workforce):
- The roster table — one row per joiner / leaver / contractor, each carrying a Source badge (MANUAL / INTUNE / ENTRA ID / ORG LOGIN / CSV IMPORT) and a status, with inline status / type filters.
- + Employee — the manual-add modal (first/last name, email, title, department, type, status).
- Import — the CSV / HRIS-extract wizard: map your columns, dry-run, then commit.
- View selector — three system presets (Active humans only, Hide external (#EXT#) accounts, Hide service accounts) plus your org’s saved/shared views, one pinnable as the default.
- ⚙ Filter modal — an AND/OR rule builder over the roster’s typed columns, plus Always include / Always exclude override lists and Save as new view (with share + set-as-default).
Step 1 — Open the workforce roster
/app/workforce is the canonical roster — every joiner, leaver, and contractor in your program. The page has the usual filters at the top, plus one column on the right you might not have noticed before: Source.
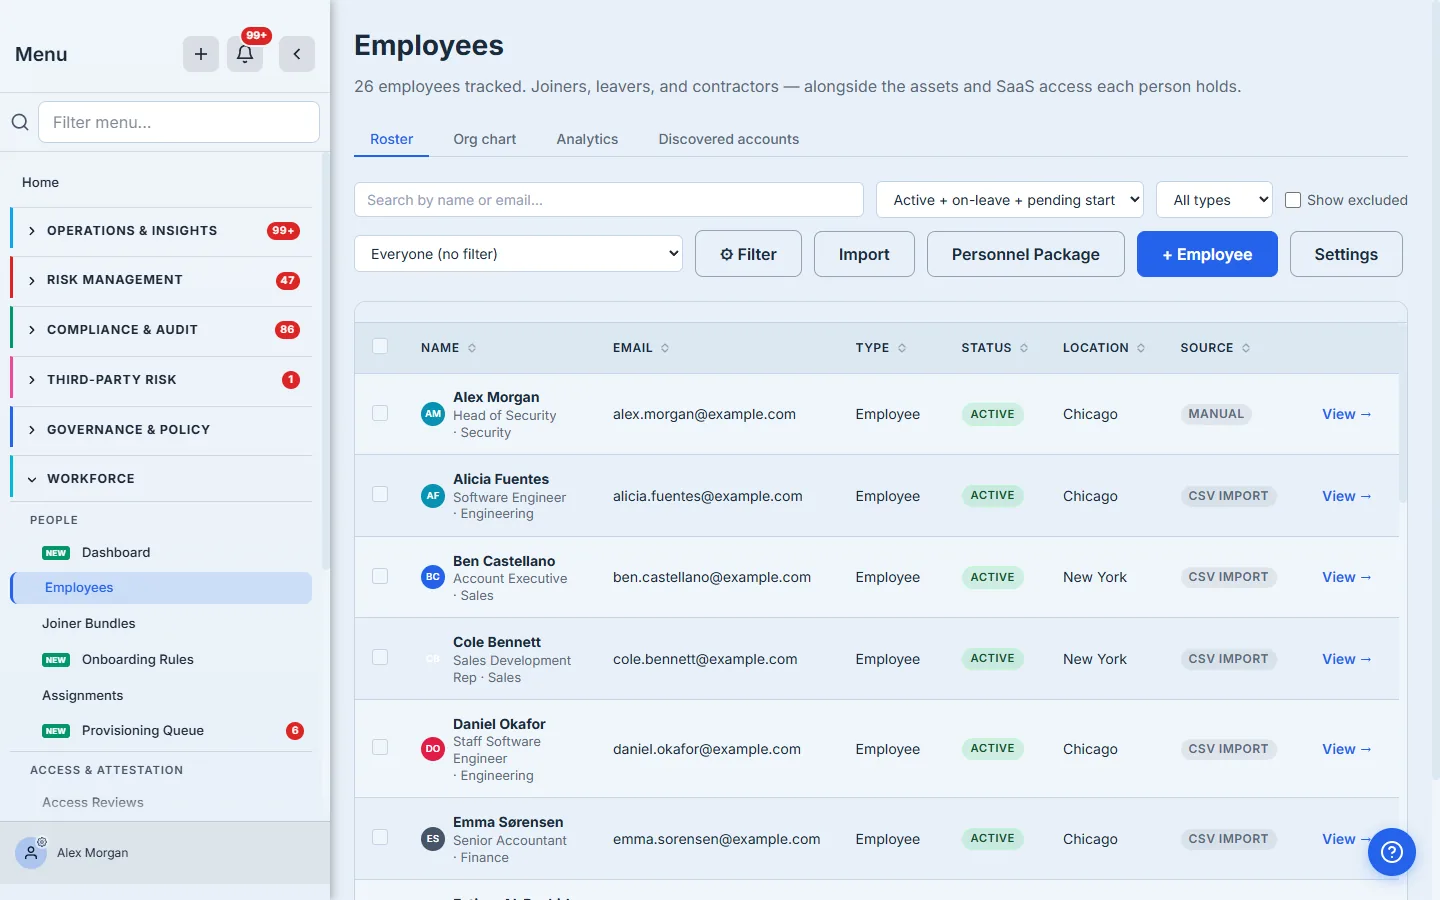
The badge on every row is the answer to “where did this name come from.” Five badges, five ingestion paths — MANUAL, INTUNE, ENTRA ID, ORG LOGIN, CSV IMPORT. Talarity stamps the source on the row at write time, so the badge is a queryable fact rather than a guess.
The badge names who owns the row now, not who created it. Provenance is not frozen at creation: once a Microsoft sync matches a row by email, it adopts it and re-stamps the badge — a person your HR team typed in by hand last year will show INTUNE the first time the directory sees that address. That is deliberate (the directory is genuinely driving the row’s status and names from then on), but it means “MANUAL” answers “nothing upstream is managing this person”, which is a more useful question than “who typed it first”.
Step 2 — Manual roster adds
The classic HR path. Click + Employee in the header and the modal collects the minimum a roster row needs — first name, last name, email, optional title and type (employee / contractor / intern / vendor) and status. (If the employment type has default onboarding bundles, a checkbox here applies them on create — assigning standard assets and queuing policy acknowledgements.)
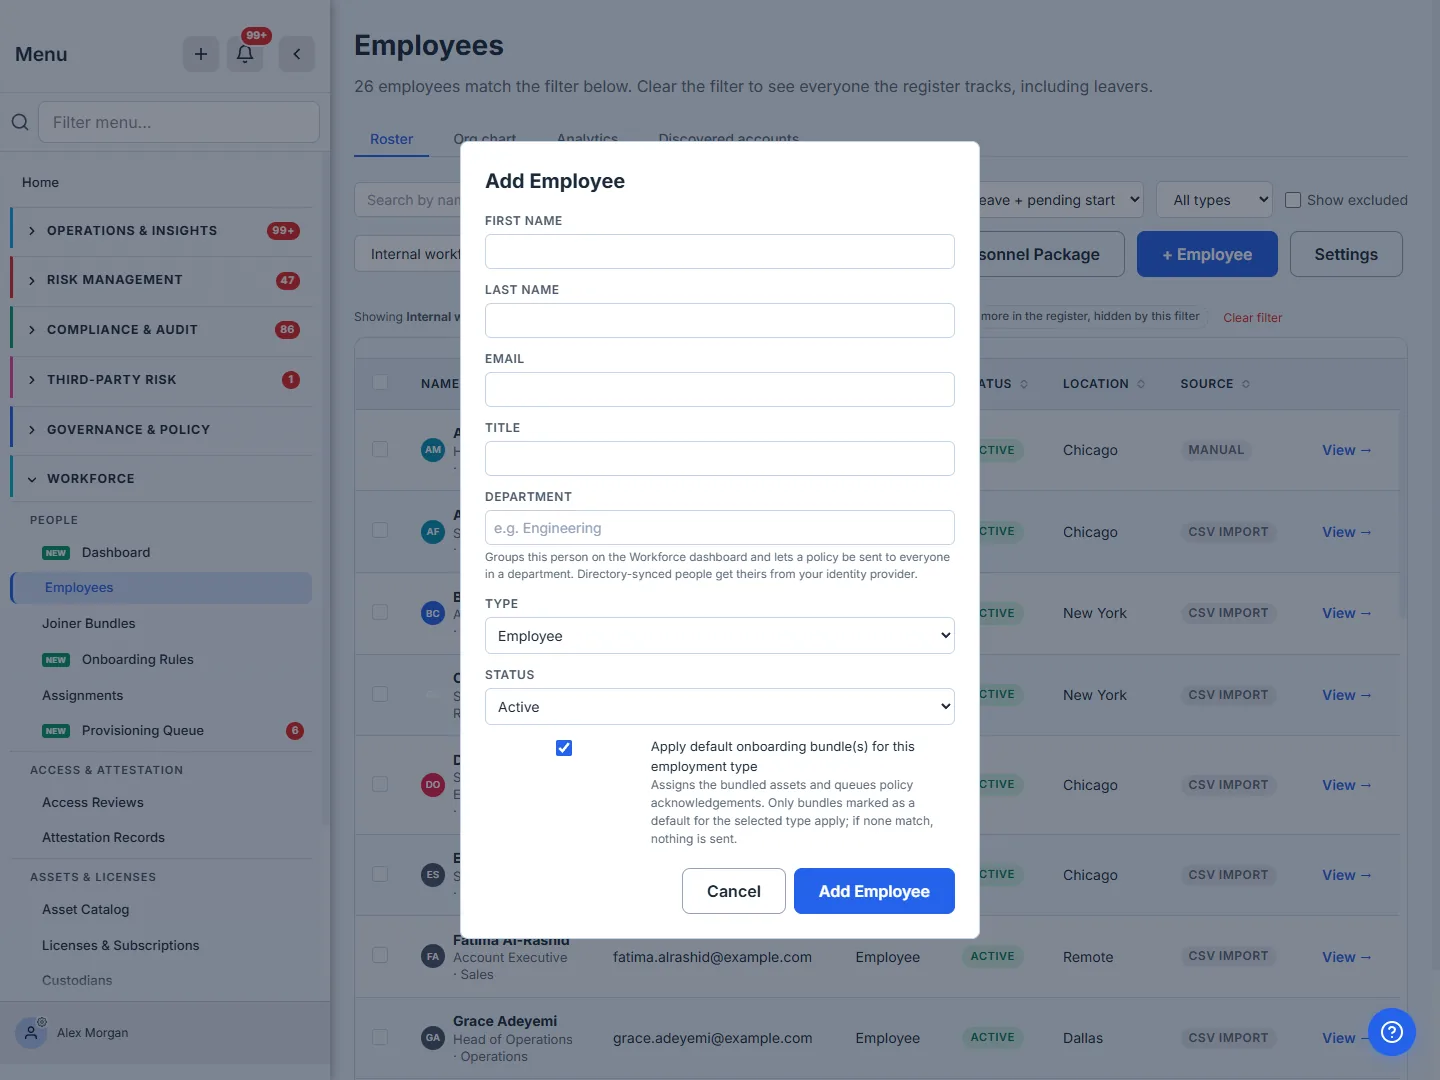
Fill it and Add Employee. The row lands in the roster with a MANUAL badge — Talarity stamps source_system = 'manual' on the record so an auditor can later distinguish “the HR team typed this person in” from “Microsoft told us this person exists.”
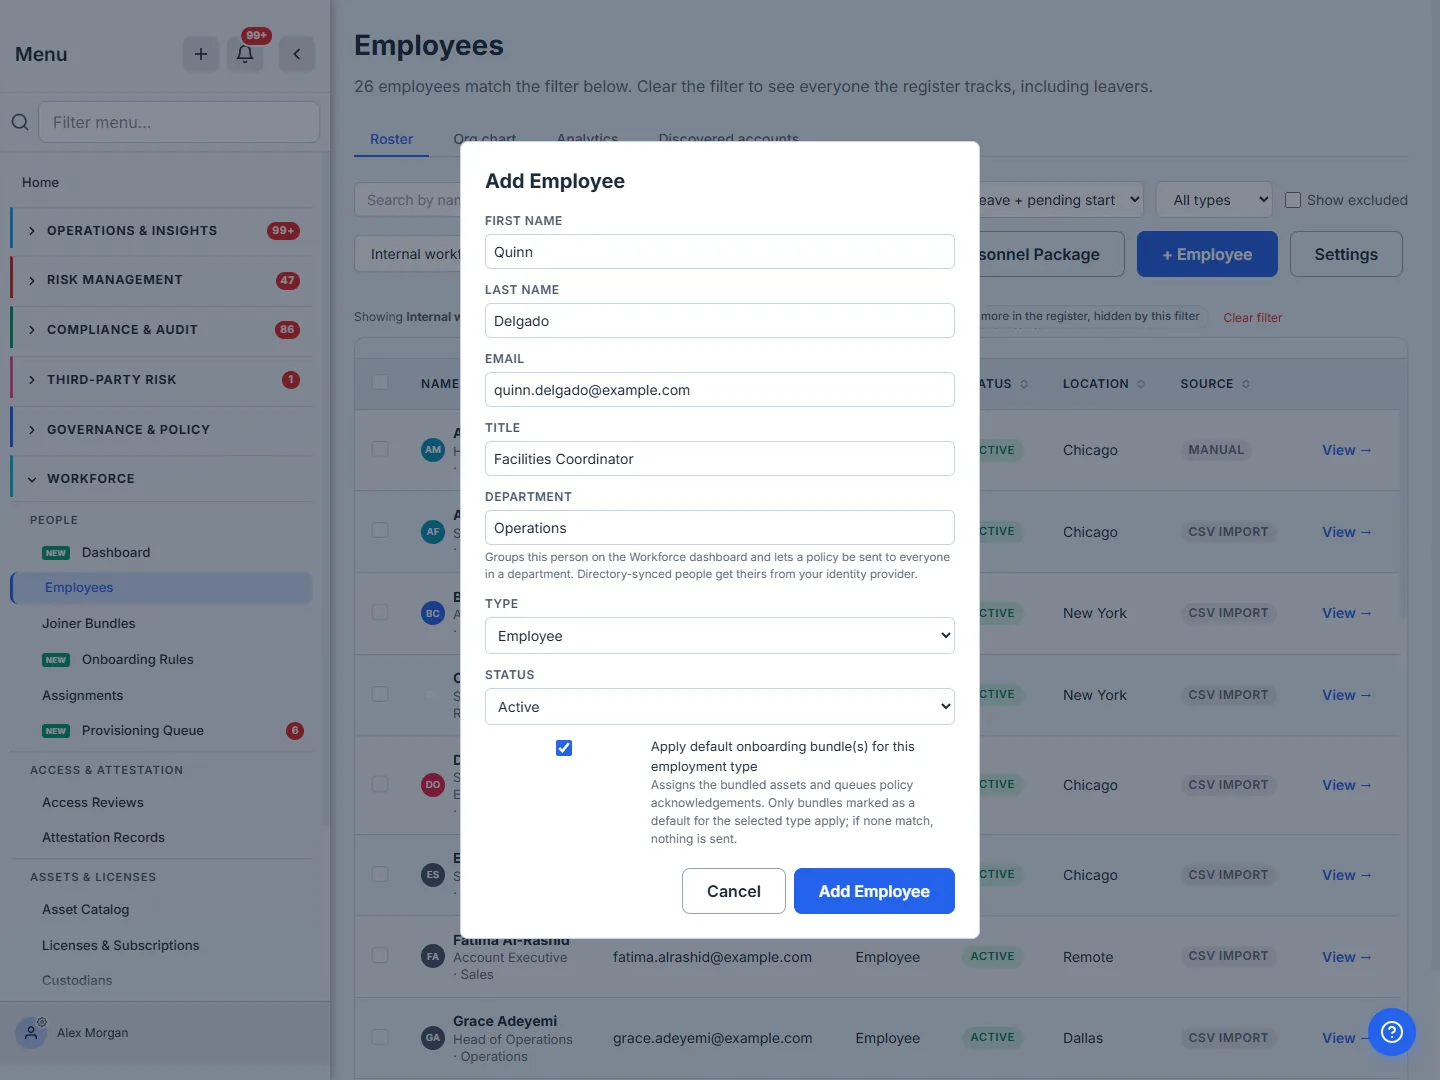
Manual is the right path when the person doesn’t have a Microsoft account — contractors who use their own email domain, auditors visiting for a quarter, the office manager at a one-person remote site. Every other path needs an upstream identity; manual is the catch-all when none exists.
Step 3 — Microsoft Graph (Intune / Entra ID) sync
This is the source most teams don’t fully understand — and the most common cause of “who is this person?”
When you connect Talarity to your Microsoft tenant (the same connector that pulls device inventory), the sync also fetches /v1.0/users from Microsoft Graph and upserts every account it finds into the workforce roster. Every row that lands carries an INTUNE badge (or ENTRA ID if the connector is configured for Entra-only). Status mirrors the directory: accountEnabled = true lands as Active; accountEnabled = false flips the row to Terminated — the same direction Microsoft is signalling.
What the directory actually fills in
It is not just a name and an on/off switch. Each Graph user maps onto the roster’s own columns:
| From your directory | Lands on the roster as |
|---|---|
displayName, givenName, surname | Name |
jobTitle | Job title |
department | Department — what the Workforce dashboard groups by, and what a policy sent to “everyone in Engineering” resolves against |
officeLocation | Location |
mobilePhone | Work phone |
accountEnabled | Status (Active / Terminated) |
userType | Member vs Guest, so you can filter Entra B2B guests out |
manager | Reports-to, which draws your org chart |
That table is the reason this connector is worth wiring properly rather than treating as a name feed. Department is the one worth checking first: if your directory does not populate it, the dashboard’s Departments panel has nothing to group by and every department-targeted policy audience quietly resolves to nobody. Both symptoms have the same upstream cause, and both are fixed in your Microsoft admin centre, not here.
Manager is the exception that is not a bug. Microsoft does not expose the manager relationship to app-only tokens in every tenant. When it withholds it, Talarity does not invent a hierarchy or claim everyone reports to nobody — it simply records no manager, and the org chart stays empty until the relationship is readable. An empty org chart on a populated tenant is a permissions answer, not a sync failure.
The directory pulls everyone, not just employees. Microsoft Graph’s
/v1.0/usersendpoint returns every account in the tenant — full-time staff, contractors with a corporate identity, service accounts, accounts from a since-acquired subsidiary that nobody got around to clearing, and a long tail of test accounts named after old projects. If you see a name in your Talarity roster you don’t recognise, the answer almost always is Microsoft still has it. The fix is in your Microsoft admin centre, not in Talarity: disable the account upstream, and the next sync flips the row to Terminated automatically.
A name with a purple INTUNE badge is driven by Microsoft. To remove it, off-board on the Microsoft side first. The reverse is also true — re-enabling a disabled Microsoft account flips the Talarity row back to Active on the next sync. Disabling and re-enabling are mirror operations.
“Driven by Microsoft” does not mean “you cannot touch it” — the sync is edit-wins. Correct someone’s title or department in Talarity and the next sync keeps your edit rather than overwriting it; the field is marked as an override so anyone reading the row can see it diverges from what the directory says. The sync only writes a column while it still matches what it last wrote there — that is, while nobody has edited it. Status is the deliberate exception.
accountEnabledis not subject to edit-wins: a disabled directory account terminates the row no matter what you set locally, because an account disable is a security event and letting a local edit suppress it would make the roster lie about someone’s access. Everything else is yours to correct; the one field you cannot override is the one you should not want to.
Step 4 — Login users who haven’t been added to the roster yet
Talarity has three identity surfaces — the workforce roster (joiners, leavers, contractors), the org_users table (people who can log in to the application), and the Microsoft directory (everyone in your tenant). Most rows in the roster also exist as login users — but some logins exist only as logins, not yet attached to a workforce row. A new admin you invited last week. An auditor with a guest account. A contractor who got an app login before HR got around to adding them to the roster.
Those orphaned logins surface as candidates in the Talarity workforce picker. When you assign an asset to someone who has a login but no employee row, you’ll see them in the picker with an “Account only” badge — selecting one (clicking the candidate row) writes a new employee row with source_system = 'login' and the green ORG LOGIN badge, pointing back at the original org_users record. The login and the employee row are linked from then on; any subsequent Microsoft sync or manual edit operates on the same canonical employee.
It is the quiet path most orgs never notice they need: the person already has a login — an invited admin, a guest auditor, a contractor issued an app account ahead of HR — and one materialize turns that login into a first-class roster row without re-typing anything.
Step 5 — CSV / HRIS bulk import
The path for “here’s our HRIS extract, load it” — the right answer when your HRIS has no directory connector, and the usual answer for a one-time migration off a previous tool. Import sits in the roster header, next to + Employee.
The wizard maps your columns to the roster’s, and it does not demand your spreadsheet already look like ours: headers auto-match on the names real exports actually use — a Dept, Team, Division or Business unit column all land on Department; Role or Position land on Job title. You map, dry-run, read what it says it will do, and only then commit. Rows land with a CSV IMPORT badge.
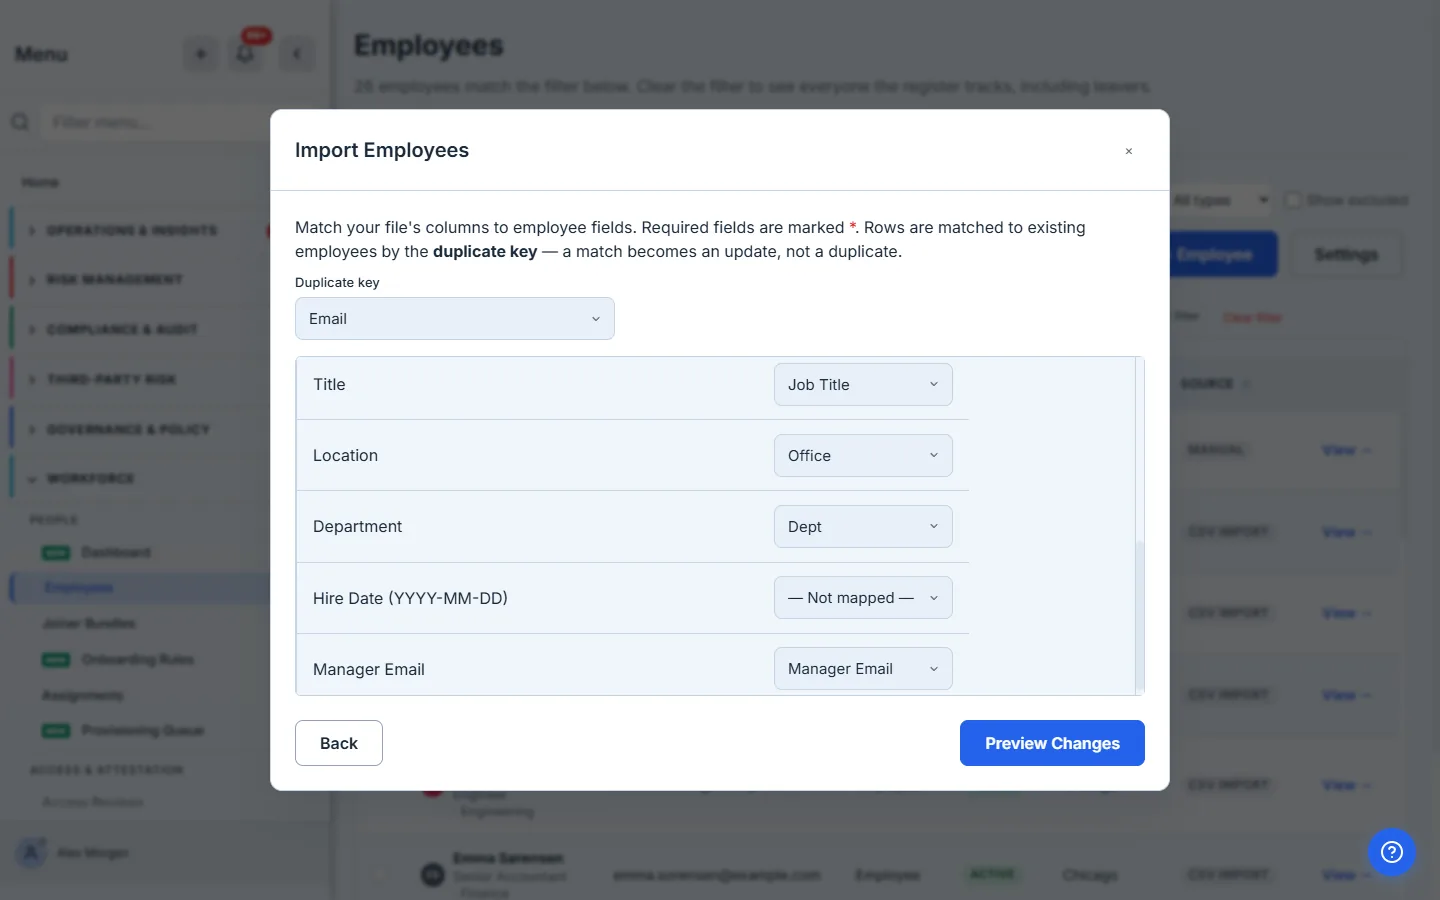
The Duplicate key at the top is what makes a re-import safe: rows are matched to existing employees by that key — email, by default — so a second upload of the same file is an update, not a pile of duplicates. That is also how you patch one column across the whole org: a file of just Email,Department matches every row and fills in the one field, leaving everything else untouched.
Two behaviours are worth knowing before you upload:
- Manager comes in as an email, and resolves into the actual hierarchy. A
manager_emailcolumn is matched against the register in a second pass at commit time — including against rows created earlier in the same file — so one full-roster CSV links the whole org chart in a single pass, rather than requiring you to load people first and their managers second. - You cannot off-board someone by importing them as terminated. A
terminatedstatus is rejected on import, on purpose. Termination is not a value in a column; it is a workflow that fans out asset-revocation work items, and a spreadsheet that quietly marked forty leavers as terminated would file none of them. Leavers go through the off-board path, which does the revocations.
The reassuring path is the dangerous one. A CSV is the easiest way to make the roster look right and the easiest way to make it be wrong — an extract is a snapshot of the moment it was taken, and it does not know who left yesterday. Import is for backfilling people you already have; keep a connector or the off-board workflow for the ongoing truth.
Step 6 — Filtering the noise out: views, presets, and include/exclude lists
Knowing where each row came from is half the answer; the other half is not having to look at the rows you don’t care about. Talarity’s roster carries a saved-view system that lets every coordinator pick the slice that fits their work, save the slice as a named view, share it with the org, and pin one as the default everyone sees by default.
The view selector sits between the inline status / type filters and the ⚙ Filter button. It is a single flat list — presets first, then your saved views — covering:
- Everyone (no filter) — the unfiltered roster, every row from every source.
- System presets — Active humans only, Hide external (#EXT#) accounts, Hide service accounts (heuristic), Internal workforce (no vendor accounts). These ship in code, can’t be deleted, and update with each Talarity release.
- Saved views — anything your org has built, marked (mine) for the ones you authored.
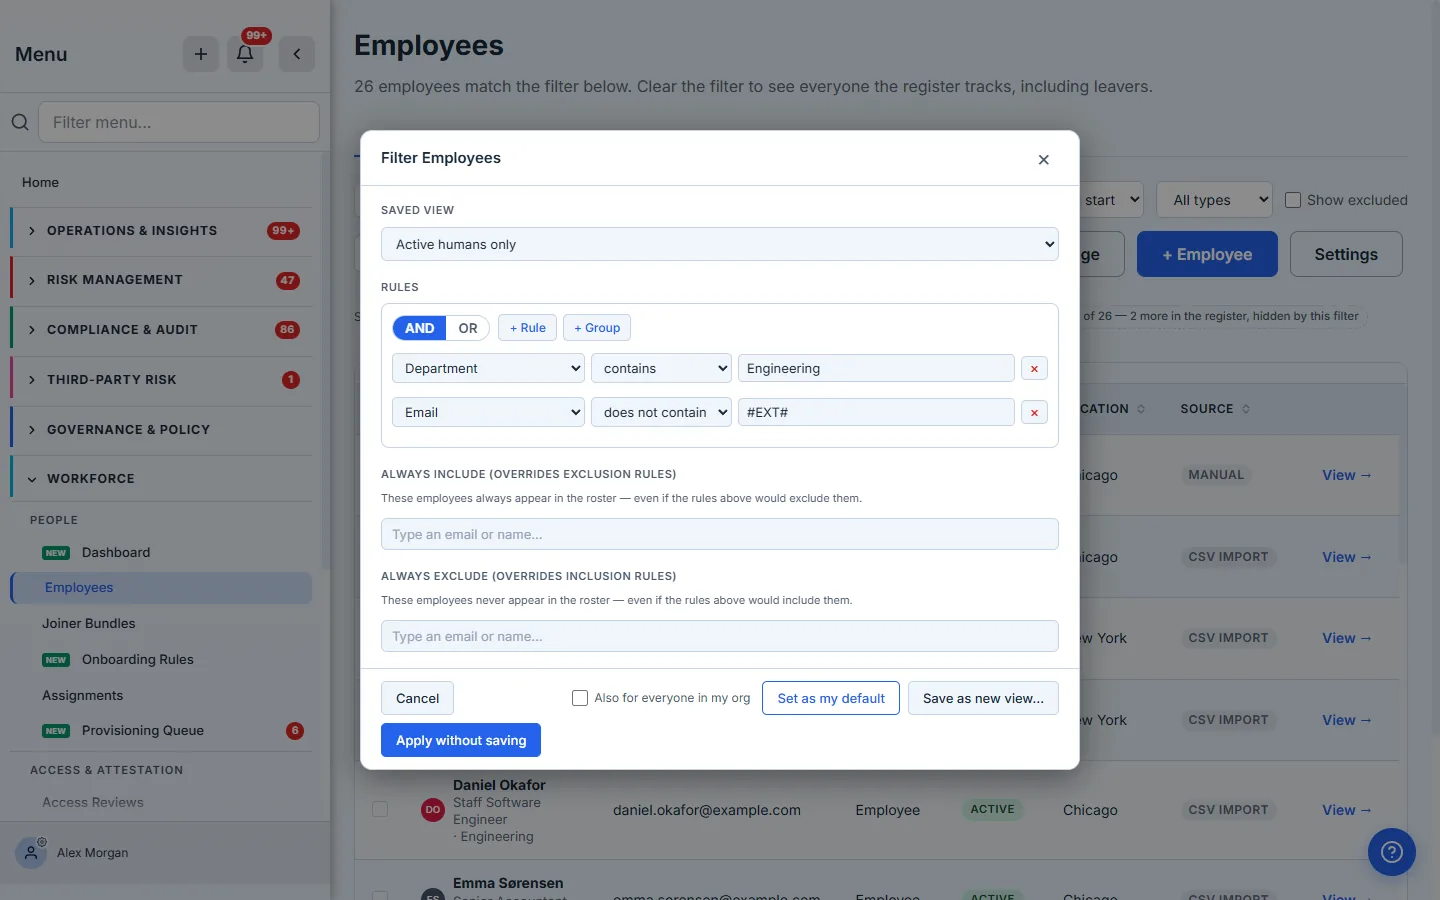
Picking a preset applies it immediately — no save, no commit. To build one, open ⚙ Filter: the same modal carries the saved-view picker at the top and a rule builder beneath it, so the presets and your custom rules live in one place. Every rule reads as a sentence — Department is Engineering, Email does not contain #EXT# — because the field and operator dropdowns show the names you would say, not the database columns underneath them.
The roster header shows chips for the active filter — each rule spelled out, plus any always-include / always-exclude overrides and a Clear filter button — so it’s never ambiguous that a filter is in force.
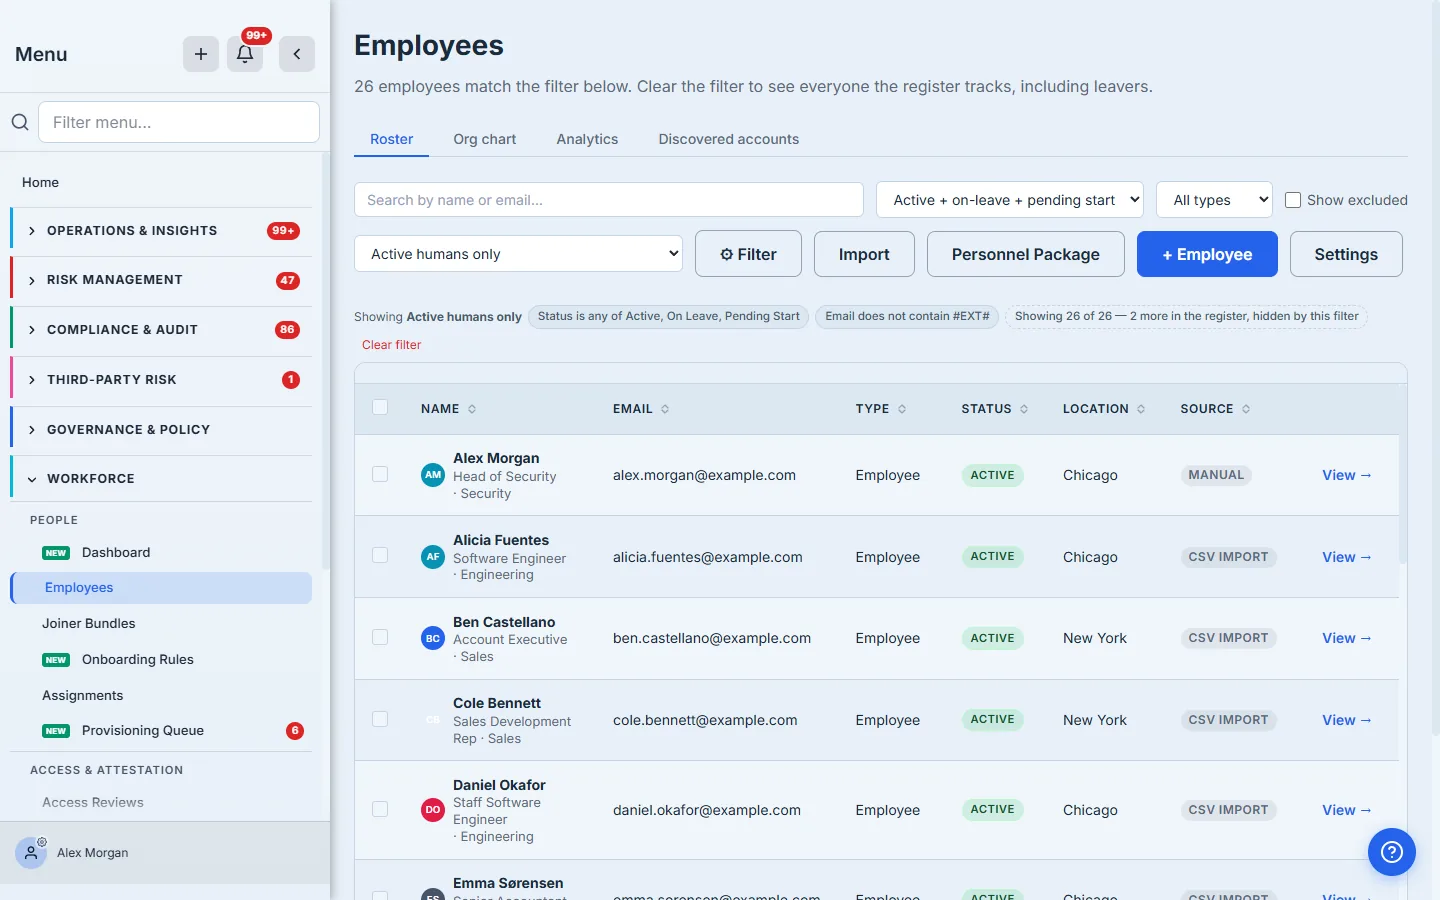
The system presets are the answer to 80% of “make the roster less noisy” questions. Most orgs need nothing else for day-one usability — Active humans only hides terminated and externals; Hide external (#EXT#) accounts hides Entra B2B guests; Hide service accounts hides veeam / alerts@ / wordpress / noreply by email-substring match; Internal workforce drops vendor-type rows. Reach for a custom view when the preset gets you 80% of the way and you need one more rule.
Step 7 — Build a custom view with the filter modal
Click the ⚙ Filter button to open the full rule builder. The modal exposes three things the preset dropdown doesn’t:
- A custom rule tree — AND/OR groups of field/operator/value rules over the roster’s own fields, named as you would say them: Status, Employment type, Job title, Department, Location, Hire date, Source system, Directory user type, Account enabled, and the rest. A rule reads as a sentence — Department is Engineering — and the chip it leaves on the roster reads the same way, so the filter you built and the filter you are looking at can never describe themselves differently.
- Always include — a list of specific employees who should always show in this view regardless of what the rules above say. This is how you whitelist “the system account that’s actually a real person.”
- Always exclude — the mirror, for the “yes, the heuristic flagged this as a service account but Sandra in Finance owns this mailbox and I never want to see her here” case.
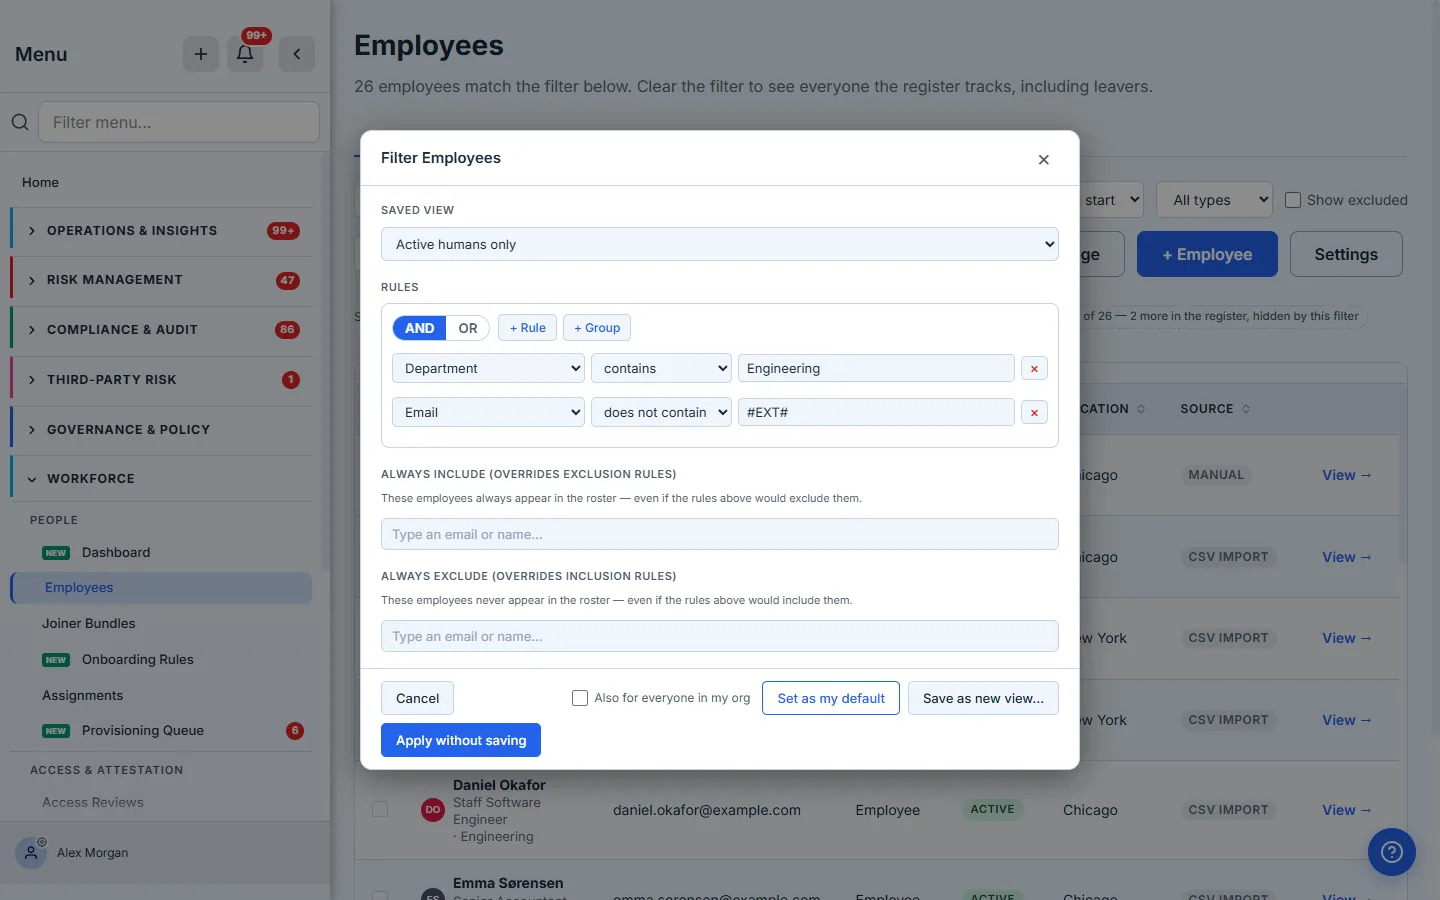
The override semantics are load-bearing. Rules are patterns; the include/exclude lists are exceptions. A coordinator who wants “Active humans only, but always include ops@talarity.com (who’s a real human despite the platform-y email) and never include the contractor-mailbox account” can express exactly that without rewriting the rule tree.
Always include overrides Always exclude overrides Rules. Order matters: a row that matches the always-include list shows, even if the rules would have hidden it. A row that matches the always-exclude list hides, even if the rules would have shown it. Reach for include when the heuristic under-classifies a real person; reach for exclude when the heuristic over-classifies a noise account.
Step 8 — Save the view, pin a default, share with the team
The footer’s Save as new view opens an inline panel — no second modal, no separate page — with the three knobs that turn a one-off filter into a durable team view:
- View name — what shows in the dropdown afterwards.
- Share with everyone in my org — makes the view appear in every coordinator’s dropdown, not just yours.
- Set as my default view — Talarity loads this view automatically every time you open
/app/workforce. - Set as the default for everyone in my org — the same, but for every user who hasn’t picked their own. Org-default is shared automatically (the option implies the share toggle).
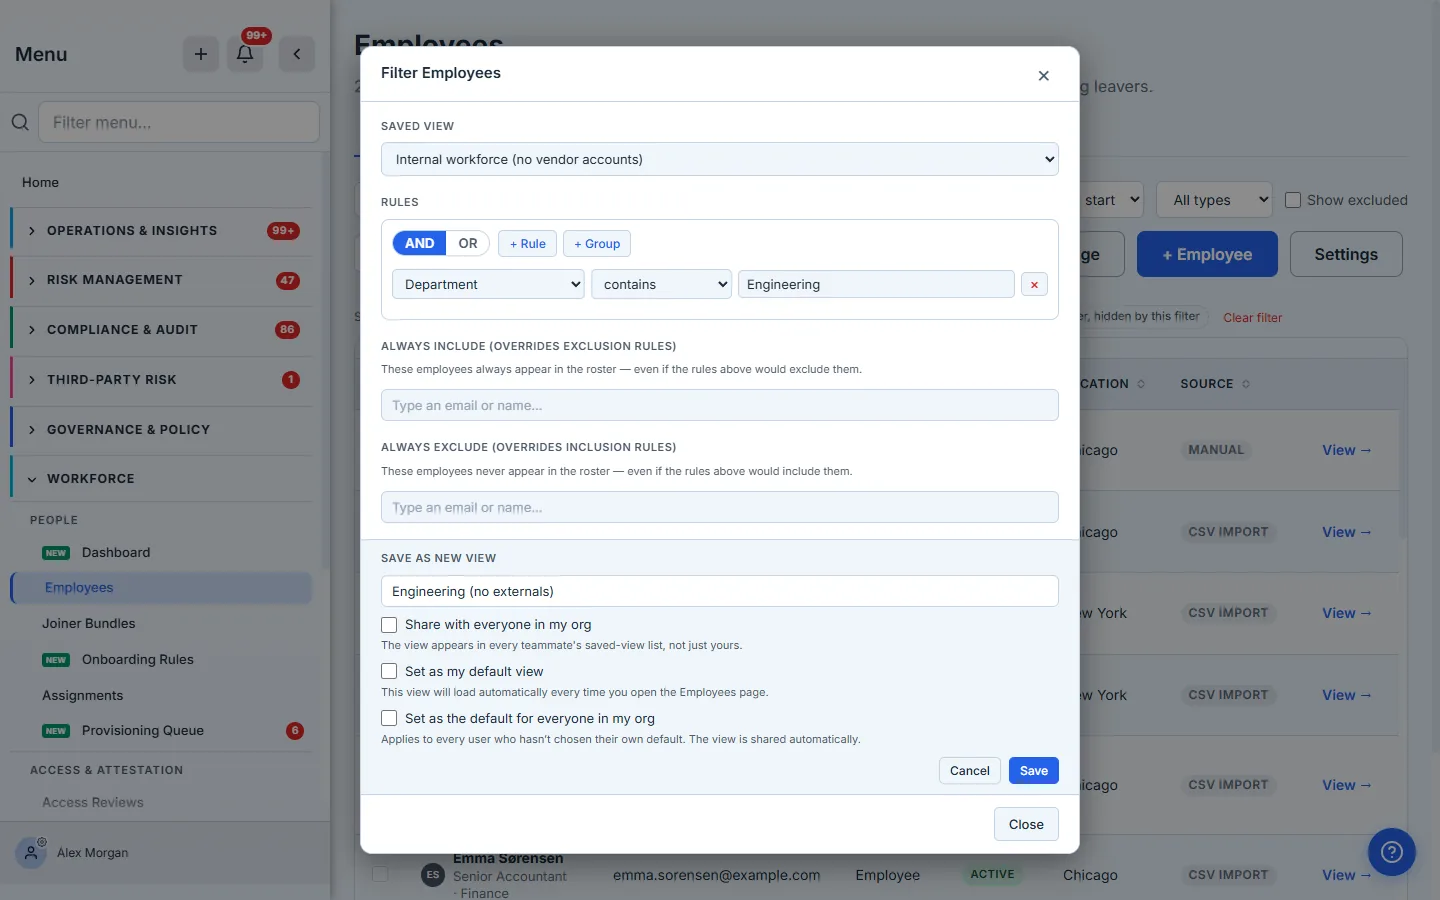
Two defaults coexist by design:
- My default is per-user. Each coordinator picks their own. The compliance lead defaults to Active humans only; the HR director defaults to a custom Joiners this quarter view; the IT admin defaults to the unfiltered roster.
- Org default is the floor. If a user hasn’t picked their own My default, the org default loads. The compliance officer with admin rights pins Active humans only as the org default, and from then on every new coordinator opens the roster not seeing terminated employees by default — without having to remember to apply a filter every time.
The compounding effect is the load-bearing detail: a coordinator joins the team, opens the roster for the first time, sees the org-default view, and doesn’t even know they’re looking at a slice — they’re just looking at “the roster.” Which is the right thing — the noise is filtered out before the noise was a problem.
What the Source column unlocks
The column itself looks small. The patterns it surfaces are not.
- “Why is this person here?” is one second of scanning. Manual = HR added them. Intune = Microsoft has them. Org login = they had a Talarity account before HR finished the paperwork.
- “Why is this person still here?” is the same question, inverted. An Intune-source row with status Active means Microsoft still considers the account live; the fix is in your Microsoft admin centre. A manual-source row with status Active means HR hasn’t off-boarded them; the fix is in Talarity.
- “Where do my contractors actually live?” A manual row pattern tells you the population HR is tracking directly. An Intune-source row for someone in Customer Success means their account is in Microsoft. Mixed-source rosters are normal; knowing the mix is what lets you split tooling responsibilities cleanly.
- Termination drift is visible. An Intune-source row carrying status Active when the person has been gone for months means a Microsoft account that was never disabled. The roster’s Status × Source slice surfaces that gap before an auditor finds it.
What you walk away with
- One roster that aggregates every ingestion path — manual, Microsoft Graph, login-only materialization — into a single view.
- A per-row Source badge that names which path put the row there, in colour, with the same query semantics every other roster field has.
- Status that mirrors Microsoft for Intune/Entra rows — disabling an account upstream terminates the Talarity row on the next sync; re-enabling re-activates it.
- A way to explain unfamiliar names in one second instead of half an hour, and the right place to fix each kind of stale row (your Microsoft tenant vs. Talarity vs. the candidates picker).
- Three system presets that hide the obvious noise on day one — terminated + external + service-account accounts — plus a custom-rule modal with Always include and Always exclude override lists for the edge cases the heuristic doesn’t catch.
- A personal default view for each coordinator and an org-default view for everyone who hasn’t picked their own, so the right slice loads automatically instead of needing to be applied every time.
Open /app/workforce and scan the Source column. Look for any row whose source surprises you. Then open the view selector, pick Active humans only, and notice how much of the surprise was just noise the org-default would have already hidden.