Every third-party framework now expects due diligence before access — not a vendor list you reconcile once a year. SOC 2 CC9.2 asks the entity to “assess and manage risks associated with vendors and business partners.” ISO 27001:2022 A.5.19–A.5.20 require security to be addressed in the supplier relationship and in the agreement — before the relationship starts. NIST SP 800-161 and the 2023 Interagency Guidance on Third-Party Relationships both frame onboarding as a gated lifecycle: planning → due diligence → approval → contracting → ongoing monitoring.
The failure mode is universal: a vendor gets “added” as a name in a spreadsheet. No owner. No risk profile. No approval. No tier. Six months later an auditor asks “who approved this processor, and how risky is it?” and nobody can answer.
Talarity makes the defensible path the easy one. Adding a vendor walks you through a structured intake that captures the risk profile, then routes the new vendor through your org’s approval gate and a classification step that computes a repeatable risk tier — so by the time a vendor is active, it already has an owner, an approval trail, and a tier you can defend.
This article covers adding and onboarding a vendor end-to-end: the intake wizard, the proposal-approval gate, and classification. The deep configuration of how tiers are scored (the tiering policy) and what assessments you send are companion articles; this one gets a vendor from “we’re considering them” to “active, tiered, and owned.”
A vendor can also enter this flow from the other direction. When someone on your team files a New Vendor request through the guest request portal, approving it creates the prospect vendor record described here — ready for tiering, with the request’s approval note on its trail. See From request to fulfillment for how that request becomes this record.
Who’s involved
- Business / vendor owner — proposes the vendor and owns the relationship. Fills the intake wizard. Receives every notification about the vendor afterward.
- Program owner / approver — when the approval gate is on, reviews each proposed vendor and approves or rejects it. (Set the gate in Vendor Program settings.)
- Security analyst — runs the classification step that turns the captured risk factors into an inherent-risk tier, then kicks off onboarding assessments.
What’s on the page
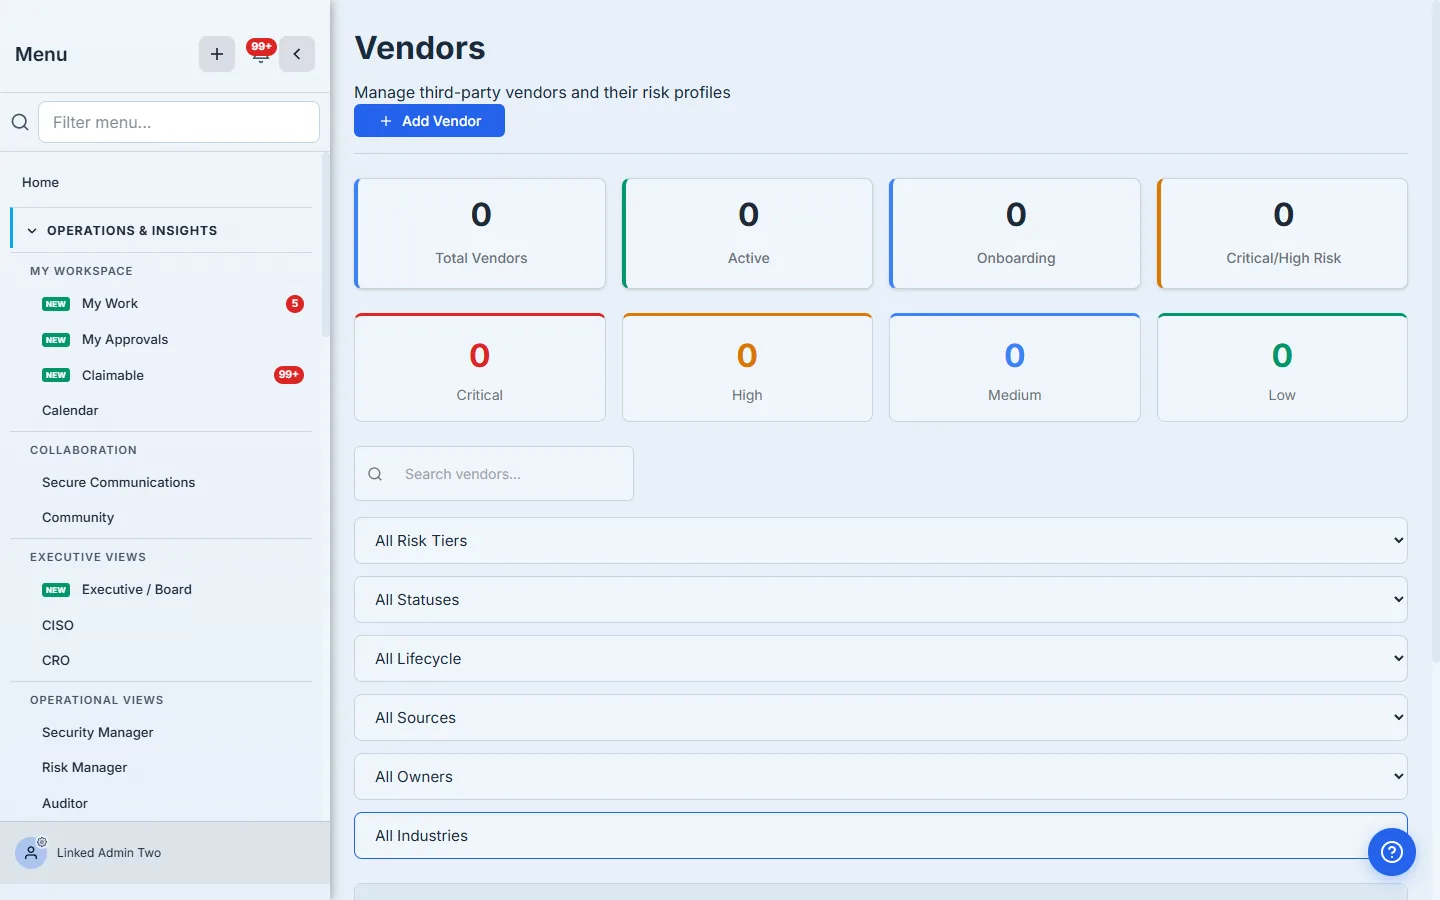
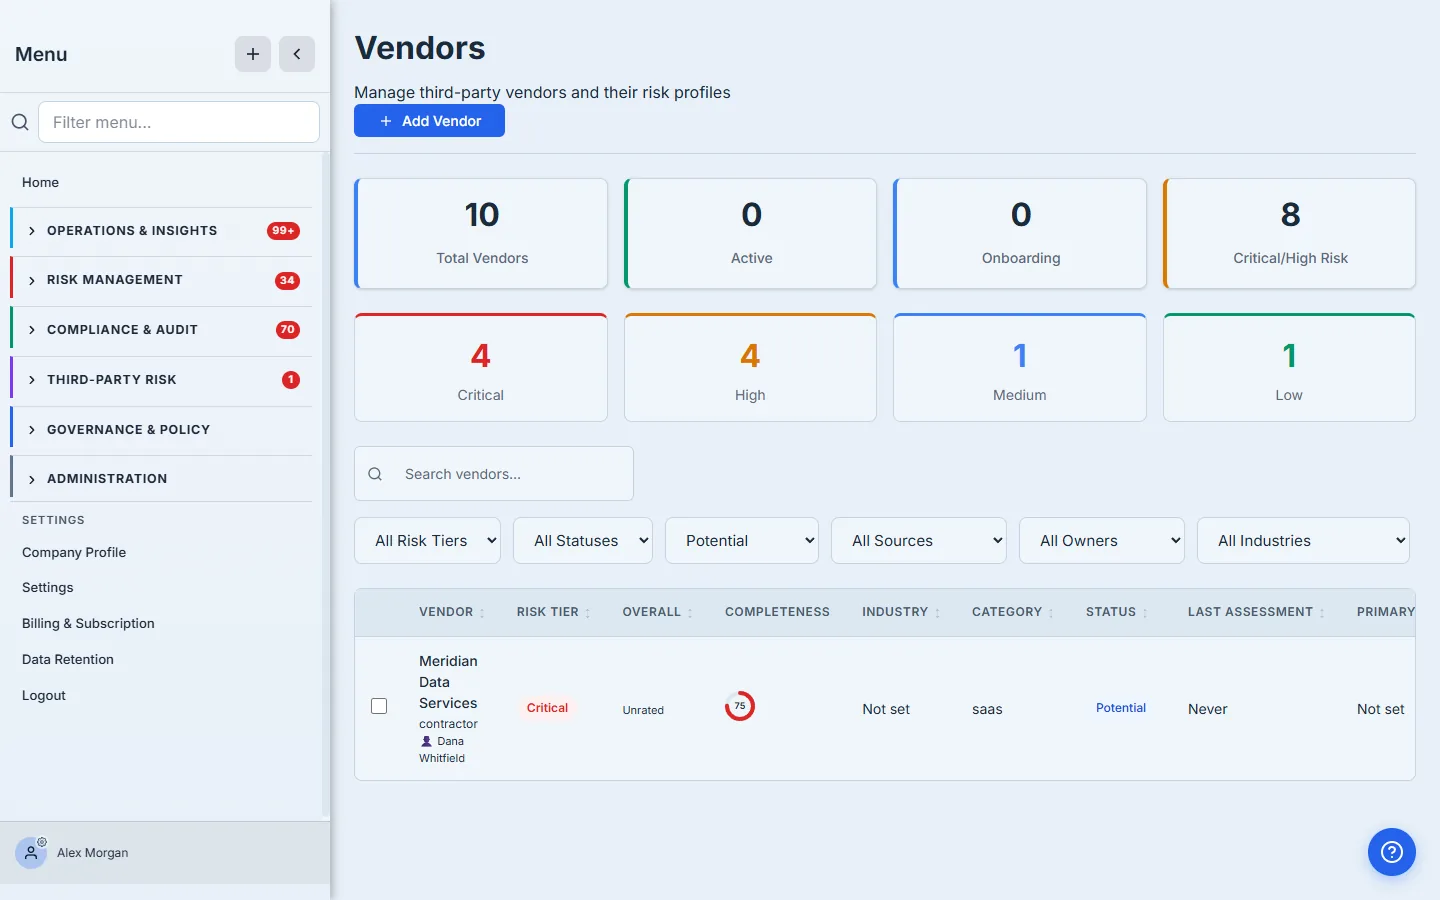
Open Vendor Management (/app/vendors) — the list page doubles as your program dashboard.
- Program KPIs across the top — total vendors, active, onboarding, and the critical/high-risk count.
- Filters — risk tier, lifecycle state, owner, catalog provenance, and industry.
- + Add Vendor — opens the onboarding flow: template or catalog start → risk profile → calculated tier (overridable with a reason) → approval gate → classification.
Step 1 — Open Vendors and click “Add Vendor”
Go to Third-Party Risk → Vendor Management (/app/vendors) and click + Add Vendor. The list page is also your program dashboard — total vendors, active, onboarding, and the critical/high-risk count across the top, with filters for risk tier, lifecycle state, owner, catalog provenance, and industry once you have vendors to filter.
Add Vendor opens a seven-step wizard. Don’t let the seven steps intimidate you — most are short, several are optional, and the whole thing exists to capture the inherent-risk factors that drive the vendor’s tier. You can get a vendor in with just Step 1.
Step 2 — Start from a template or the catalog (optional, but do it)
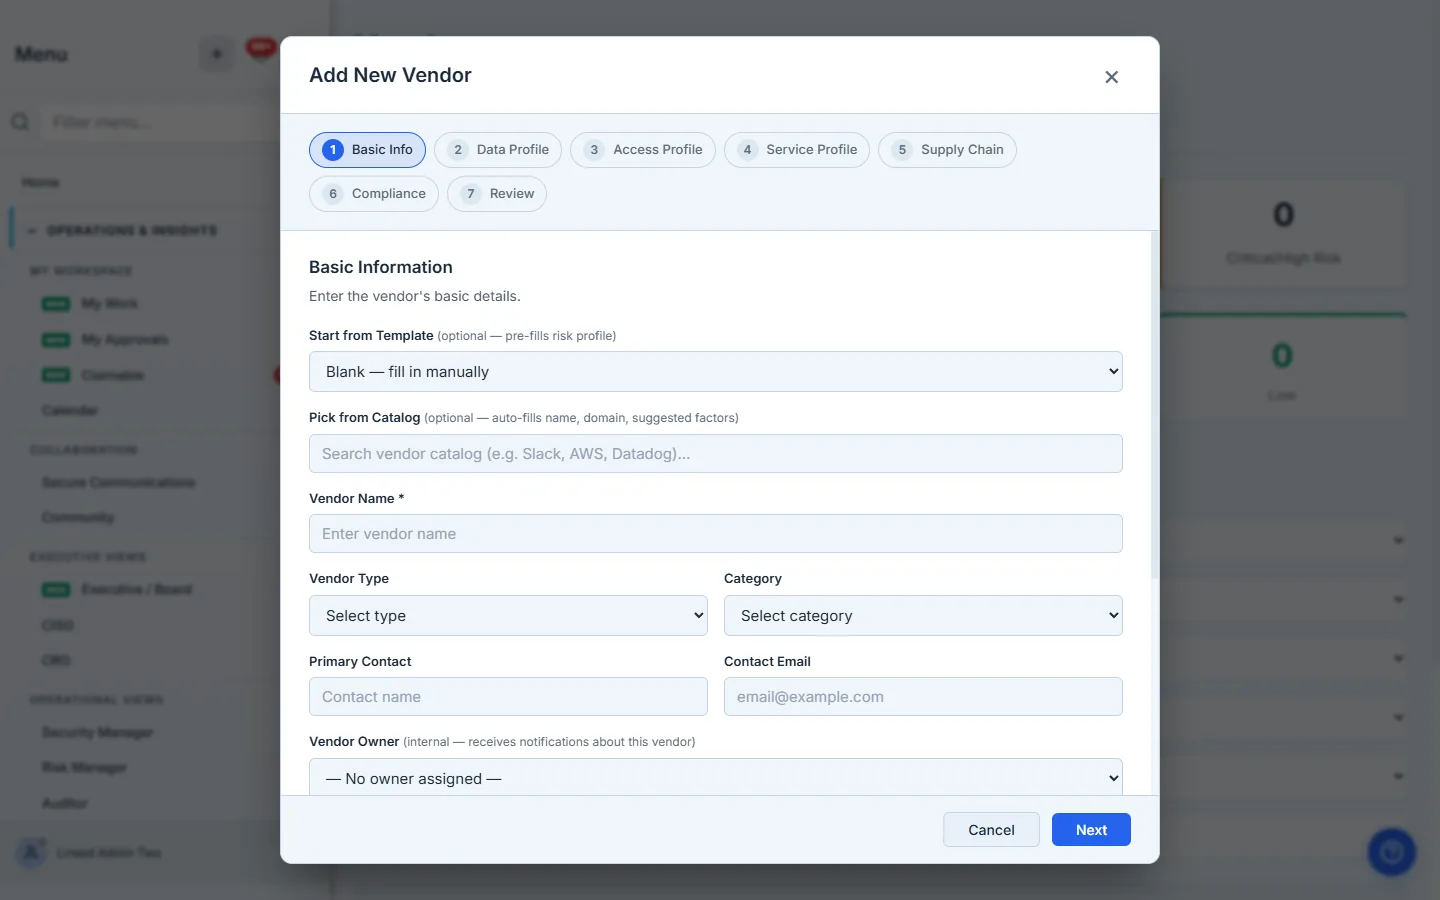
Two shortcuts sit at the top of Step 1 (both visible in the screenshot above), and both save real time:
- Start from Template pre-fills the risk profile for a kind of vendor — Cloud SaaS (PII), Payment Processor, Managed Security, Staffing/HR, and more. Pick the closest match and the wizard seeds sensible factor defaults you can adjust. Use this when you don’t have the exact vendor in the catalog but know its category.
- Pick from Catalog searches a platform-curated vendor library. Type a known vendor’s name and it auto-fills the name, primary domain, industry classification, and suggested risk factors from the catalog entry — so a well-known SaaS provider is half-onboarded before you’ve answered a single question.
The owner field is the one people skip and shouldn’t. “Vendor Owner” is the internal person on the hook for this relationship — they receive every notification about the vendor (renewal due, rating dropped, finding opened). Leave it blank and those notifications fan out to all org admins instead. Pick the real owner now; it’s the difference between “someone is watching this vendor” and “everyone assumes someone else is.”
Step 3 — Capture the risk profile
Steps 2 through 6 capture what makes a vendor risky: the data it touches (PII, PHI, PCI, confidential), the access it has to your systems, its service criticality (RTO/RPO, business impact), its supply-chain / fourth-party exposure, and its regulatory footprint. Each answer feeds the tier engine.
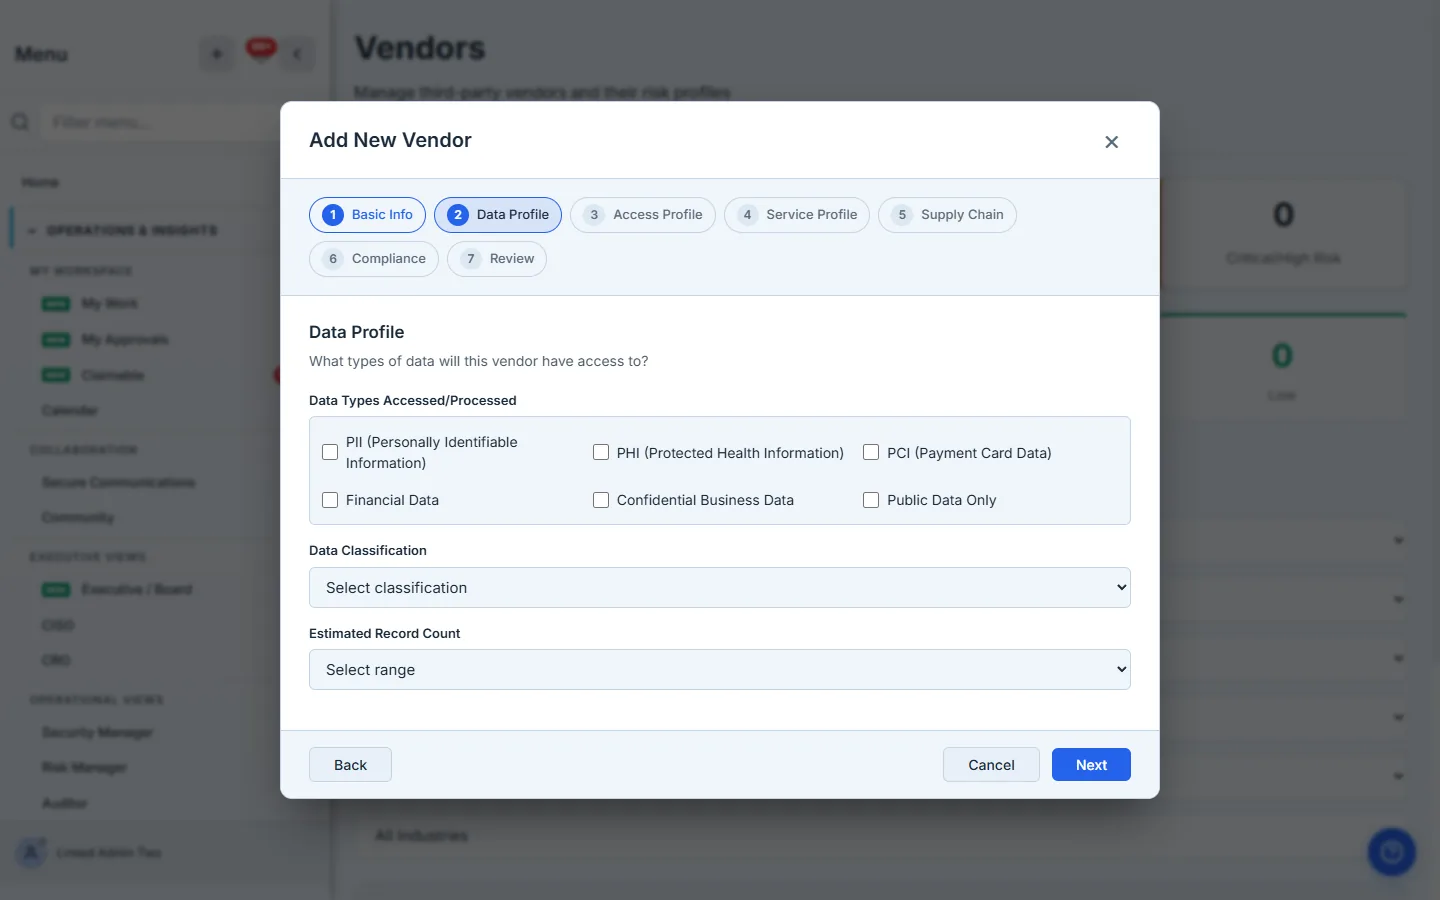
You don’t have to fill every field to create the vendor — but the more you capture, the more reliable the computed tier, and the higher the vendor’s profile completeness score (the ring you’ll see on the list and detail). Think of these steps as front-loading the due diligence the framework expects.
Step 4 — Review the calculated tier, and override only with a reason
Step 7 shows a calculated risk tier preview from everything you entered, plus a plain-language summary of the load-bearing factors.
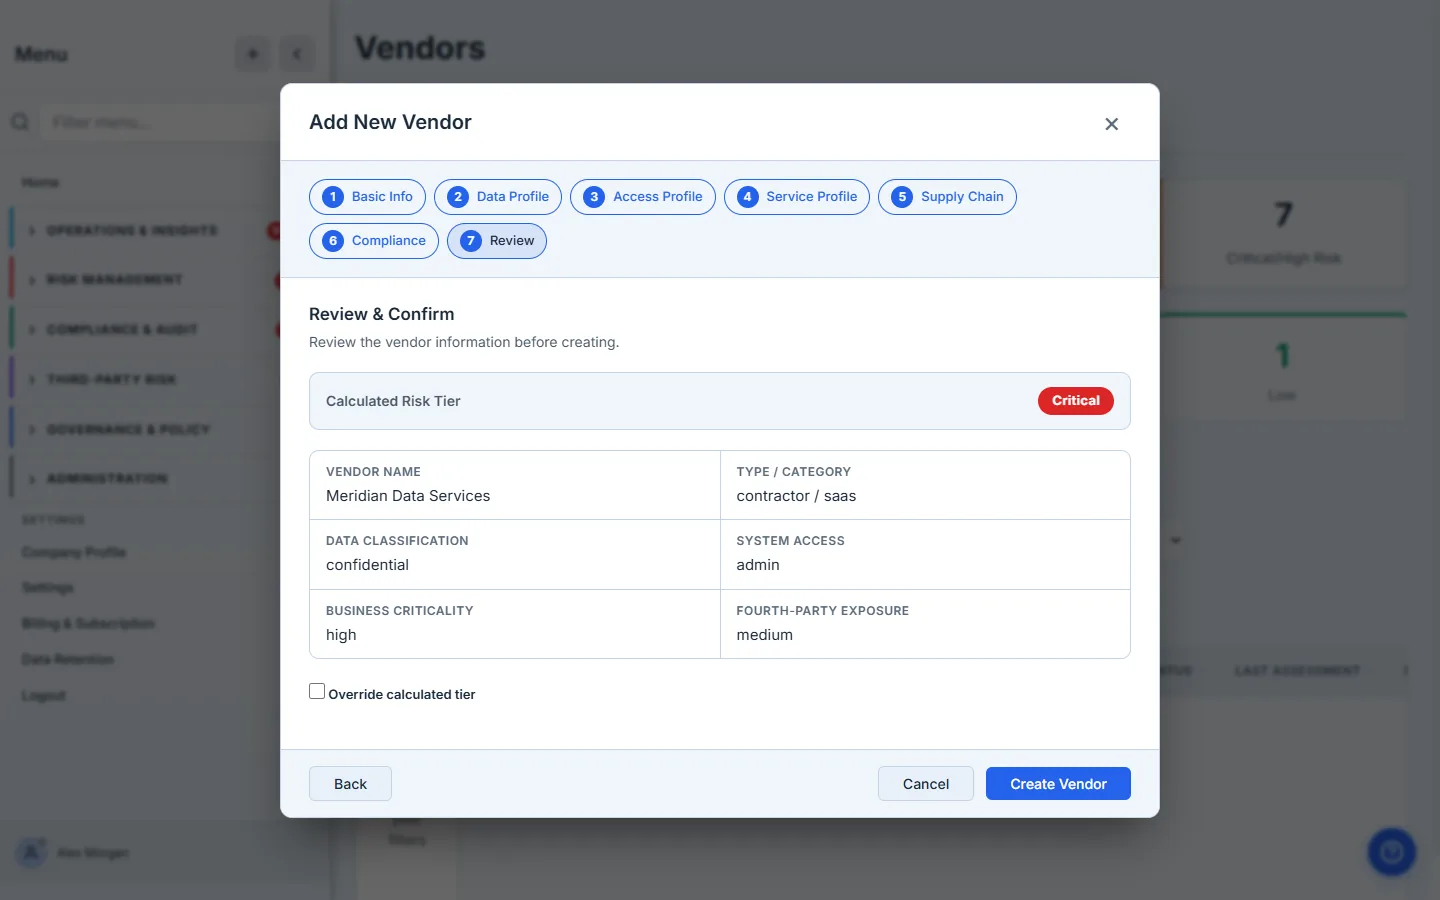
If you disagree with the computed tier, you can override it — but Talarity makes the override governed, not silent. Check “Override calculated tier” and you must supply a manual tier, an override category (Compensating Controls in Place, Business Risk Acceptance, Regulatory Finding, Executive Decision / CEO Exception, or Other / Temporary Exception), a justification (minimum 20 characters), and an optional expiration after which the vendor reverts to its calculated tier.
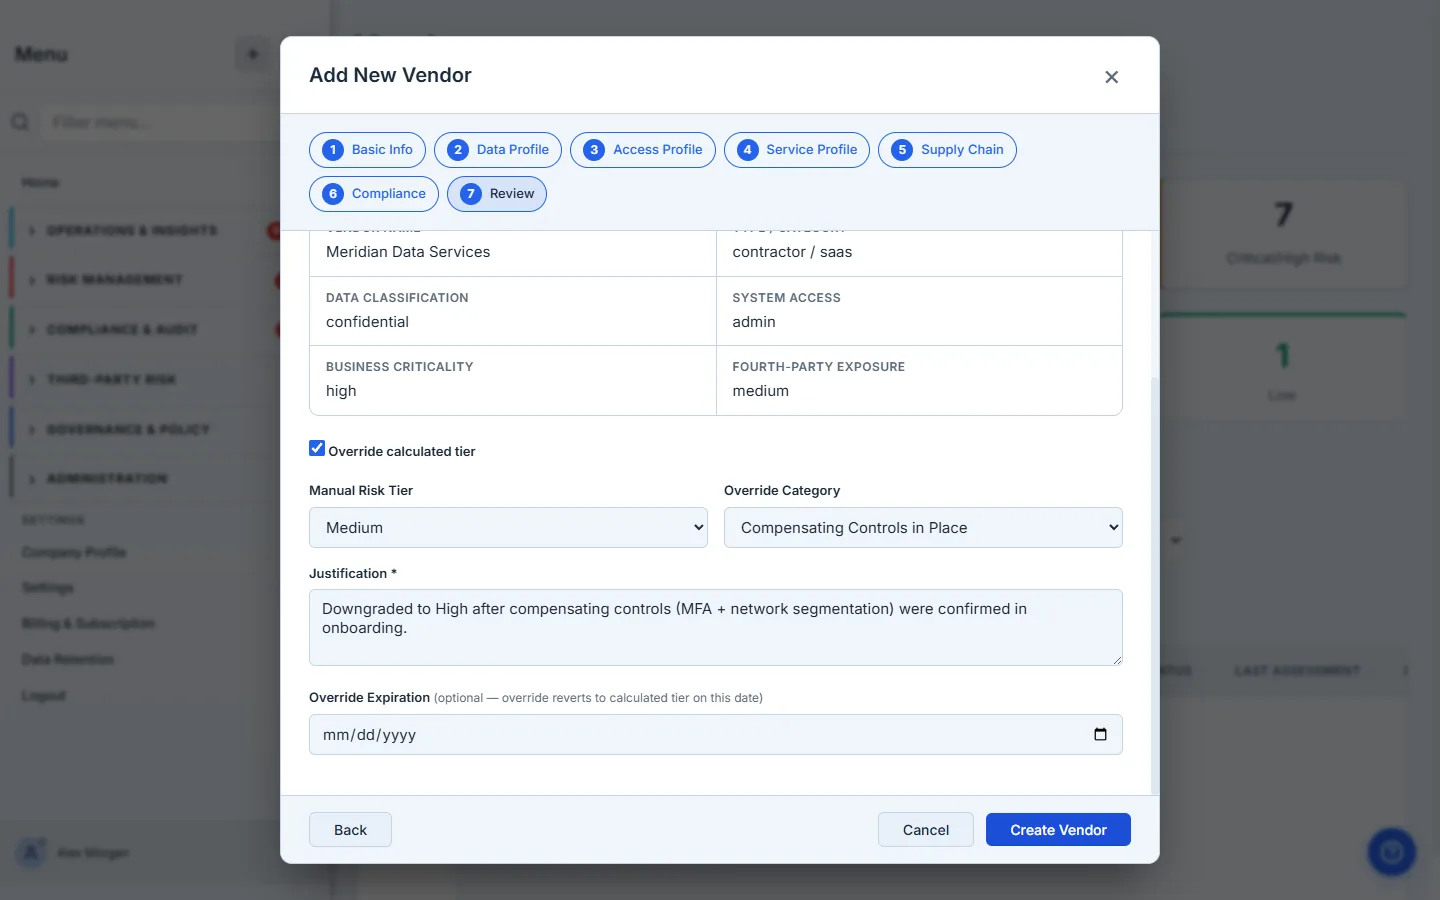
An override without a reason is how risk programs rot. The required justification and expiration are what let an auditor — or you, a year later — understand why this vendor’s tier was set by hand. Use the override when you genuinely know something the model doesn’t; never use it to make a number look better.
Step 5 — Submit, and the approval gate takes over
Click Create Vendor. What happens next depends on your program settings:
- Simple mode — the vendor goes straight to Active with its computed tier. Light-touch, for short vendor lists.
- Standard / Complex with the intake gate ON — the vendor lands in Proposed. It is not active yet. It waits for an approver.
- Standard / Complex with the gate OFF — the vendor proceeds directly to Intake, ready to classify.
This is the separation-of-duties control in action: when the gate is on, the person who proposes a vendor isn’t the person who waves it into production. The moment a vendor is proposed, every active org admin gets a “New vendor proposal” notification linking straight to the review queue.
Step 6 — Review the proposal queue and approve
Approvers open the queue at Vendors → filter Lifecycle = Proposed (the notification deep-links here). Every proposed vendor shows its owner, profile-completeness ring, and provisional tier.
Open the vendor and the detail page presents Approve and Reject right in the lifecycle action bar, alongside a “what’s missing” breakdown of the profile.
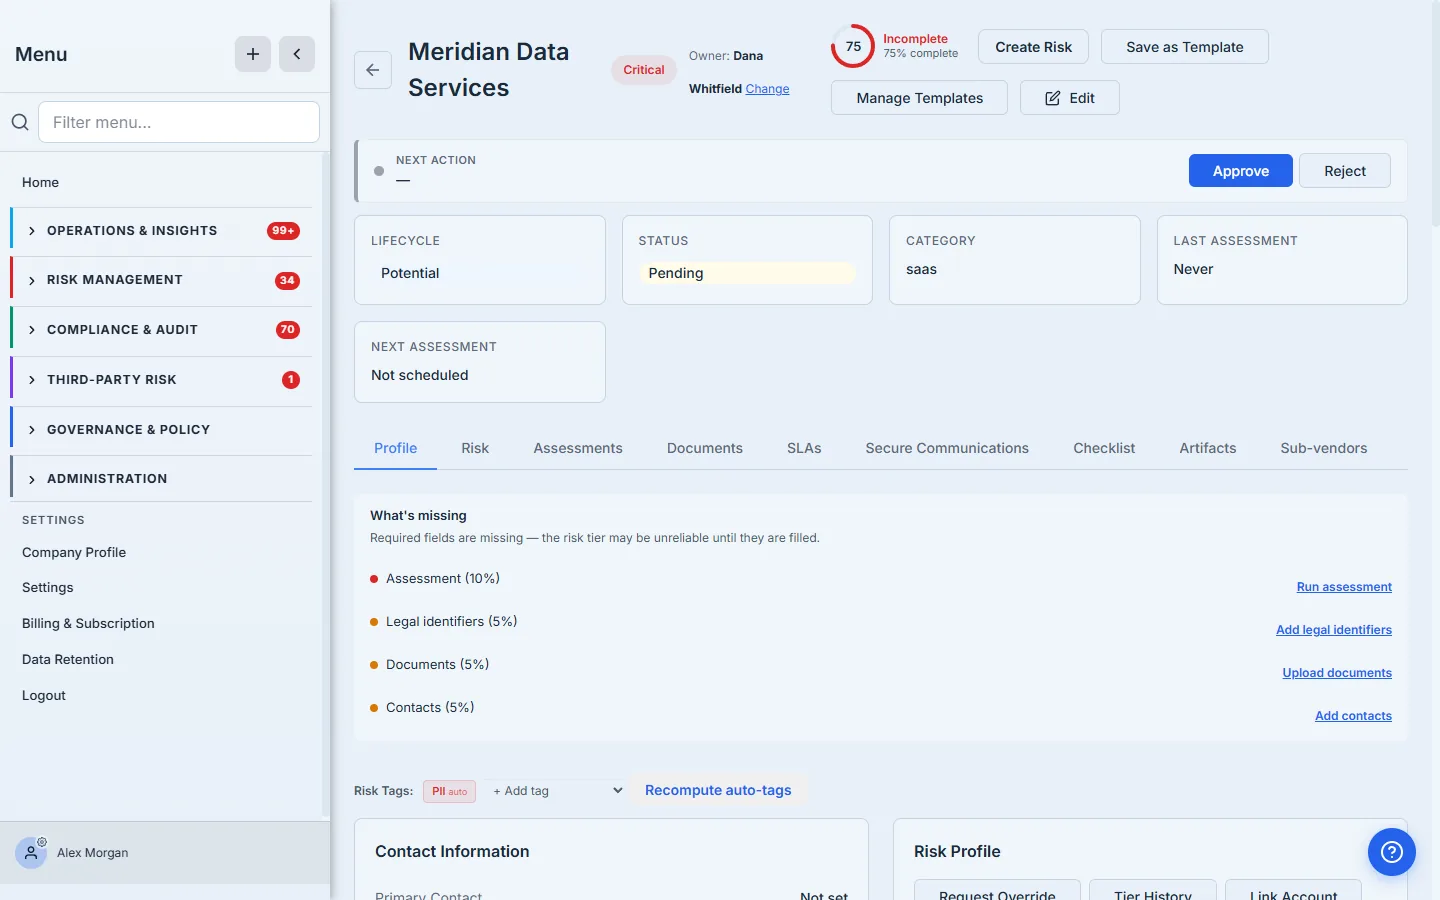
Approve transitions the vendor to Intake and records who approved it and when — that approval stamp is the audit artifact the framework wants. Reject asks for a reason and notifies the proposer, so a declined vendor never just disappears.
Step 7 — Classify, and the tier becomes authoritative
An intake vendor shows a Classify Now action. Classification is where the inherent-risk factors become the vendor’s official tier. The classify dialog confirms the four core factors — data sensitivity, system criticality, access type, and regulatory scope — pre-filled from what the wizard captured.
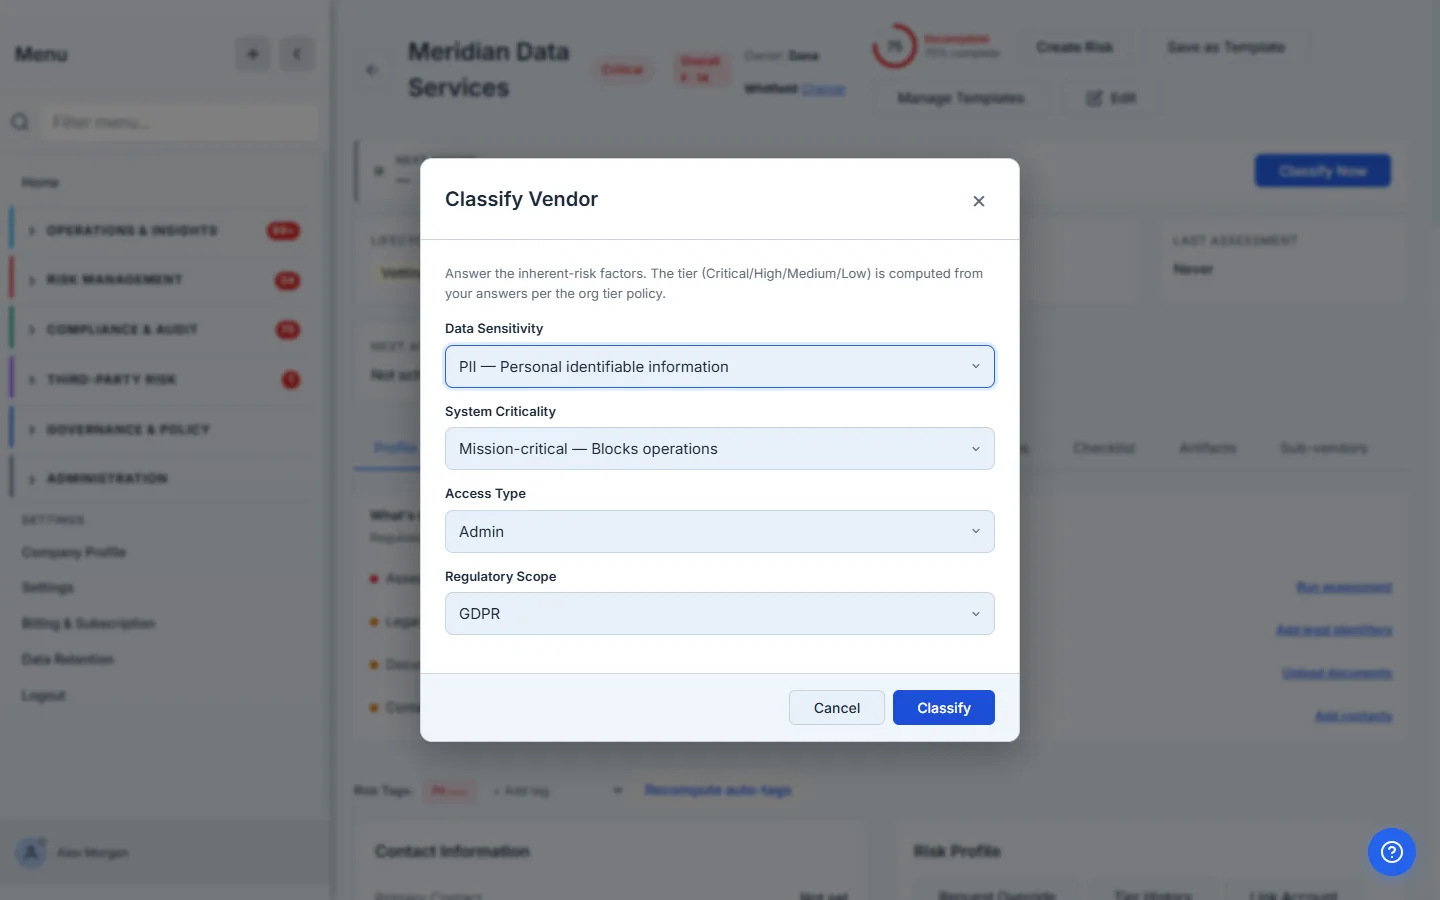
Click Classify and Talarity computes the tier from your answers against the org’s tier policy, writes it to the vendor’s tier history (so every tier change is dated and attributed), and advances the vendor to Onboarding.
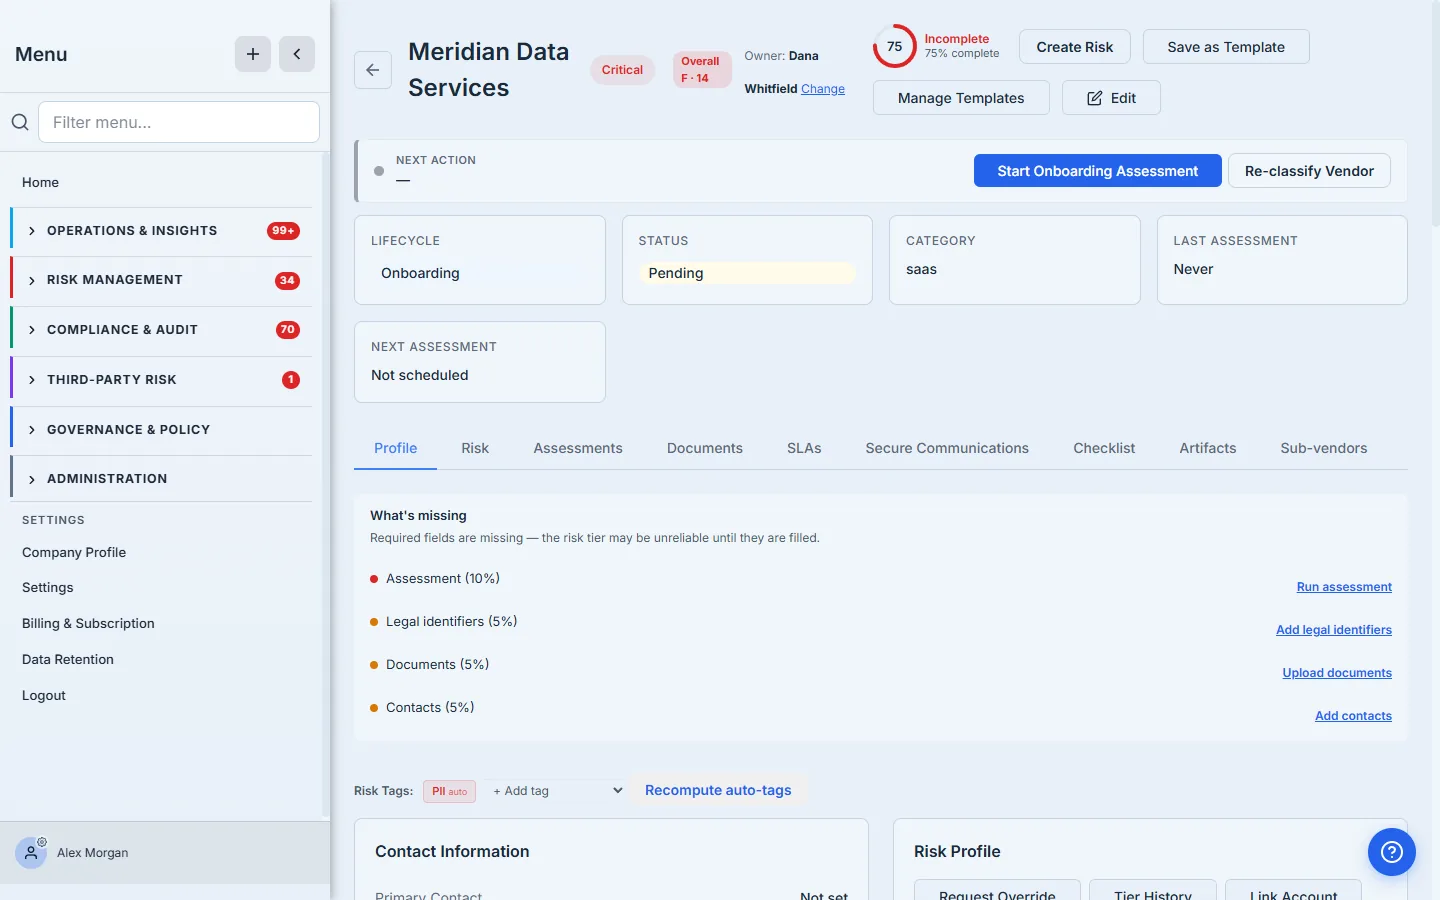
From Onboarding, the next action is Start Onboarding Assessment — sending the vendor the questionnaire that collects evidence for their tier. That assessment flow (and the vendor portal that lets them respond) is its own article.
The lifecycle at a glance
A vendor moves through an explicit, auditable set of states — and Talarity stamps who changed it and when at every hop:
Proposed → Intake → Onboarding → Active — with Under Review, Restricted, Offboarding, and Terminated for the rest of the relationship. The gate decides whether new vendors start at Proposed or Intake; Simple mode starts them Active. You never have a vendor in your program without knowing exactly where it is in its lifecycle.
What you walk away with
- A vendor that’s owned from the moment it’s created — notifications have a home, not a void.
- A captured risk profile that front-loads the due diligence every framework expects.
- An approval gate that creates documented separation of duties on every new vendor — proposed, reviewed, approved or rejected with a reason, all logged.
- A classified tier written to an attributed tier history, computed from the factors rather than guessed — and overridable only with a category, a justification, and an expiry.
- A vendor that arrives at Active already defensible, instead of a name you’ll have to reconstruct a story around at audit time.
Open /app/vendors, click Add Vendor, and propose your most important processor. Pick the owner, capture the data and access it has, and submit. If your gate is on, approve it; then classify. Three minutes of structure now is the audit answer you’ll be glad you have later.
Related: onboarding sets the inherent risk that tiering then acts on, and the data you record here is what vendor data mapping works from later. Overview: vendor risk management.