Maturity models are everywhere in security and compliance — CIS Controls v8.1 rates every safeguard on implementation maturity, NIST CSF talks in tiers, CMMC is built on levels, and FFIEC’s cybersecurity assessment grades each domain from baseline to innovative. The promise is the same in all of them: don’t just tell me you do this — tell me how well, and prove it. Auditors have learned to distrust a wall of green checkboxes. They want a defensible maturity rating with evidence behind every claim.
That’s exactly what a gated Talarity assessment does, and it trips up almost everyone the first time. You open a CIS assessment, you see five or six tiles on every control, you upload a document — and nothing seems to “advance.” The instinct is that the tiles are a sequence of evidence slots you fill one at a time. They aren’t. Each control is one question with one answer: the maturity level you’re at today. Evidence doesn’t move your answer for you — it unlocks the higher levels so you’re allowed to claim them. This article walks the whole model on a real CIS assessment so the behaviour stops being surprising and starts being useful.
Who’s involved
- Control owner — the person who actually runs the safeguard. Picks the maturity level that’s honestly true today and attaches the proof.
- Compliance lead — sets the org’s evidence-gating default, decides per assignment whether an evidence-gated completion is required, reviews the maturity ratings, and answers “why is this control only a 2?”
- Auditor — pulls the assessment and, for every claimed level, the linked evidence behind it. A gated assessment is built so the answer to “show me” is one click, not a scramble.
What’s on the page
From Assessment Center (/app/assessment-center) open (or start) an assessment. The taking page is the same either way:
- Framework header — your live Overall Score, completion progress, and the Evidence gating chip showing whether this run’s answers require proof (and whether that was your choice or the assigner’s).
- Domain rail — the control domains down the left (e.g. the 18 CIS control domains); the current one’s safeguards fill the middle.
- Safeguard card — number, title, requirement text, IG badges, asset type and security function, with the maturity scale below.
- Maturity scale + evidence panel — one tile per level; Levels 0–1 are claimable freely, Levels 2–5 unlock only once evidence is attached against that level (reusable from the Artifact Repository).
Step 1 — Open the assessment
From Assessment Center (/app/assessment-center) open your in-progress CIS Controls assessment, or start a new one. The taking page is the same either way: the framework header with your live Overall Score and progress, the 18 CIS control domains down the left, and the safeguards for the current domain in the middle.
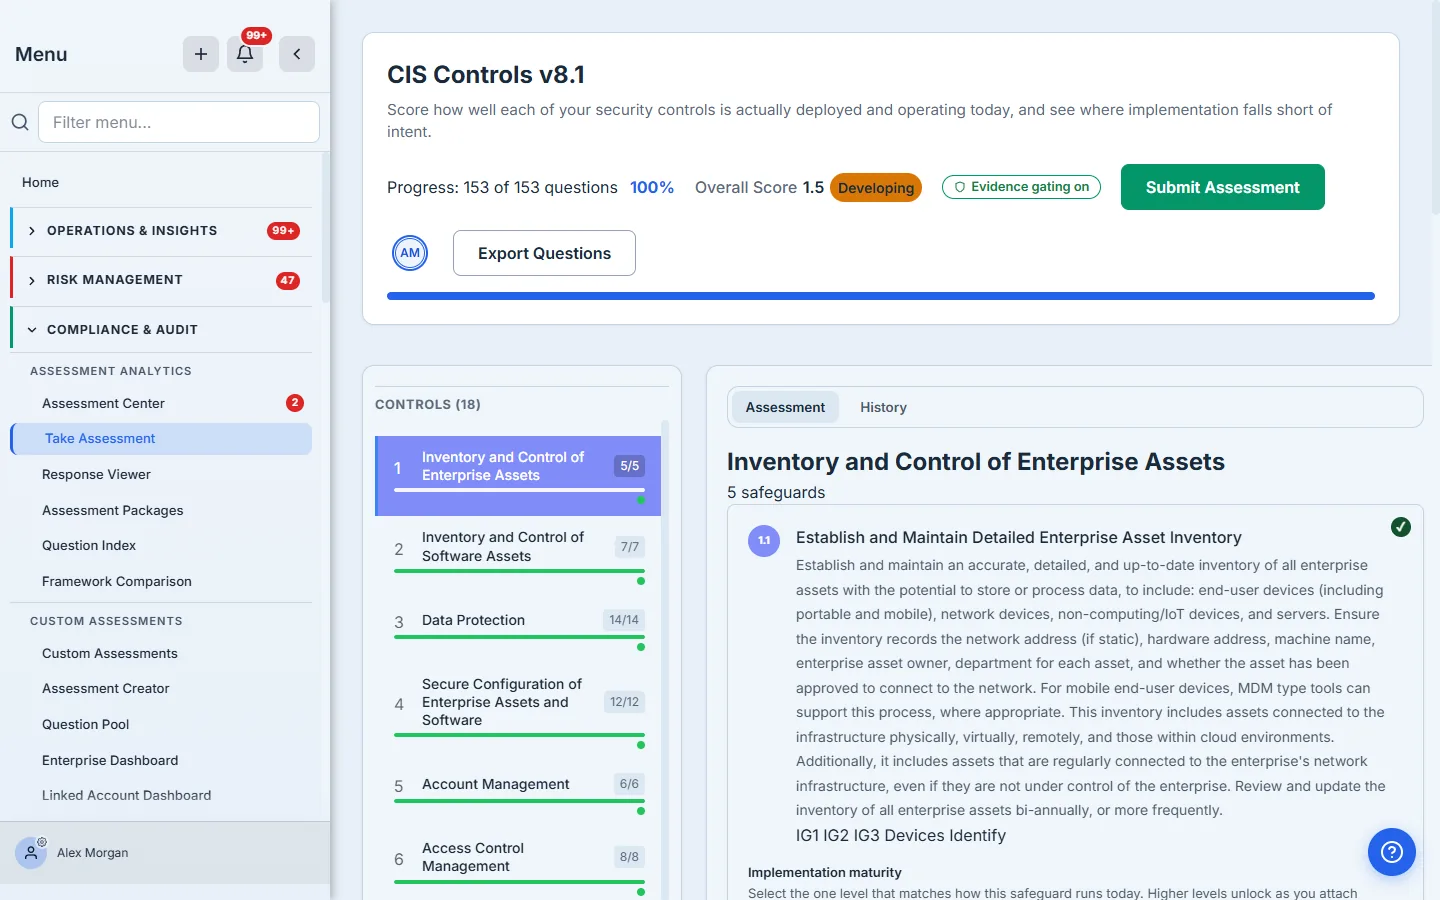
The score in the header is an average, not a checklist tally: every safeguard is rated 0–5, and your Overall Score is the mean maturity across all of them — shown as a 0–5 average (e.g. 3.0) with the matching maturity-level badge. Under the hood that average also converts to a percentage (maturity ÷ 5 × 100), which the Scoring Methodology modal explains and the 60% pass threshold uses. Either way, one control can’t “complete” the assessment — each one carries a fraction of the score, and the number moves as your ratings do.
Step 2 — Read the control before you rate it
Each safeguard is a card: the CIS number, the title, the full requirement text, the Implementation Group badges (IG1 / IG2 / IG3), the asset type it applies to, and the security function. Read it as a question — “how mature is this safeguard in our environment right now?” — not as a box to tick.
Step 3 — The maturity scale is one question, not five slots
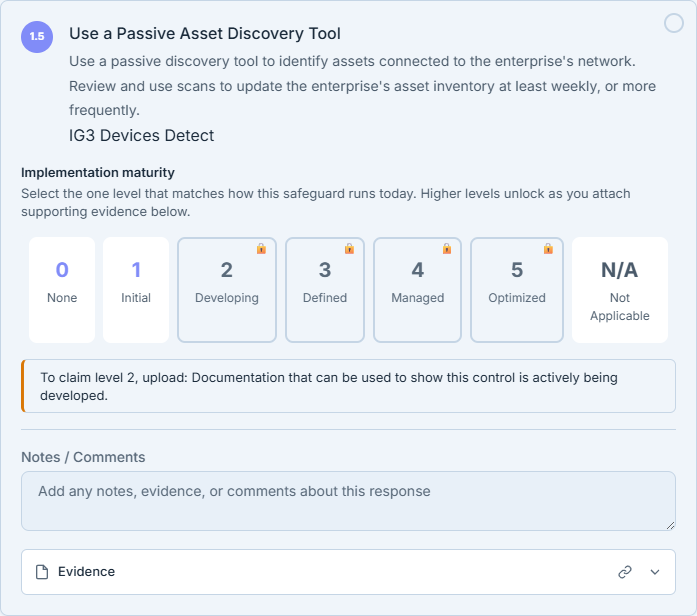
Below every control is the maturity scale: None (0), Initial (1), Developing (2), Defined (3), Managed (4), Optimized (5), plus Not Applicable. This is the single most misread control in the product, so the line above it now says it out loud — select the one level that matches how this safeguard runs today. You pick one tile. Hover any tile for the full definition of that level.
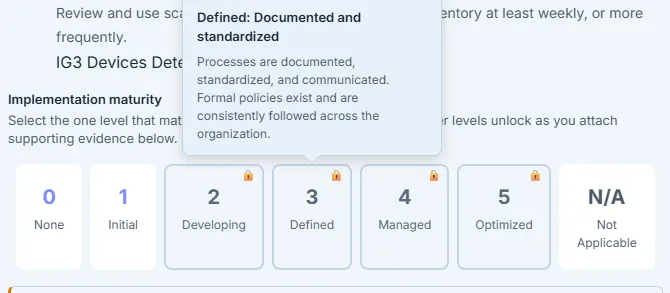
The tiles are not five evidence slots you fill one by one. They’re one question with one answer. “Upload a document and move to the next tile” is the wrong mental model — there is no next tile to move to. There’s the level you’re at today, and you choose it.
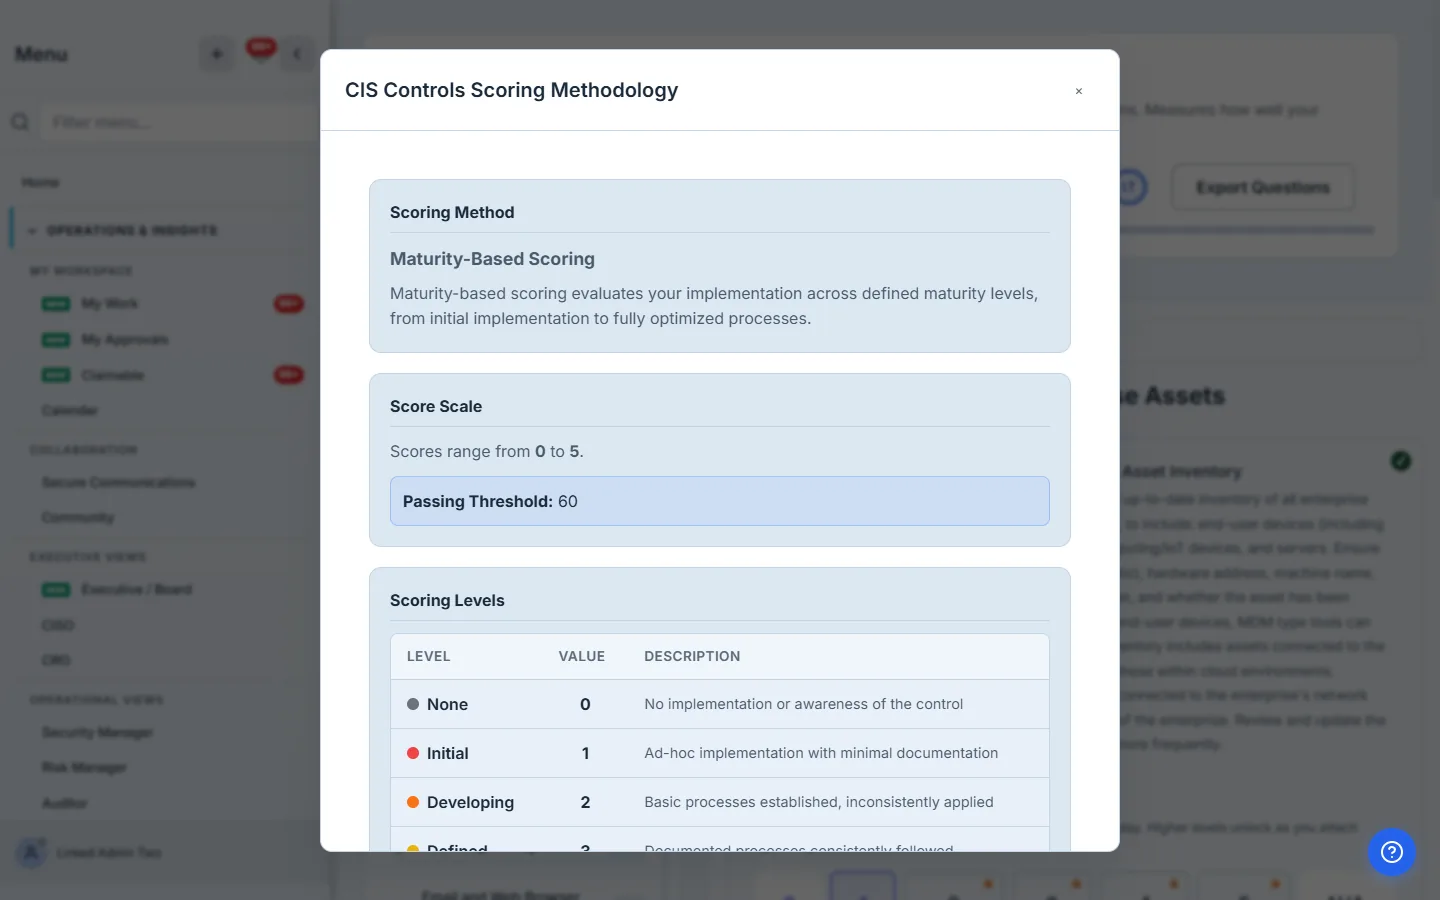
The scale maps to a 0–5 score (None = 0 through Optimized = 100%), and the passing threshold for CIS is 60 — i.e. an average maturity of “Defined” across your safeguards. You can see this any time from the Scoring Methodology button in the header.
Step 4 — Levels 0 and 1 are yours to claim freely
If a safeguard genuinely isn’t implemented, or is only happening ad-hoc, say so. None (0) and Initial (1) require no evidence — they’re admissions of immaturity, and the honest answer is more useful than an inflated one. Click Initial and it saves immediately; a green status stripe down the left edge of the card (and the filled tile) confirms the answer was recorded.
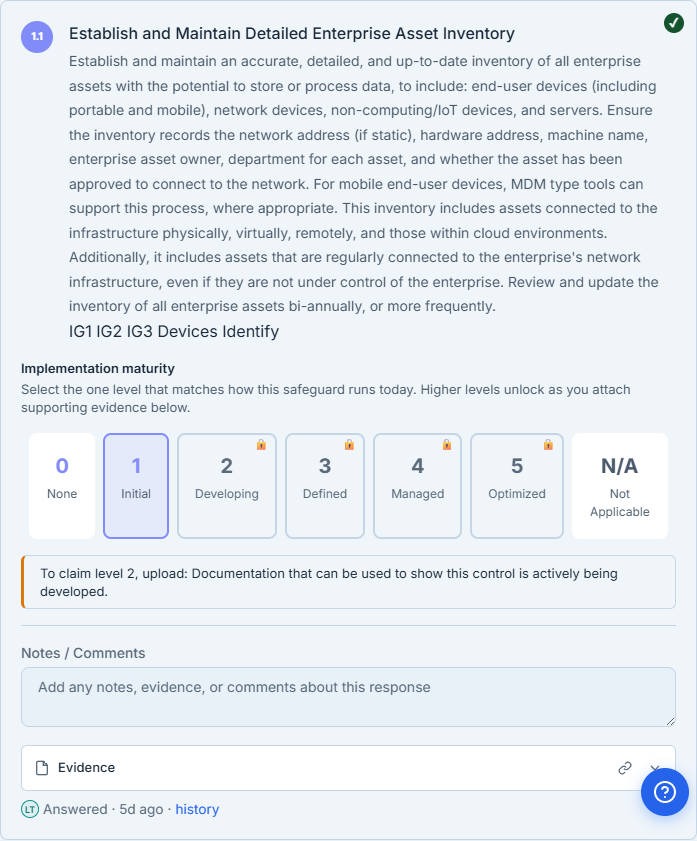
Notice what happened to the higher tiles: they went quiet. That’s the gate. (Evidence gating is an organization default — on out of the box, set under Settings → Organization — captured when the run starts. It’s a default, not a verdict: whoever assigns an assessment can require an evidence-gated completion regardless of the recipient’s setting, and an org admin can flip gating on or off for a single in-flight run from the chip in the assessment header. More on both in the next section.)
Who controls the gate — and what still counts
The gate has three controls, at three altitudes:
- The org default — Settings → Organization → Require evidence for claim answers. On by default, and snapshotted onto each run when it starts, so changing the default never rewrites a run already in flight.
- Per assignment — whoever assigns an assessment (to a team member, a group, or a linked child organization) gets a Require an evidence-gated completion toggle on the assignment form, pre-set from their org’s default. Requiring it stamps the gate onto the recipient’s run — even when the recipient’s own default is off. The recipient sees the requirement everywhere it matters: the invitation email, the assignment card’s Evidence-gated badge, and the run itself.
- Per run — the Evidence gating chip in the assessment header shows the run’s live state, and org admins can click it to flip gating for just this run. Turning it on mid-run re-checks every claim already saved and adjusts any that lack the required evidence down to the highest level the attached proof supports — the rating and its proof never drift apart, even retroactively. Turning it off unlocks the higher tiles; the confirmation spells out the one consequence worth pausing on (below).
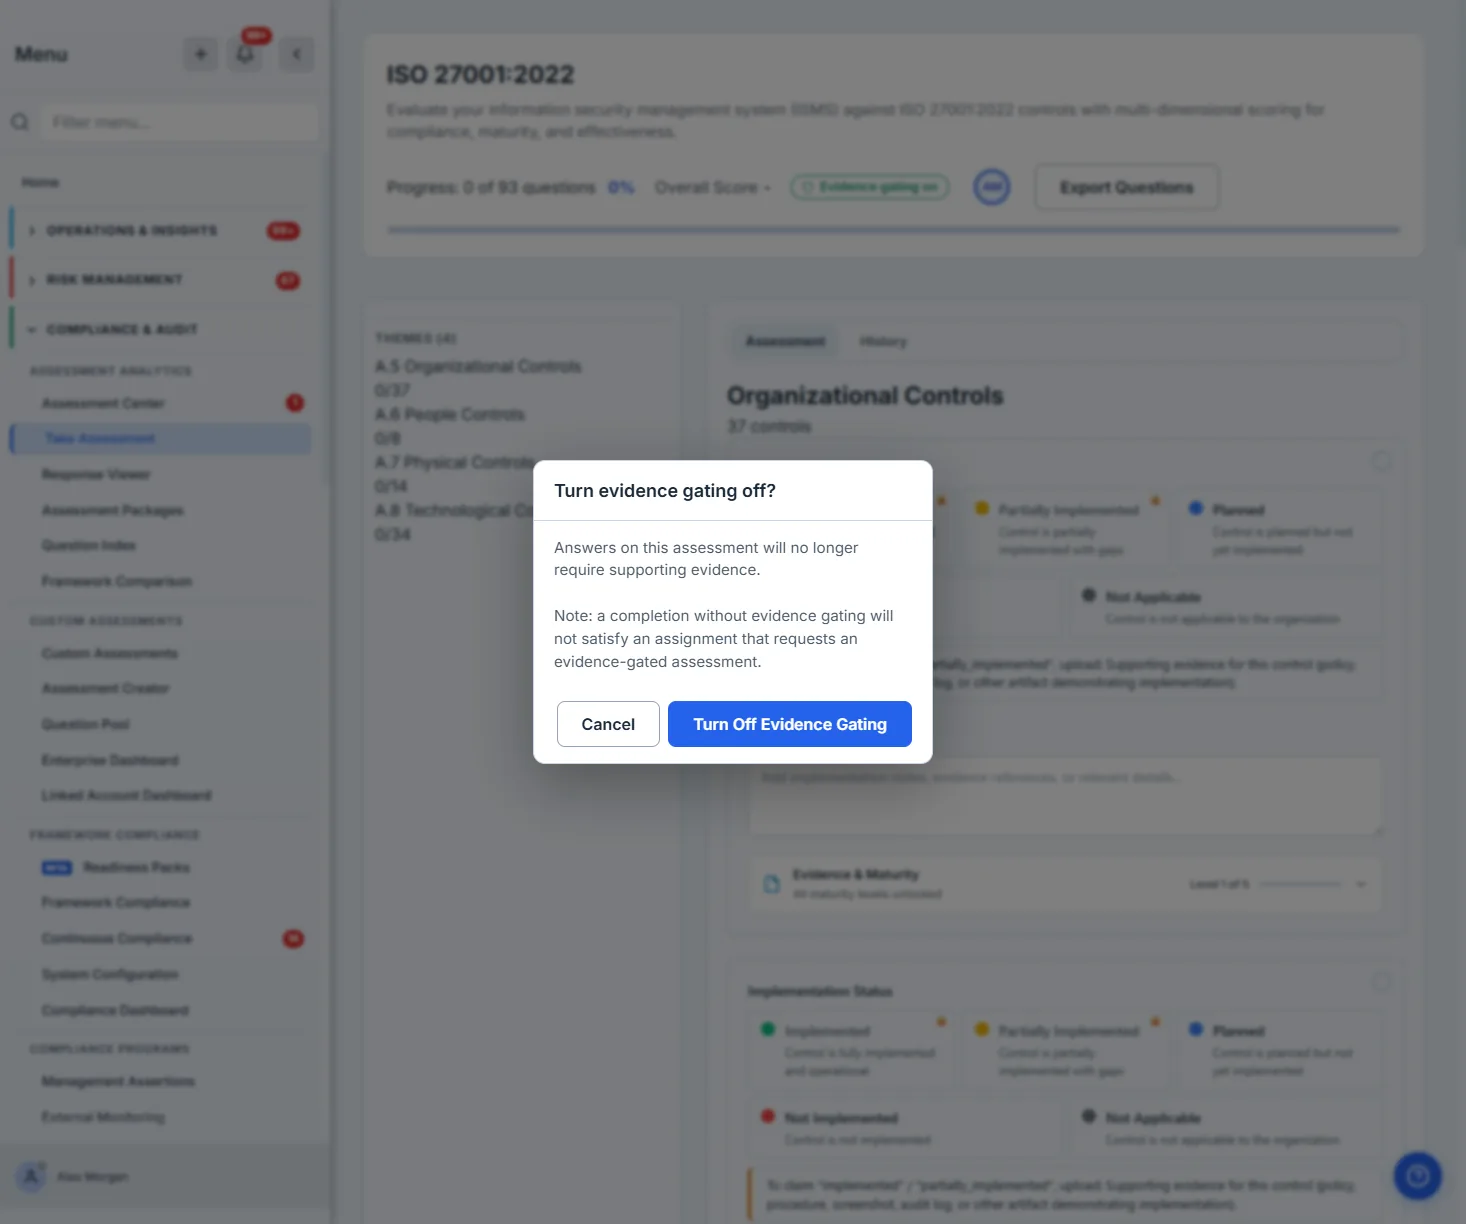
When the gate was required by the assigner, the chip says so: it reads Evidence gating required, carries a lock, and doesn’t respond to a click. Not even an org admin can turn it off for that run — the requester asked for an evidence-backed result, and the run honors that until it’s complete. The label is the tell: on is a state someone chose and can unchoose; required is a condition the assignment imposed.
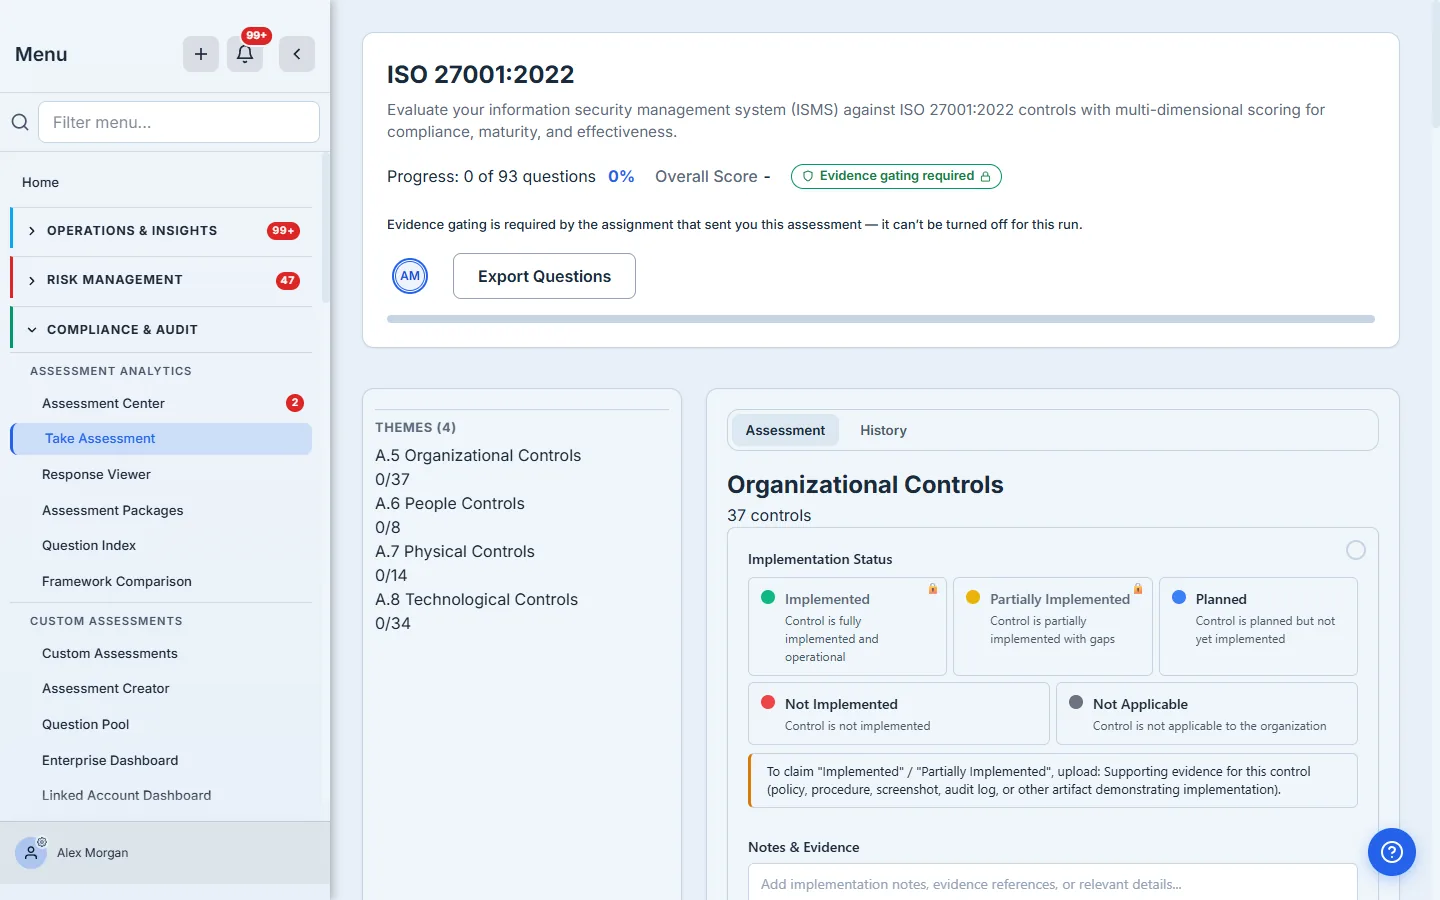
More is fine, less is not. An evidence-gated completion satisfies any request — including one that didn’t ask for gating. A completion without evidence gating never satisfies an assignment that requires it: the assignment stays open, badged Needs evidence-gated run, until a gated completion lands. You can always exceed what was asked; you can never deliver less.
Step 5 — Levels 2 through 5 are earned with evidence
The moment a level becomes a claim — “we have a repeatable process,” “this is formally defined” — Talarity asks for proof before it lets you select it. The higher tiles are locked, and a line under the scale tells you exactly what the next level needs:
- Level 2 — Developing unlocks with any supporting document showing the control is actively being run.
- Level 3 — Defined needs an approved policy or charter — the control is formally established.
- Level 4 — Managed needs a procedure showing the control is monitored and measured.
- Level 5 — Optimized needs a metric or KRI showing continuous improvement.
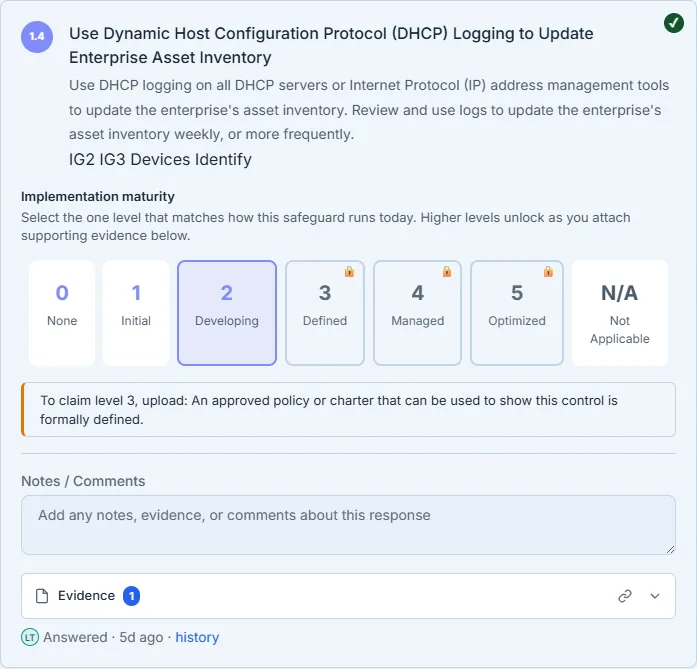
The levels are a staircase, not a menu. To claim Defined (3) you need the Level 2 evidence and the Level 3 policy; to claim Managed (4) you need 2, 3, and 4. You can’t skip a step — which is precisely what an auditor expects of a maturity model.
Step 6 — Attach the evidence against the right level
Every control card has an Evidence panel. Open it, click the link icon, and the picker leads with the tier progress for this control — a live readout of which level each rung of evidence satisfies. Here Level 2 is already green (“any document”), Level 3 needs a policy, and Levels 4 and 5 are locked behind it. You have two ways to satisfy the next rung:
- Link an existing artifact — browse everything already in your Artifact Repository: policies, procedures, KRIs, prior evidence. If the policy that satisfies this control already lives in Talarity, you link it; you don’t upload it twice.
- Upload a new file — switch the item type to Artifacts, click + Upload new, and the file is staged and added to the repository in one step.
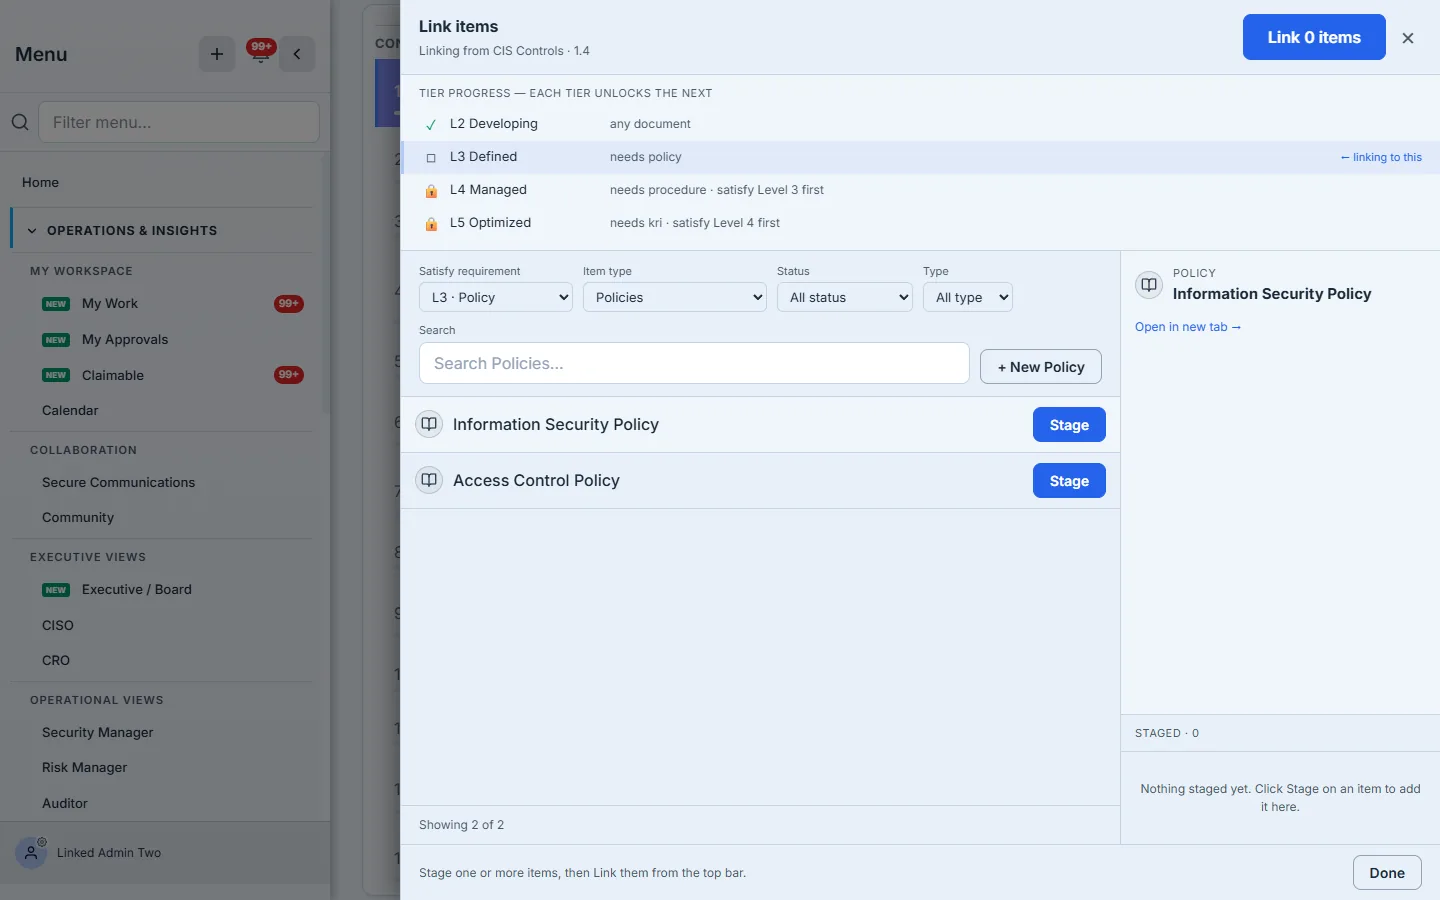
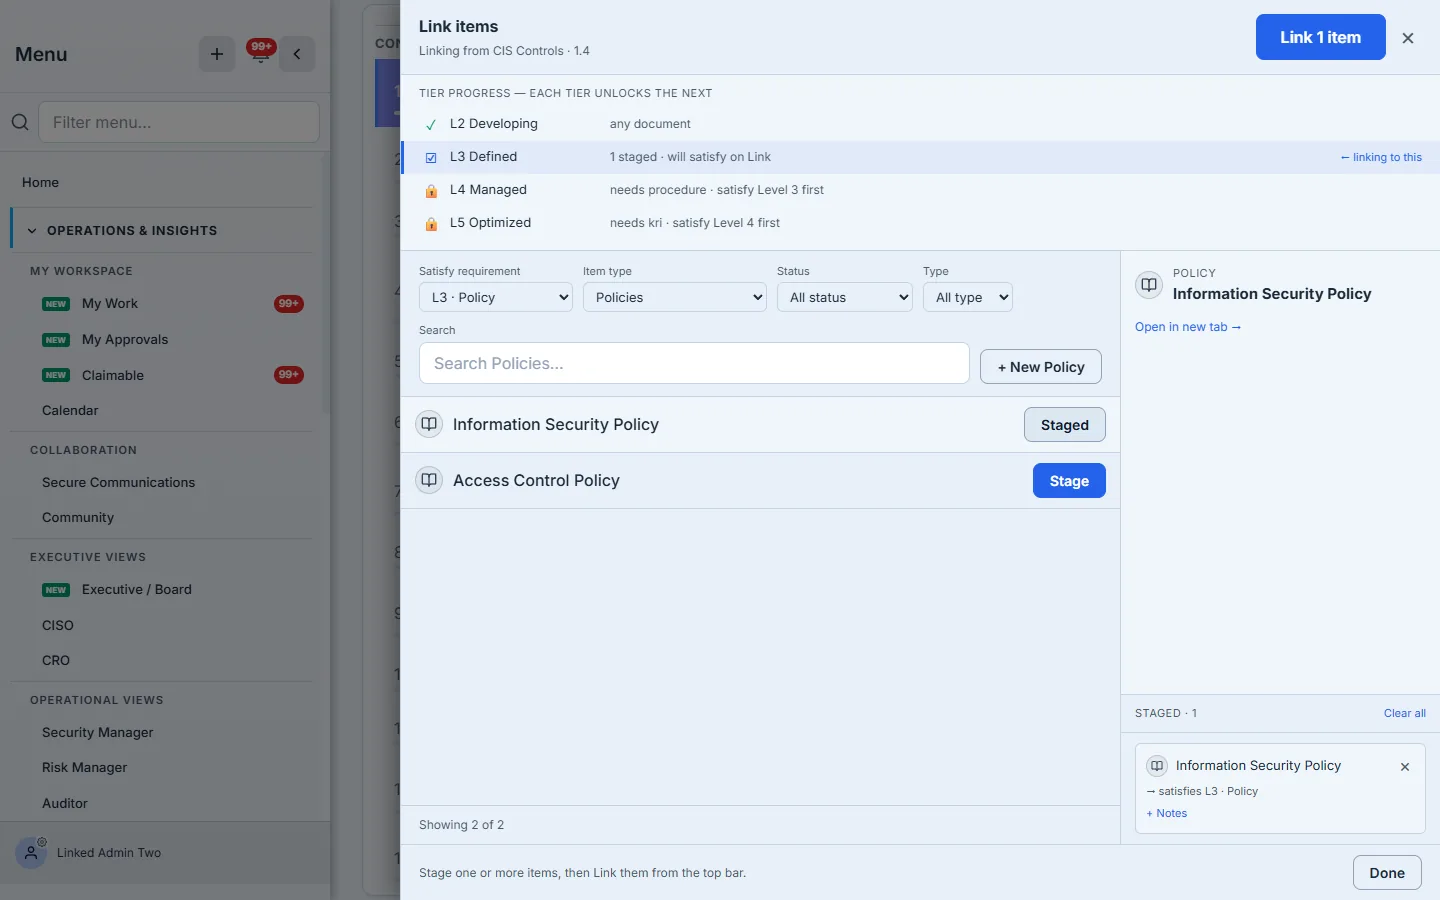
The Satisfy requirement dropdown is the part people miss. A document doesn’t just attach to the control — it attaches against a specific level. Stage your Information Security Policy as L3 · Policy and the staged item reads “satisfies L3 · Policy”; link the same file with no tier and it only counts as generic Level 2 evidence. You’re telling Talarity which rung of the staircase this proof is for.
Step 7 — Now the tile unlocks — and you select it
With the right evidence attached, the gate opens. The previously-locked tile lights up, and the “to claim level 3” hint clears. This is the step the mental model gets wrong: attaching evidence didn’t change your answer — it gave you permission to. You still click Defined to claim it.
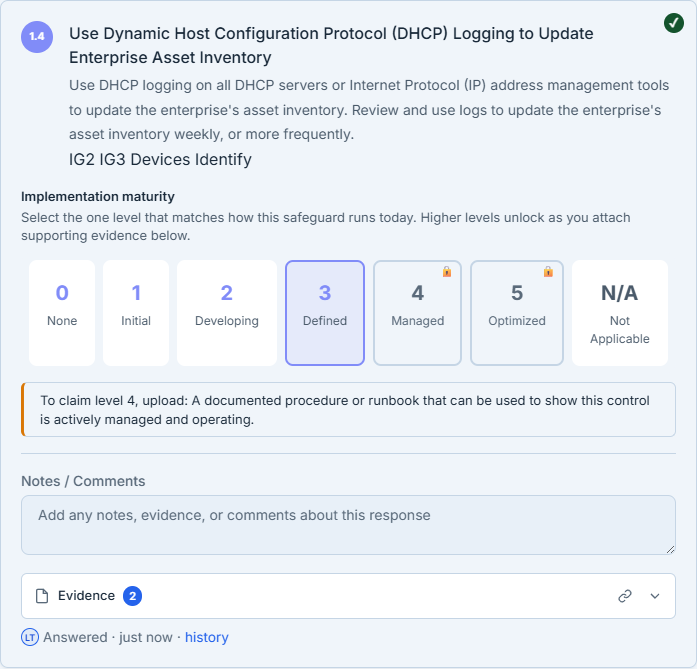
Upload, then choose. That two-beat — prove it, then claim it — is the whole gated model in one motion. Notice the hint didn’t disappear; it advanced one rung, now asking for the procedure that would unlock Managed. If you later remove the evidence, the claim drops back to the highest level you can still support; the rating and its proof never drift apart.
Step 8 — The evidence lives in the Artifact Repository, and it’s reusable
Look again at the picker in Step 6: the policies it offered — Information Security Policy, Access Control Policy — weren’t created for this control. They already existed in your Artifact Repository (/app/artifact-repository), the same place your audit reports, certificates, and DR evidence live, and you simply linked one. That’s the payoff of doing this properly: one document, many links.
The policy that proves Defined on a CIS control can be linked from the matching ISO 27001 control, next year’s CIS run, and a vendor questionnaire — uploaded once, reused everywhere, and every link still points at the single source file. Anything you do upload mid-assessment lands in the same repository and is immediately available to the next control that needs it. (Who is allowed to see each artifact is a separate control, covered in Lock down a document to one team.)
Step 9 — Know when a control is done, and submit
A control is “done” when it carries an answer — a maturity level, or Not Applicable with a justification. The green status stripe down the left edge of each answered card (you’ve seen it on every control above) and the per-domain counts in the left rail — 4 / 5, 0 / 7 — tell you where the gaps are at a glance, so you always know how much is left.
When every required safeguard has an answer, submit with Complete Assessment in the footer. Talarity runs a server-side completeness check and won’t let a run close with unanswered controls — the review step lists exactly what’s still outstanding, so finalizing is a decision, not a scavenger hunt. The result is a maturity rating where every claimed level above Initial has the evidence behind it, one click from the auditor’s question.
What you walk away with
- One answer per control — the single maturity level that’s honestly true today, not a row of checkboxes.
- Evidence that unlocks, not advances — levels 2–5 open only when their proof is attached, and you still make the claim.
- A staircase you can’t skip — Defined needs the policy and the developing evidence; Managed adds a procedure; Optimized adds a metric.
- Tier-tagged proof — every linked document is attached against the specific level it satisfies, so the gate and the auditor agree.
- A gate you control at three altitudes — the org default, a per-assignment requirement the assigner sets, and a per-run chip in the header for org admins — with one rule underneath: a gated completion satisfies any request, an ungated one never satisfies a gated request.
- A reusable evidence library — one artifact links to many controls and many assessments, uploaded once.
Open your CIS assessment this afternoon. Pick a control you know cold, set it to the level that’s actually true, and link the one document that backs it. The first control takes a minute; by the tenth, the prove-it-then-claim-it rhythm is automatic — and so is the audit trail behind every rating.