Risk-based due diligence is the whole point of a third-party program. SOC 2 CC9.2 expects you to assess and manage vendor risk — not treat every vendor identically. ISO 27001:2022 A.5.19 is explicit that the controls you apply to a supplier should be proportional to the risk. NIST SP 800-161 and the 2023 Interagency Guidance both build their entire model on risk-tiering: more scrutiny for the vendors that can hurt you most, less for the ones that can’t.
The failure mode is treating a payments processor that holds cardholder data and has admin access to your systems the same as a stock-photo subscription. Either you drown the low-risk vendors in questionnaires they don’t warrant, or you under-scrutinize the critical ones — usually both. And when the tier is set, it’s often a gut call nobody can defend at audit time.
Talarity makes tiering computed and defensible: an inherent-risk tier derived from weighted factors (not a hunch), and a tiering policy that turns each tier into concrete, automatic requirements — review cadence, required evidence, monitoring, SLAs, attestation. Effort follows risk, and the why behind every tier is on the record.
Who’s involved
- Program owner — sets the tiering policy (what each tier requires) and the scoring weights.
- Security analyst — classifies vendors; the engine computes the tier from the captured factors.
- Approver — when a computed tier needs an override, approves it (separation of duties).
- Auditor — reads the tier, the factor breakdown, the tier history, and any override’s justification.
What’s on the page
Vendor tiering lives across two surfaces — the policy that defines the tiers, and the per-vendor profile that lands each vendor in one:
- The tiering policy — what each tier requires: its review cadence, the required artifacts, and the monitoring / SLA / attestation flags. The edit-policy modal is where you set those per tier — cadence, required-artifact checkboxes, the flags, attestation cadence, and auto-open-findings.
- A vendor’s Risk Profile — the weighted factor breakdown that drives the vendor’s inherent tier, each factor showing its contribution and level.
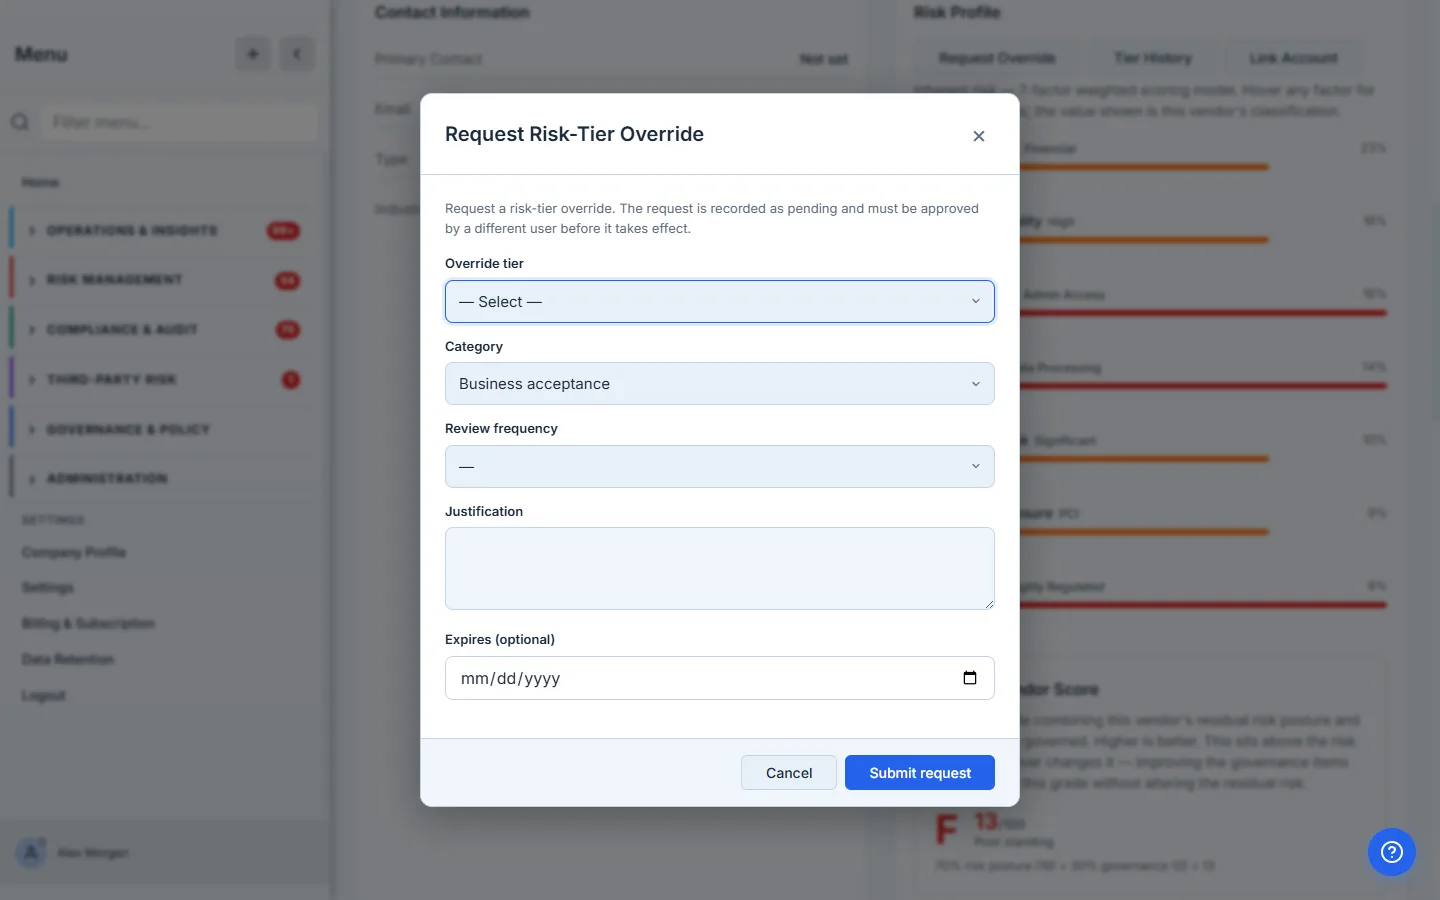
- The tier-override request — a governed manual change: target tier, category, review frequency, justification, and expiry, with the separation-of-duties requirement stated up front.
Step 1 — The tiering policy: make each tier mean something
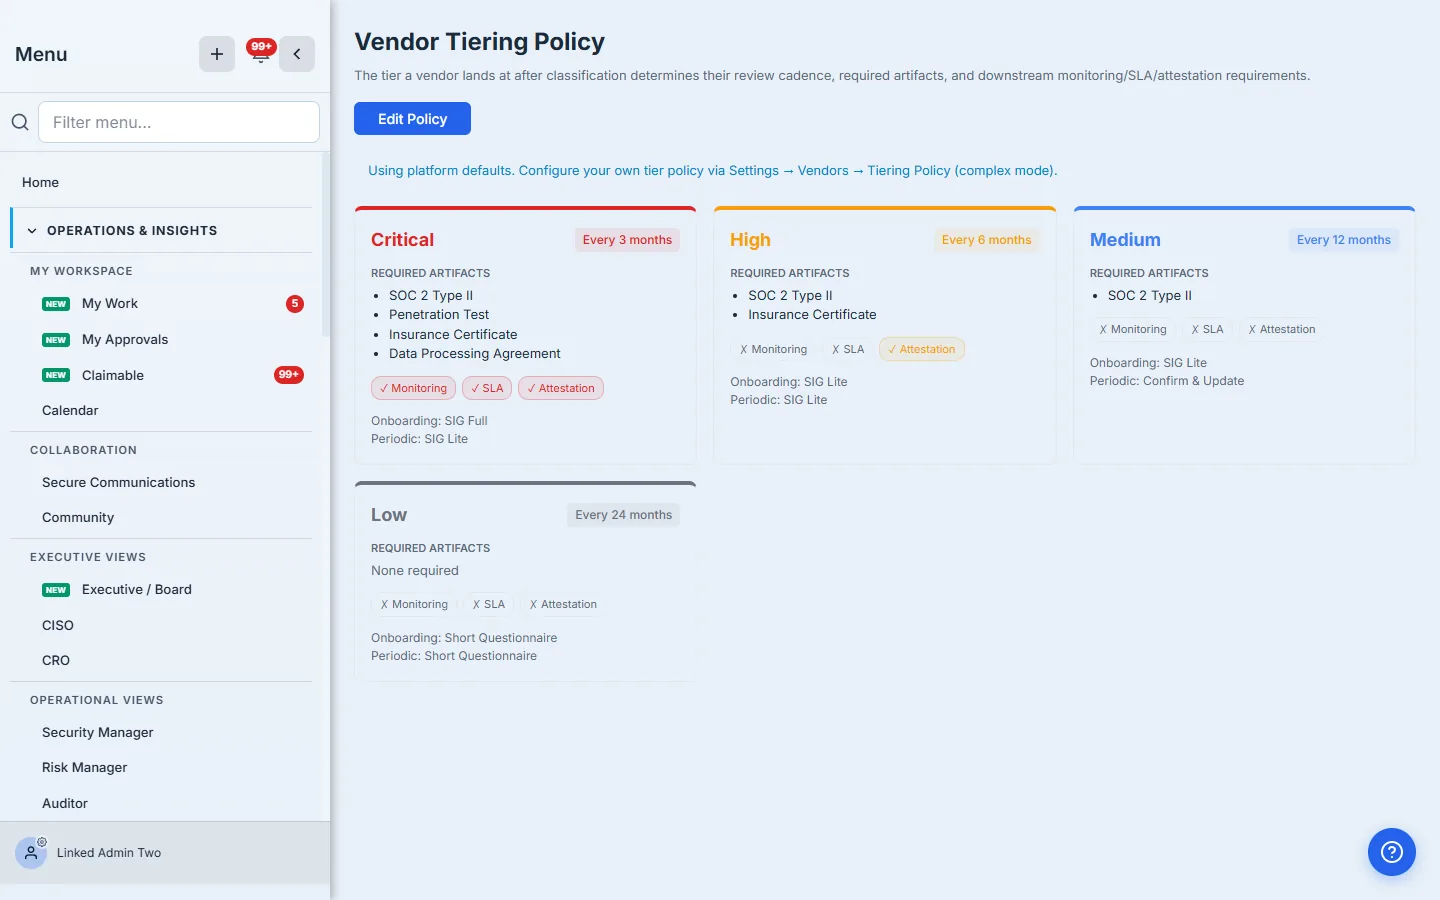
Open Tiering Policy (/app/settings/vendors/tiering-policy) — in the sidebar under Third-Party Risk → Vendor Inventory → Program Settings, where it is the second tab. This is where a tier stops being a label and becomes a contract. Each of the four tiers — Critical, High, Medium, Low — carries its own requirements.
Out of the box you get a sensible platform default, escalating with risk:
- Critical — reviewed every 3 months; requires SOC 2 Type II, a penetration test, an insurance certificate, and a data-processing agreement; monitoring, SLA, and attestation all on.
- High — every 6 months; SOC 2 Type II + insurance certificate; attestation on (continuous monitoring is off by default at this tier — turn it on if you want it).
- Medium — every 12 months; SOC 2 Type II; lighter ongoing requirements.
- Low — every 24 months; no required artifacts.
The cadence column is the single most valuable field on this page. It’s what turns “we should review vendors periodically” into a dated obligation the platform tracks for you — a Critical vendor that’s gone 4 months without a review surfaces as overdue automatically, instead of slipping until the next audit.
Step 2 — Tune the policy to your program
Click Edit Policy. Every tier is configurable: the review cadence, which artifacts are mandatory (SOC 2 Type I/II, ISO 27001, penetration test, insurance certificate, DPA, privacy attestation, BCP, incident-response plan, BCP test results), whether monitoring / SLA / attestation are required, the attestation cadence, and whether findings auto-open a remediation workflow.
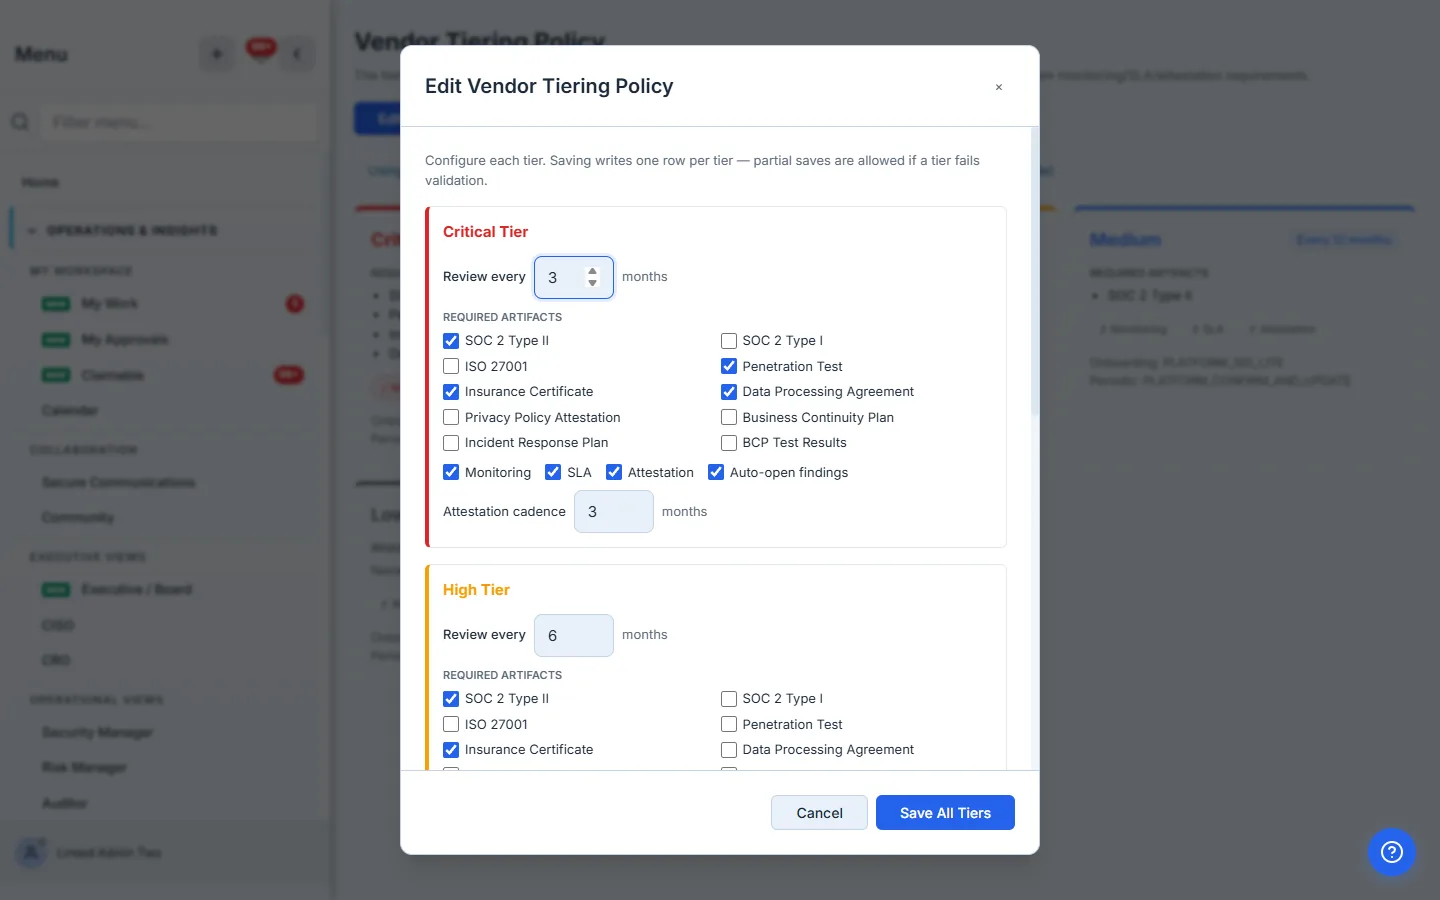
Saving writes one row per tier, so you can adjust Critical without touching Low. The point isn’t to max out every checkbox — it’s to encode your program’s policy once, so every vendor that lands at a tier inherits exactly the right requirements without anyone re-deciding.
Step 3 — How the tier is computed
A vendor’s inherent tier is computed from seven weighted risk factors captured during onboarding and classification — data sensitivity, business criticality, system access, service type, fourth-party exposure, regulatory exposure, and industry risk — each contributing a weighted share of a 0–100 score that maps to Critical / High / Medium / Low. Open any classified vendor and the Risk Profile panel shows the breakdown.
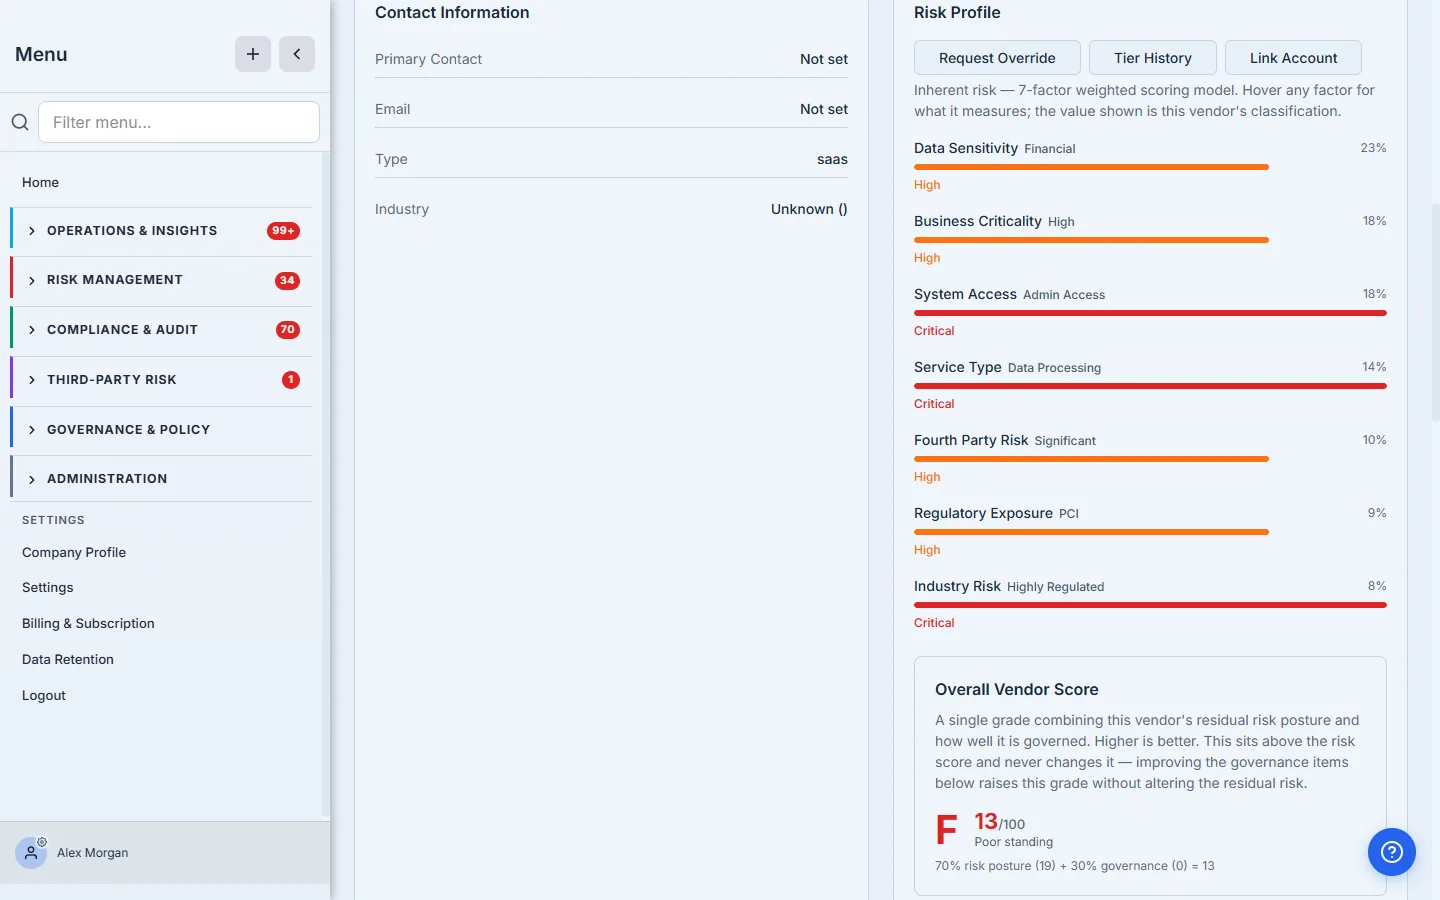
This is what makes the tier defensible: it isn’t a number someone picked, it’s the output of a transparent model. Two analysts classifying the same vendor with the same answers get the same tier — and an auditor can see exactly which factors drove it. (Program owners can tune the model org-wide in the Risk Matrix Builder at /app/vendor-risk-matrix — adjust the factor weights, which must total 100%, add custom factors, and move the score-to-tier thresholds (Critical ≥ 75, High ≥ 50, Medium ≥ 25, Low < 25), then Preview Impact to see which vendors would change tier before saving. The defaults reflect a data- and access-weighted model.)
Tier follows the answers, not the analyst. The most common way vendor programs lose credibility is inconsistent tiering — the same kind of vendor landing at different tiers depending on who assessed it. A weighted engine with a fixed policy removes that drift.
Classification also writes to the vendor’s tier history, so every tier change is dated and attributed — first classification, re-classification, or escalation. When an auditor asks “when did this vendor become Critical and why,” the answer is on the record. (The end-to-end classify flow — proposed → approve → classify → onboarding — is covered in the onboarding article.)
Step 4 — Overrides, with governance
Sometimes the engine is wrong — you know something the factors don’t capture, or a compensating control changes the picture. Talarity lets you override the computed tier, but never silently. On the vendor’s Risk Profile, click Request Override.
An override request is governed:
- It requires a manual tier and a justification, with an optional category (defaults to business acceptance), review frequency, and expiry.
- It’s recorded as pending and must be approved by a different user — separation of duties is enforced server-side; you cannot approve your own override.
- Once approved, the override becomes the vendor’s effective tier and is logged with who requested it, who approved it, and when. Revoking it reverts the vendor to the computed tier. If you set an expiry, it lapses automatically.
An override is a decision, so Talarity makes you record it like one. The category + justification + approver are exactly what an auditor needs to see that an off-model tier was a deliberate, accountable choice — not someone quietly changing a number.
Step 5 — Residual risk: controls reduce inherent risk
Inherent risk is the vendor before your controls. Residual risk is the vendor after the compensating controls you’ve verified. On the Risk Profile you’ll see both — Inherent → Residual — and the percentage reduction your verified controls earn. A vendor with strong, tested controls can carry a lower residual tier than its inherent tier, and the reduction only counts for controls with a usable effectiveness signal — a formal test result or a recorded effectiveness rating. (Linking compensating controls and computing residual risk is its own walkthrough.)
What you walk away with
- A tiering policy that turns each tier into concrete, automatic requirements — cadence, evidence, monitoring, SLAs — so effort follows risk instead of being spread evenly.
- An inherent tier computed from weighted factors, transparent and repeatable, with a factor breakdown an auditor can read.
- A tier history that dates and attributes every change.
- Governed overrides — category, justification, separation-of-duties approval, expiry — so off-model tiers are accountable, not quiet.
- A clear inherent → residual view so verified controls measurably reduce a vendor’s risk.
Open /app/settings/vendors/tiering-policy, set what Critical actually requires for your program, then classify your highest-risk vendor and read its factor breakdown. The tier you get is one you can defend — and the cadence it carries is one the platform will hold you to.
Related: the tier is inherent risk; what you actually carry afterwards is residual risk once your controls are applied. Tiering also sets reassessment cadence, which is where vendor monitoring takes over. Overview: vendor risk management.