Every framework that touches your security program expects you to know what equipment you own, who holds it, and to prove you got it back when someone left. ISO 27001:2022 is explicit: A.5.9 wants an inventory of assets, A.5.10 an acceptable-use posture, and A.5.11 the return of assets on termination. SOC 2 splits it across CC6.1 (access provisioned and tracked), CC6.2 (registered and authorized), and CC6.3 (removed on termination). NIST CSF 2.0 ID.AM-1 and NIST SP 800-53 CM-8 both want a current hardware inventory; PS-4 wants property retrieved when personnel are terminated.
Most teams run this out of an IT ticket queue and a spreadsheet, and the spreadsheet is always a quarter behind. Talarity makes the custodian a first-class role: you own one or more asset categories, and every equipment task that belongs to those categories — issue it to a new hire, grant a SaaS seat, recover a laptop, revoke access — routes to you automatically, with the device’s serial captured at the point of handover and a full ledger an auditor can read.
This article is written for the custodian — the person who actually hands out and takes back the gear. Building the joiner bundles that trigger onboarding is covered in New-hire onboarding, gated end-to-end; syncing devices from Intune or Entra is covered in Managing assets with Intune. Here we live in the custodian’s chair.
Onboarding isn’t the only thing that fills your queue. When someone files an Asset / Equipment request through the guest request portal, approving it creates a pending provisioning assignment that lands right here — in the custodian’s queue for the matching category. See From request to fulfillment.
Who’s involved
- Custodian — you. Owns one or more asset categories; issues, recovers, and revokes the equipment that belongs to them. Works out of a single queue.
- HR / People ops — applies a joiner bundle to a new hire (which fills your queue) and offboards leavers (which fills it again, with recovery work).
- Employee — the new hire who receives the gear and confirms receipt; the leaver whose equipment you reclaim.
- Auditor — pulls the record: which serial-numbered device went to which person, on what date, and the evidence it came back.
What’s on the page
Where this lives. Custody runs out of Talarity’s Workforce category — Custodians sits in the Assets & Licenses section alongside the Asset Catalog and Licenses & Subscriptions. Workforce is in Early Access.
Custody is run from Custodians (/app/workforce/custodians), under the Workforce category:
- Categories tab — the org’s asset tree (Hardware, Software, Cloud, Data, People, Facilities, Network); assign an owner per category, and every sub-type beneath it inherits that owner unless you override it.
- By Person / By App tabs — the same custody seen from the holder’s or the application’s side.
- Provisioning Queue — onboarding kits to issue and offboarding holdings to reclaim.
- Assign / Change / Remove — the per-category and per-asset custodian actions; a ⚠ no-login chip flags a holder without an account.
Step 1 — Own your categories
Custody starts on /app/workforce/custodians. The Categories tab is the org’s asset tree — Hardware, Software, Cloud, Data, People, Facilities, Network — and you assign an owner to each. Click Assign on a category and pick the person who’ll be responsible for the equipment filed under it.
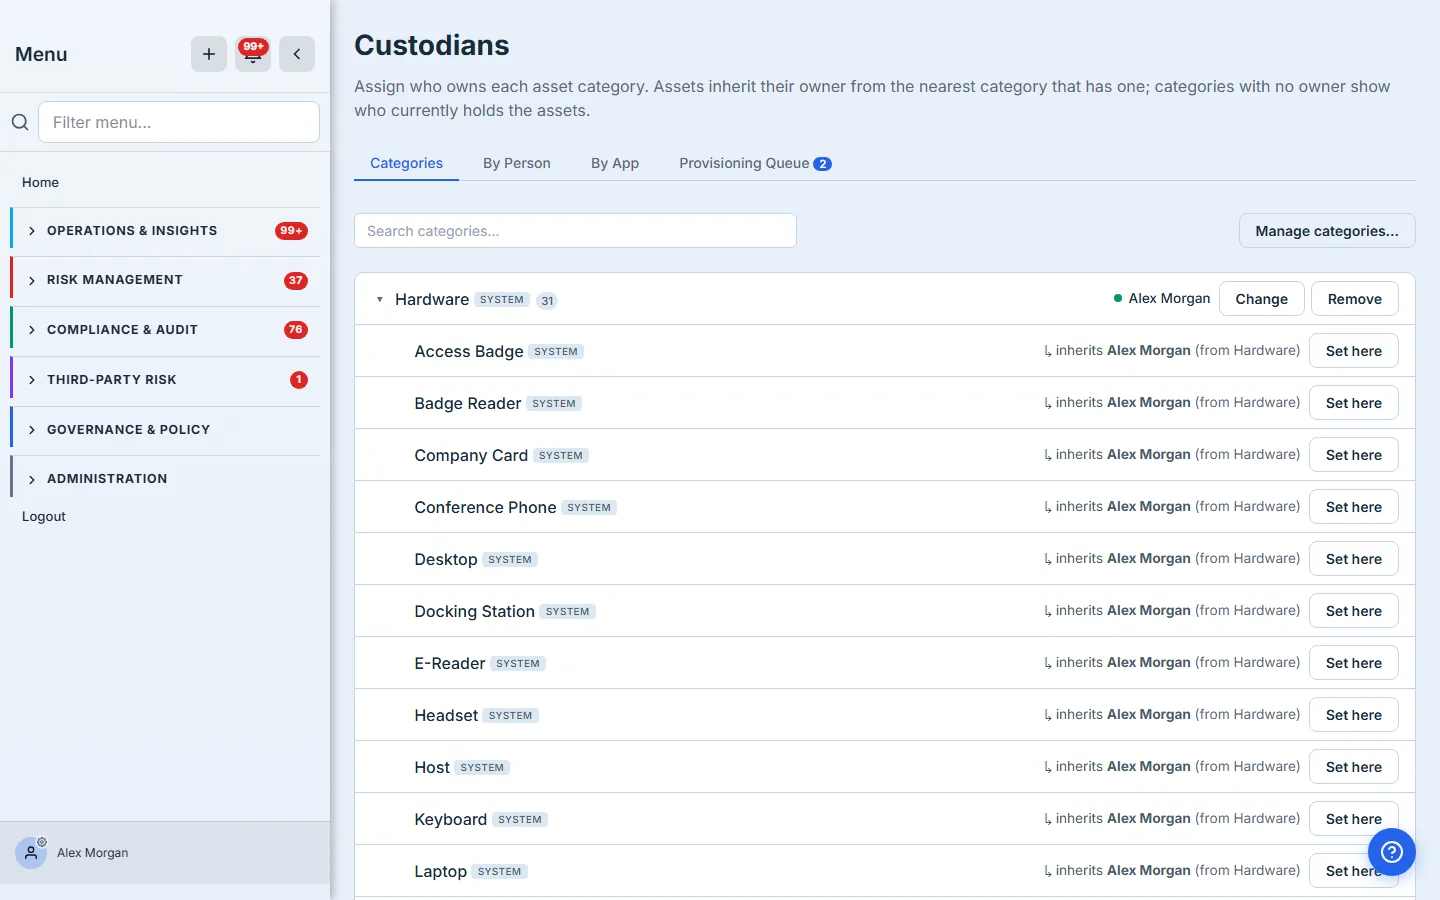
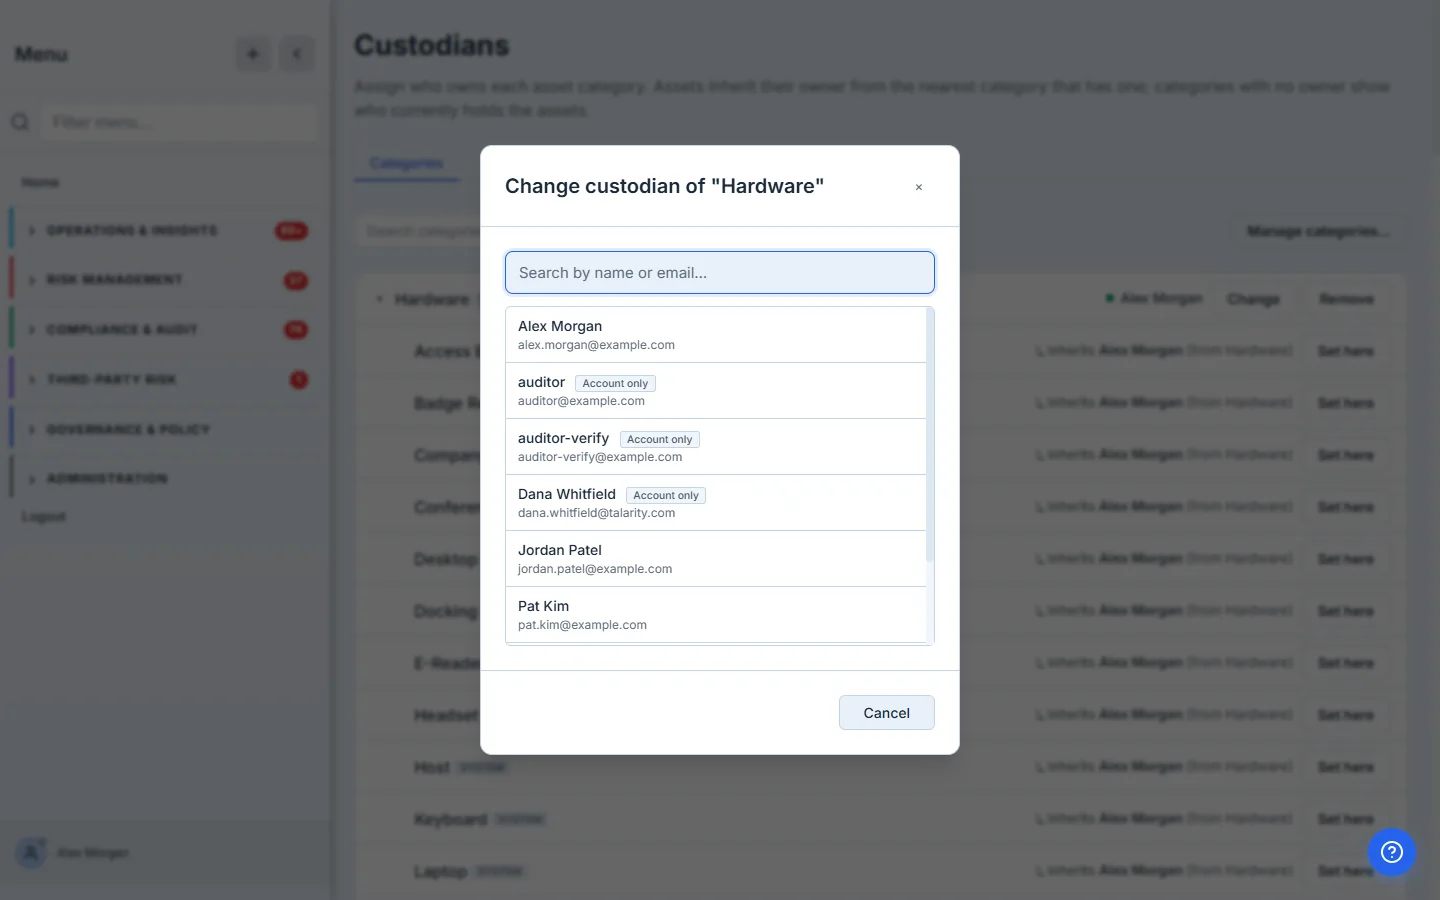
Custody is the routing table for every equipment task. When a laptop needs issuing, Talarity looks up the asset’s category, finds the nearest owner, and drops the work in their queue. Set this once and the rest of the workflow has somewhere to go. Leave it blank and the work has nowhere to land.
Behind the scenes the custodian you pick is resolved down to a real platform login (by matching email). That login is what lets the work item reach a My Work queue. A custodian who is on the roster but has no platform account yet can still be named — Talarity just flags it (more on that next).
Step 2 — Get granular: custody by sub-type
You rarely want one person owning all hardware. Phones, laptops, and access badges often belong to different people. Talarity’s category tree is hierarchical, so you can set custody at whatever depth matches how your team actually works — and anything you don’t override inherits the nearest owner above it.
Here, Hardware belongs to Alex Morgan, so Conference Phone inherits Alex. But the Phone sub-type is owned outright by Sam Rivera — a deliberate override, set with Set here. Every phone now routes to Sam; every other piece of hardware still routes to Alex.
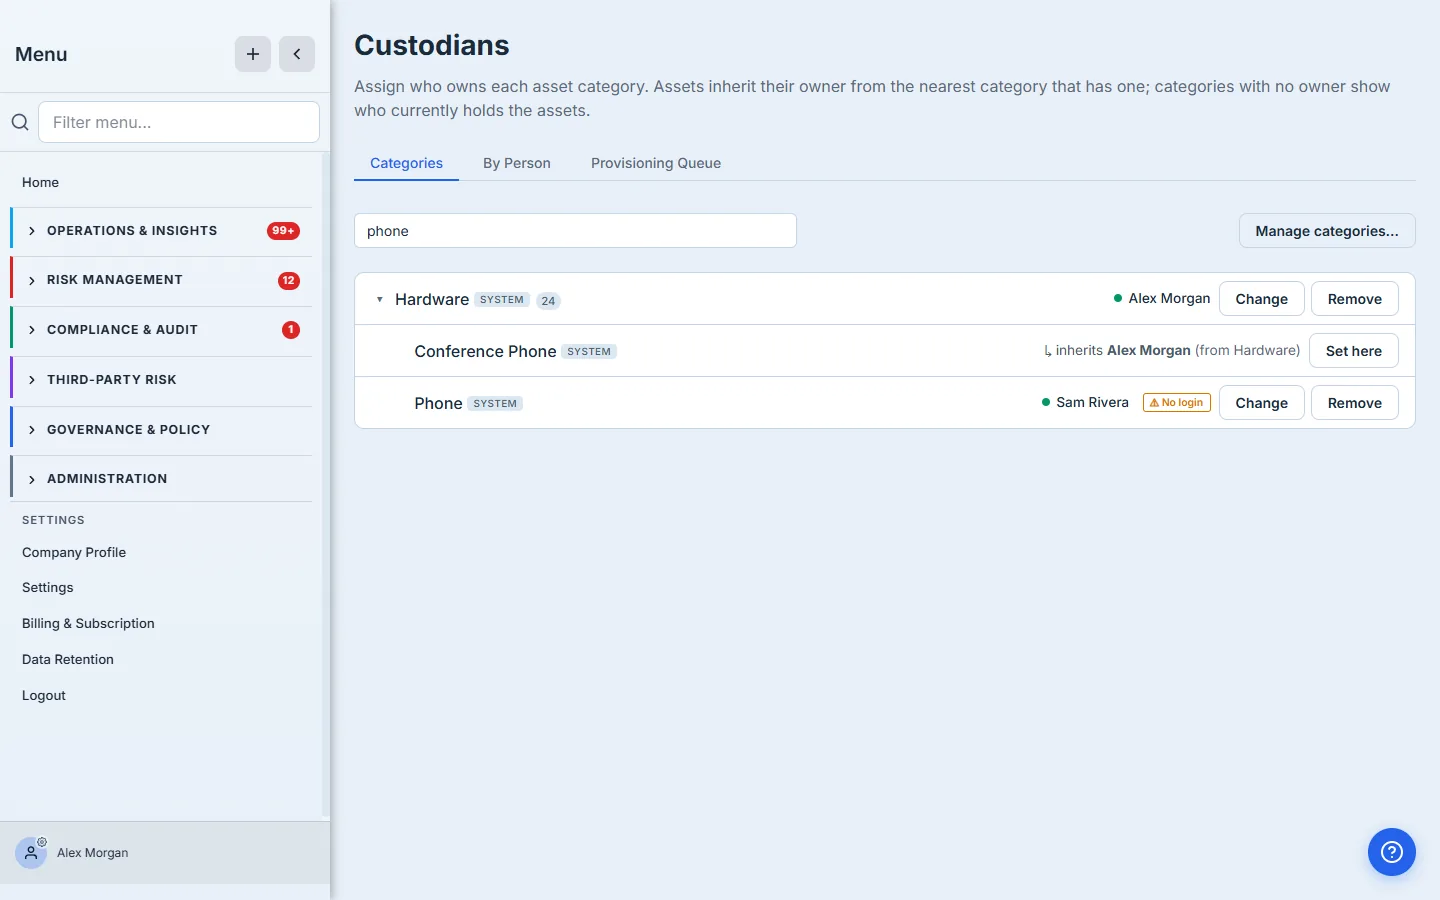
The nearest-ancestor rule means you only set what’s different. Own “Hardware” once and every laptop, monitor, and dock inherits it. Carve out “Phone” for the person who runs mobility, and only phones move. You never have to touch the dozens of sub-types in between.
Notice the ⚠ No login badge on Sam. Sam is on the roster but isn’t a platform user yet, so work routed to Sam would fall through to the org’s fallback assignee instead of reaching a real inbox. The badge is Talarity telling you to link Sam to a login (a user account with the same email) so the routing actually lands. It’s a warning, not a wall — the assignment still records who should own phones.
Step 3 — Live out of your queue
Everything you owe lands in one place: the Provisioning Queue tab. It groups open equipment and access work by employee and tags each row with what kind of action it needs:
- Issue — hand over a physical device (laptop, monitor, phone).
- Grant — provision a SaaS seat or system access.
- Recover — take a physical device back.
- Revoke — cut off access in the source system.
The three filters at the top scope the list: My items (assigned to you), Unrouted (work that fell to the fallback because a category has no reachable custodian — your cue to fix custody on the Categories tab), and All open.
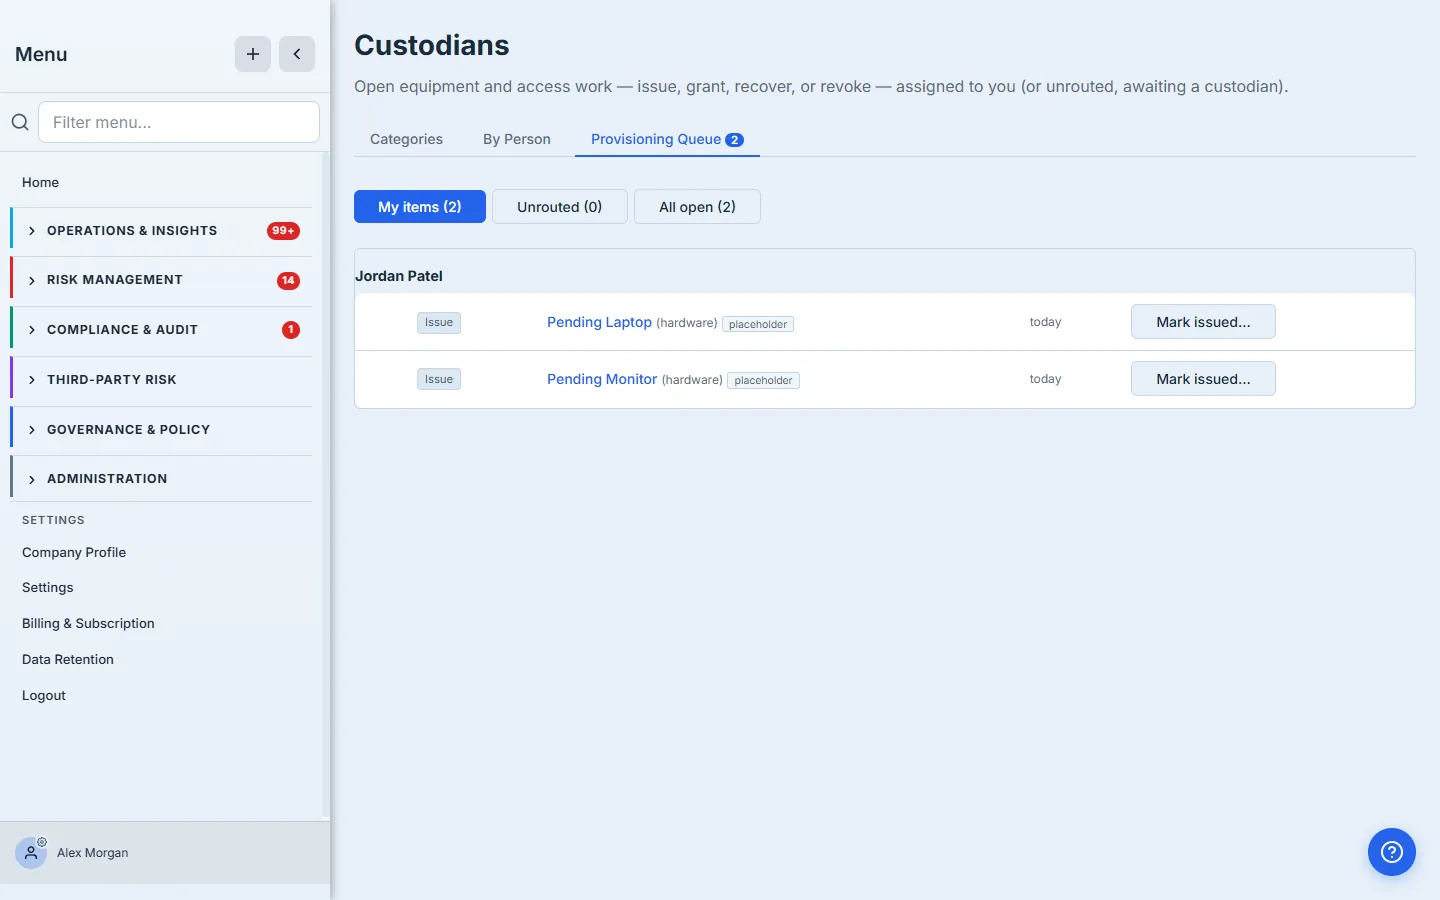
This is the screen a custodian keeps open. It doesn’t matter whether the work came from a new-hire bundle, an offboarding, or a one-off request — if it’s equipment in your categories, it’s here.
Step 4 — Onboarding: issue a new hire’s kit
When HR applies a joiner bundle to a new hire, every equipment line becomes a pending assignment and raises an Issue work item routed to its custodian. Placeholder items — “Pending Laptop” — are deliberate stand-ins: a fresh slot per hire that you resolve to a real device when you hand it over. (Building those bundles is the joiner-bundle onboarding workflow; from your chair, you just see the work arrive.)
Open the item and click Issue Asset…. Talarity asks the one question that matters — which physical device are you handing over? — and gives you two ways to answer:
- Pick one already in inventory. Search your unassigned devices and select the actual unit. The assignment re-points to that device and the placeholder is discarded. This is the path when the machine is already tracked — synced from Intune, or sitting in your spares pool — so you never re-type a serial or accidentally create a second record for a device you already own.
- Add a new one. If it isn’t tracked yet, record it — name, manufacturer, model, serial, asset tag — and Talarity promotes the placeholder into a real, named asset assigned to the hire. Type a serial that already exists and it stops you, pointing you back to Pick one in inventory so duplicates can’t sneak in.
The modal opens on whichever path fits: the inventory list if you have matching unassigned devices, the new-device form if you don’t.
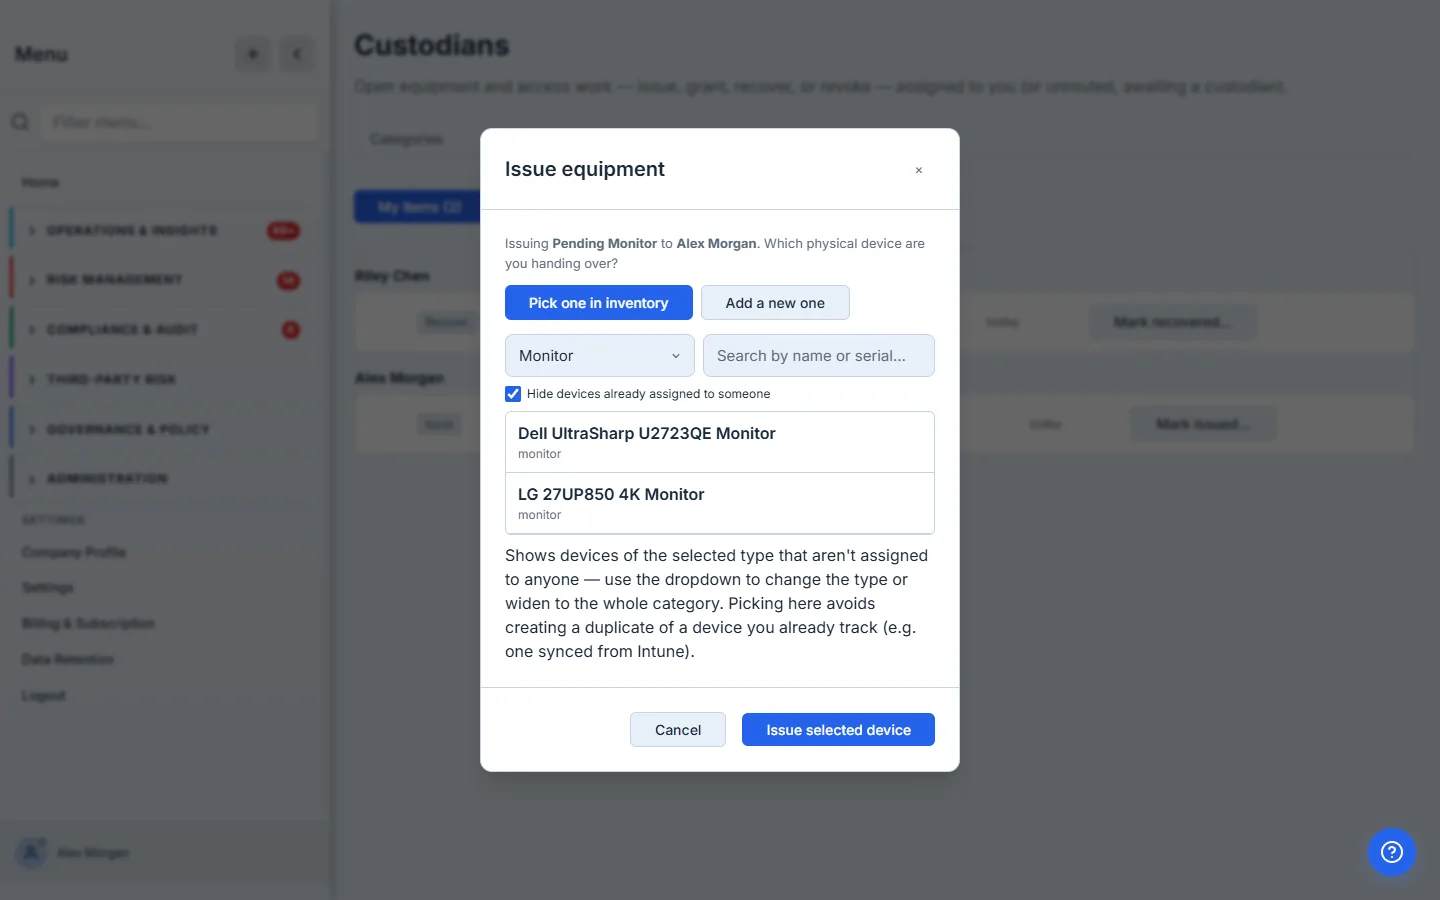
Issuing the device flips the assignment to active, records the serial against the person and the date, and completes your work item. Then it re-checks the new hire’s bundle: when the last item is issued, the bundle releases — the employee’s policy acknowledgements go out and they’re asked to confirm receipt.
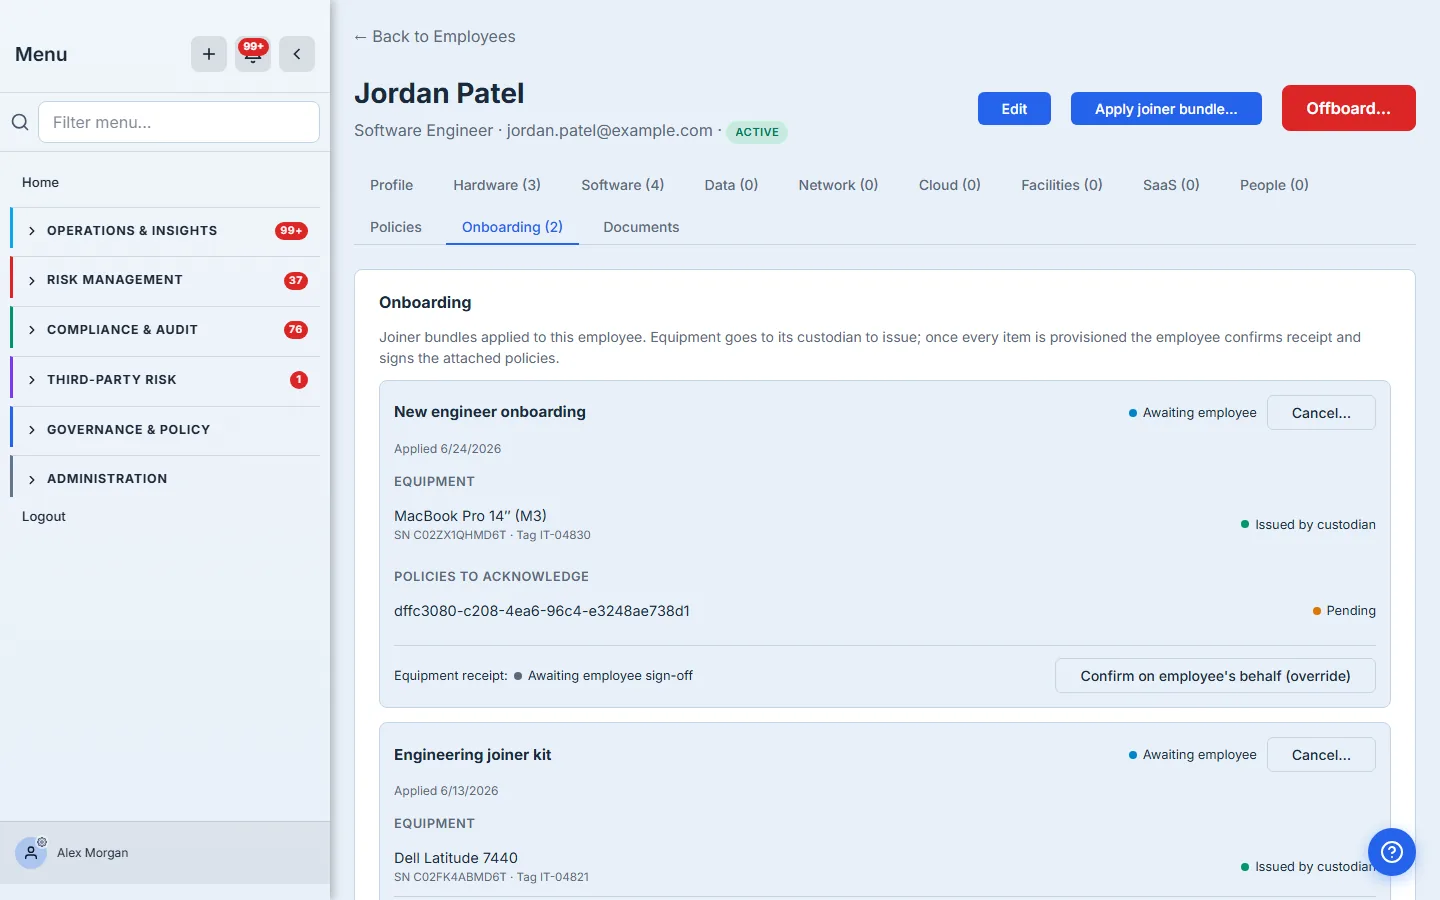
You shouldn’t have to know a serial by heart. That’s the point of “pick from inventory” — the device is already in Talarity, synced from your MDM or logged when it arrived, so you’re confirming which unit goes to whom, not transcribing a barcode. Either way the serial ends up welded to the person, the date, and the onboarding record — queryable forever, not buried in a closed ticket.
Step 5 — New, added, or upgraded equipment
Not every device comes through a bundle. Someone needs a second monitor; an engineer’s three-year-old laptop is up for refresh. You assign gear directly from the employee’s profile: open their Hardware tab and click + Assign. Pick an existing un-issued device from the pool, or + Create asset to register a brand-new one inline — and it’s assigned in the same step.
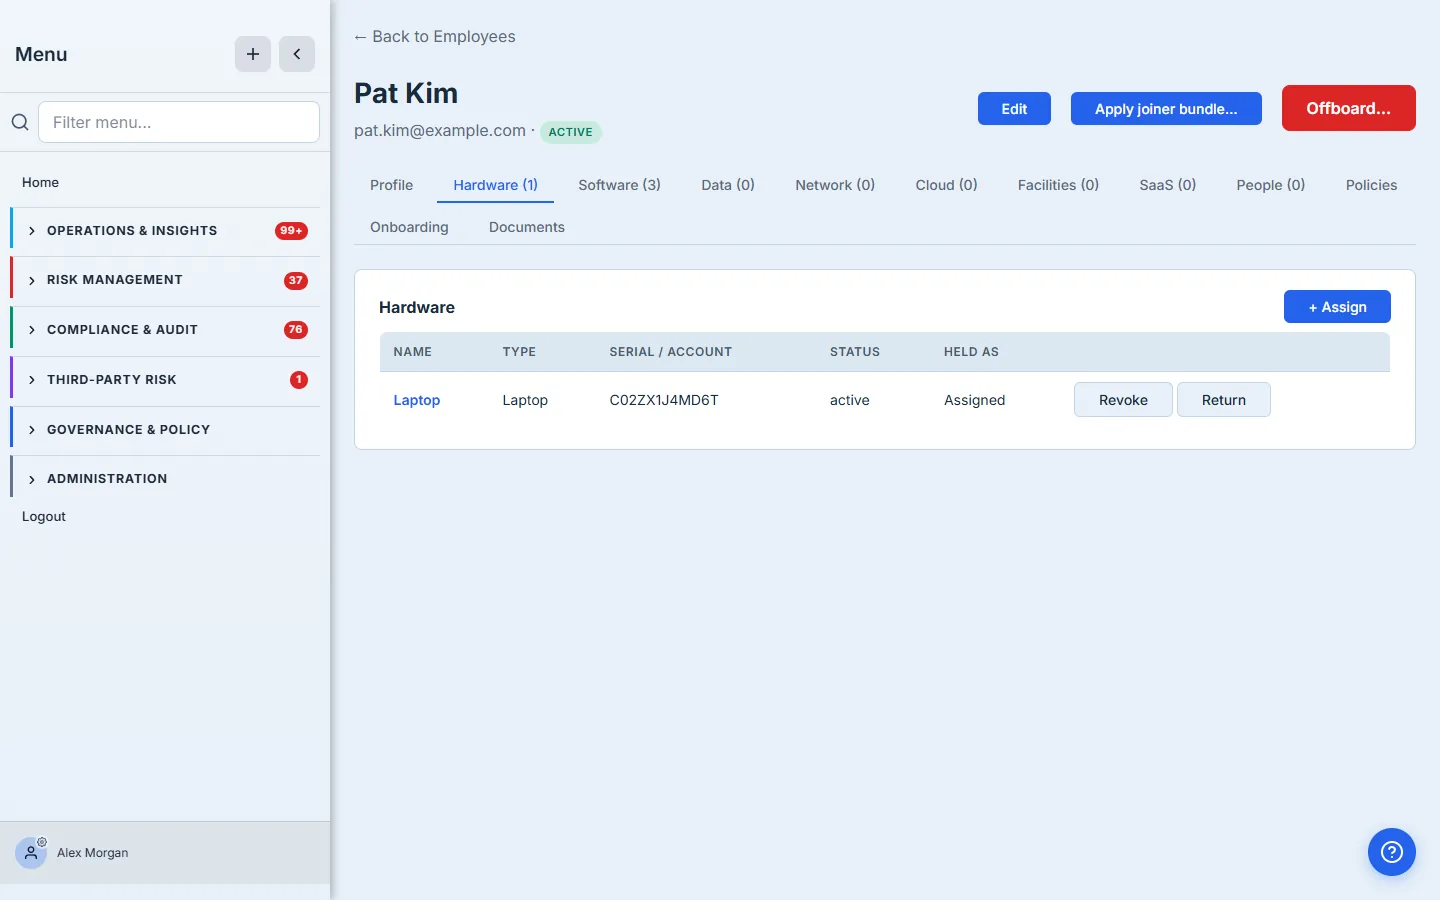
An upgrade is just the two halves together: assign the new device, then return the old one (Step 7). The person is never shown holding two laptops they don’t have, and the retired machine drops back into the pool or out of service with its history intact.
Step 6 — Keep the record straight
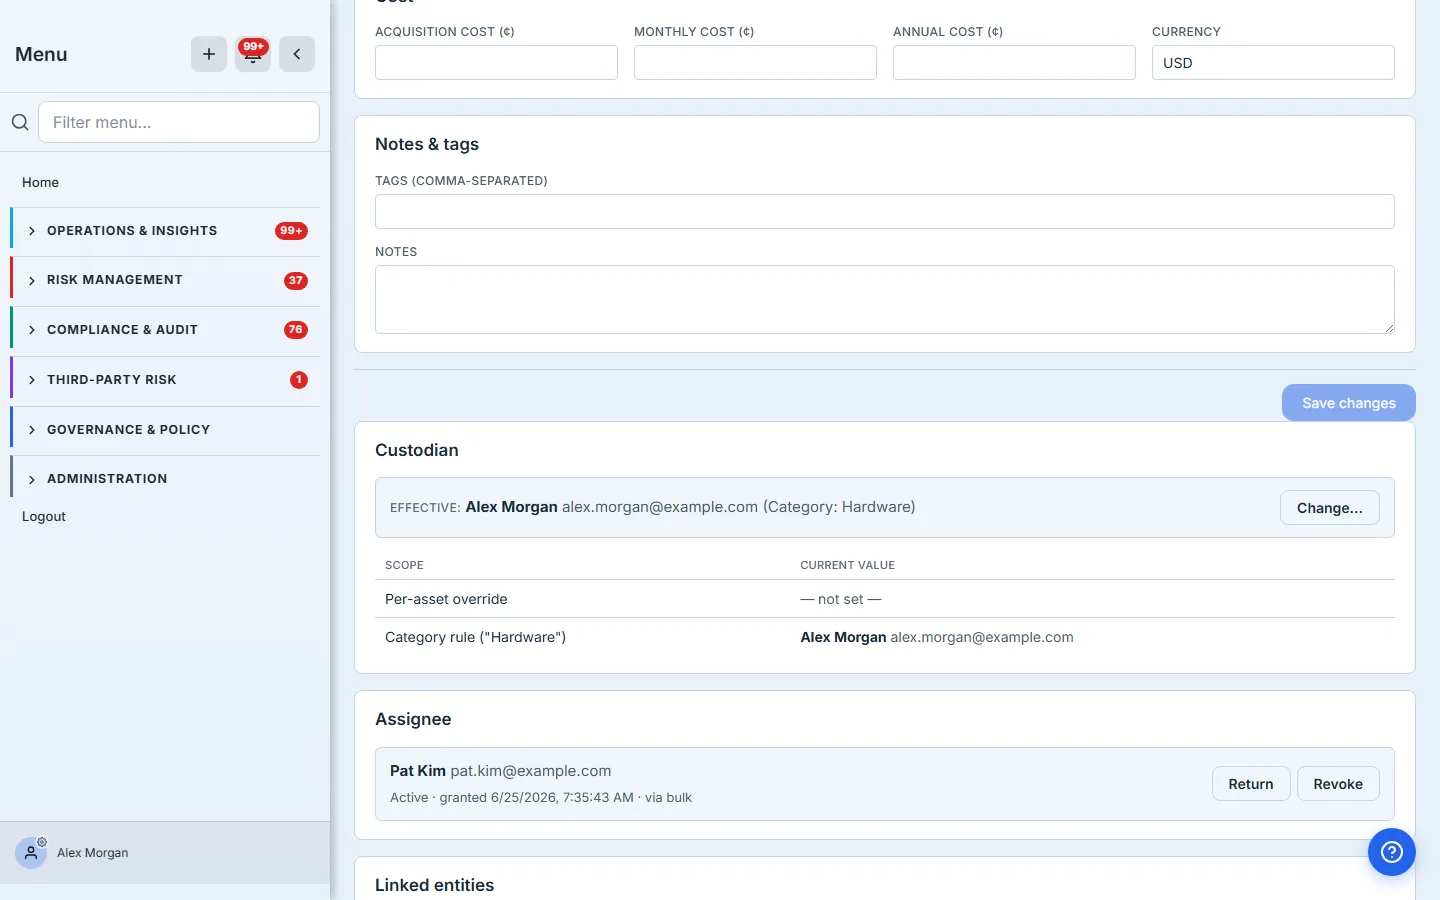
Click any device to open its detail page — the single source of truth for that asset. Everything is editable in place: name, sub-type, criticality, the full device identity (manufacturer, model, serial, OS, MAC, location), cost, and the lifecycle state. The lifecycle is a state machine, so the page only offers the transitions that make sense from where the device is now — an active laptop can move to Maintenance, Renewal Due, or Decommissioning.
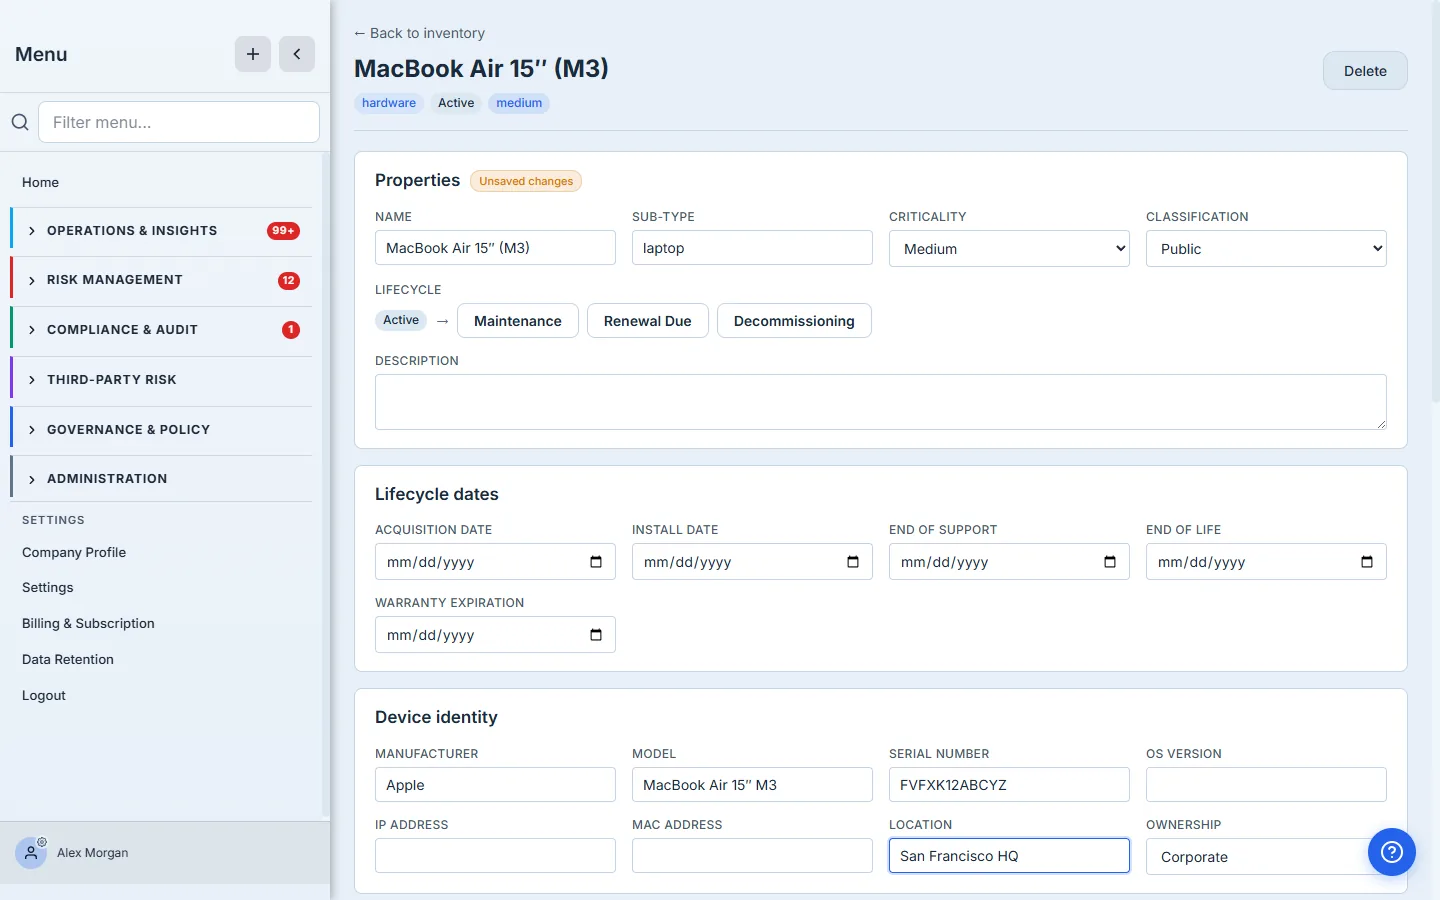
Lower on the same page sit the two relationships that matter to a custodian: who owns it and who holds it. The Custodian block shows the effective owner and how it was resolved — here, “Category: Hardware” tells you this laptop is Alex’s because it inherits the Hardware rule, with a per-asset override available if this one device needs a different owner. The Assignee block shows the current holder, when it was granted, and the Return and Revoke actions.
Step 7 — Remove equipment: return vs. revoke
Two verbs, two meanings — and Talarity keeps them distinct because auditors do too.
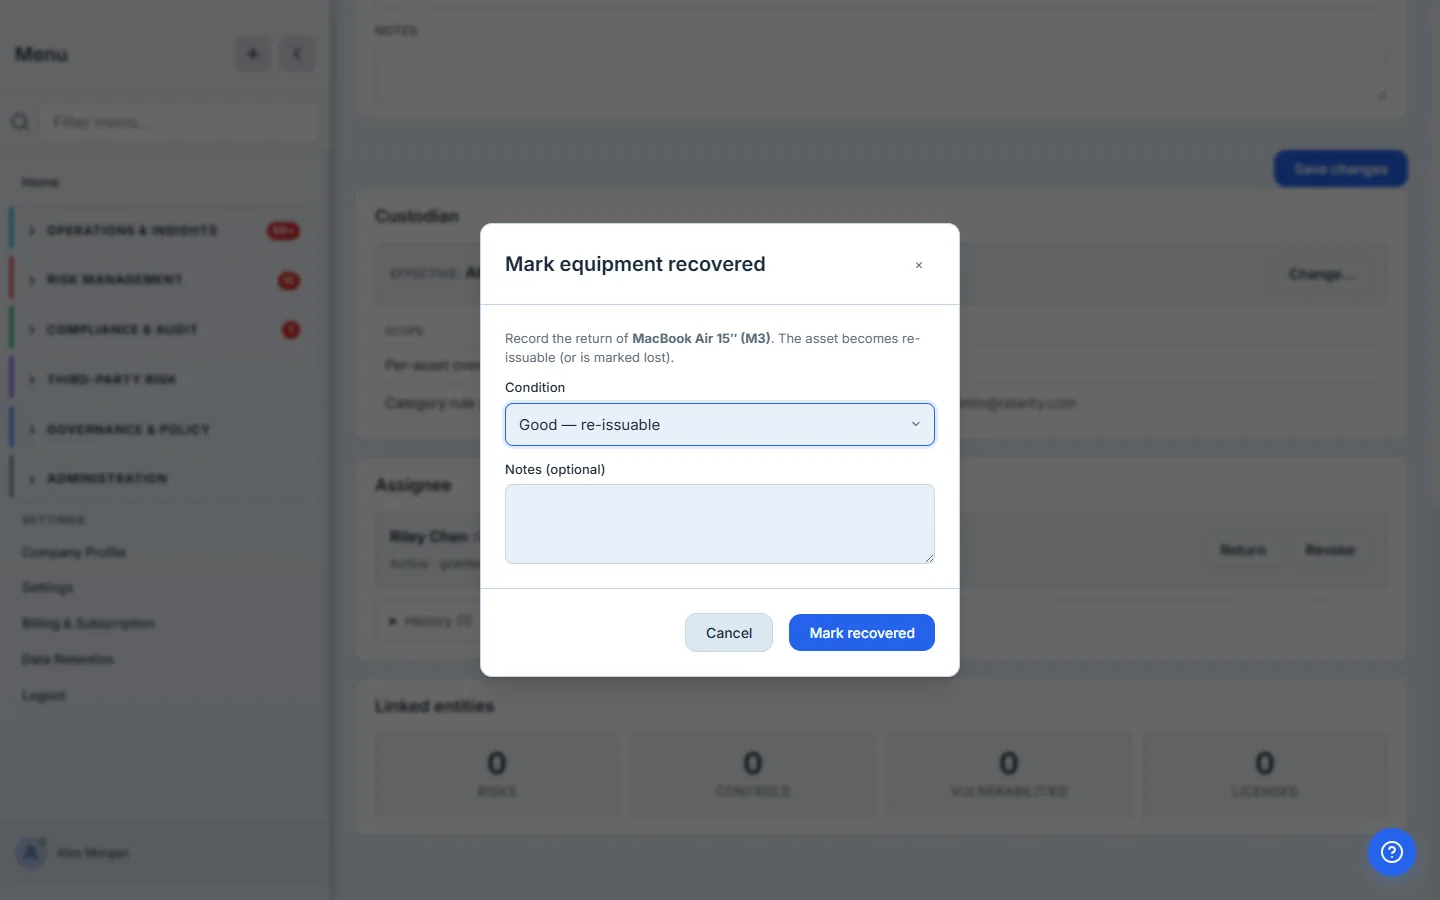
Return is for physical things you get back. It asks for the device’s condition — Good (re-issuable), Damaged, or Lost — so a cracked-screen laptop or a never-returned phone is recorded as such, not silently closed. A good-condition return drops the device back into the pool for the next hire.
Revoke is for access you cut off — a SaaS seat, a system account. It captures a reason and confirms the access was actually removed in the source system.
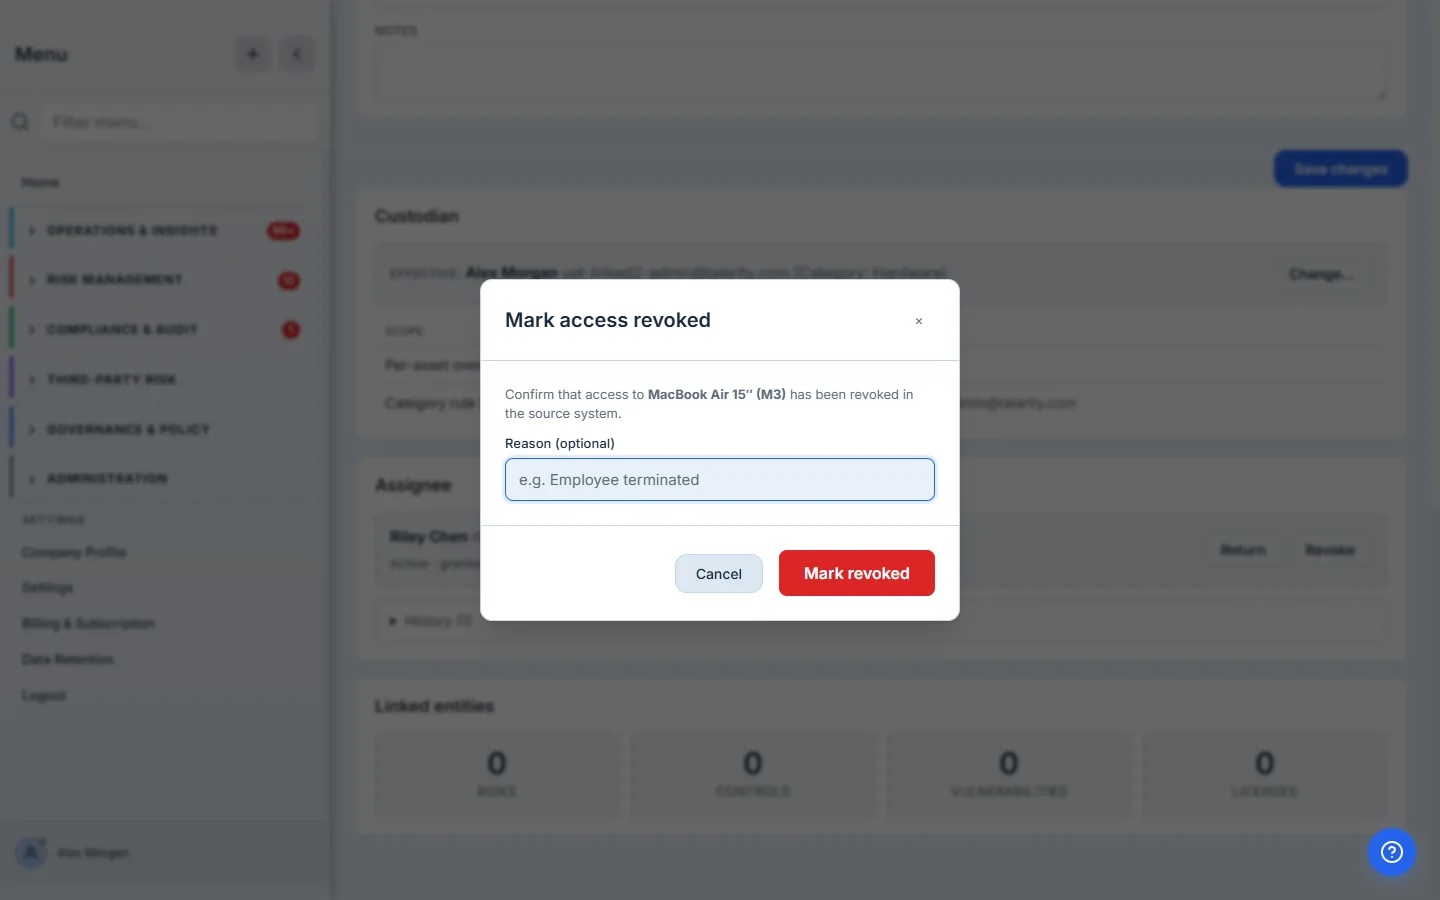
Use the verb that matches what really happened. “Return” with condition Lost is how you prove, six months later, why that asset isn’t in the pool. “Revoke” with a reason is how you prove the SaaS seat was actually pulled, not just marked done. Closing everything with a single ambiguous “done” is exactly what an auditor won’t accept.
Step 8 — Offboarding: reclaim everything a leaver holds
When HR offboards someone, Talarity doesn’t leave the equipment dangling. Offboard marks the employee terminated, moves every open assignment to pending revocation, and raises one recovery work item per device, routed to that device’s custodian — the same routing table from Step 1, working in reverse.
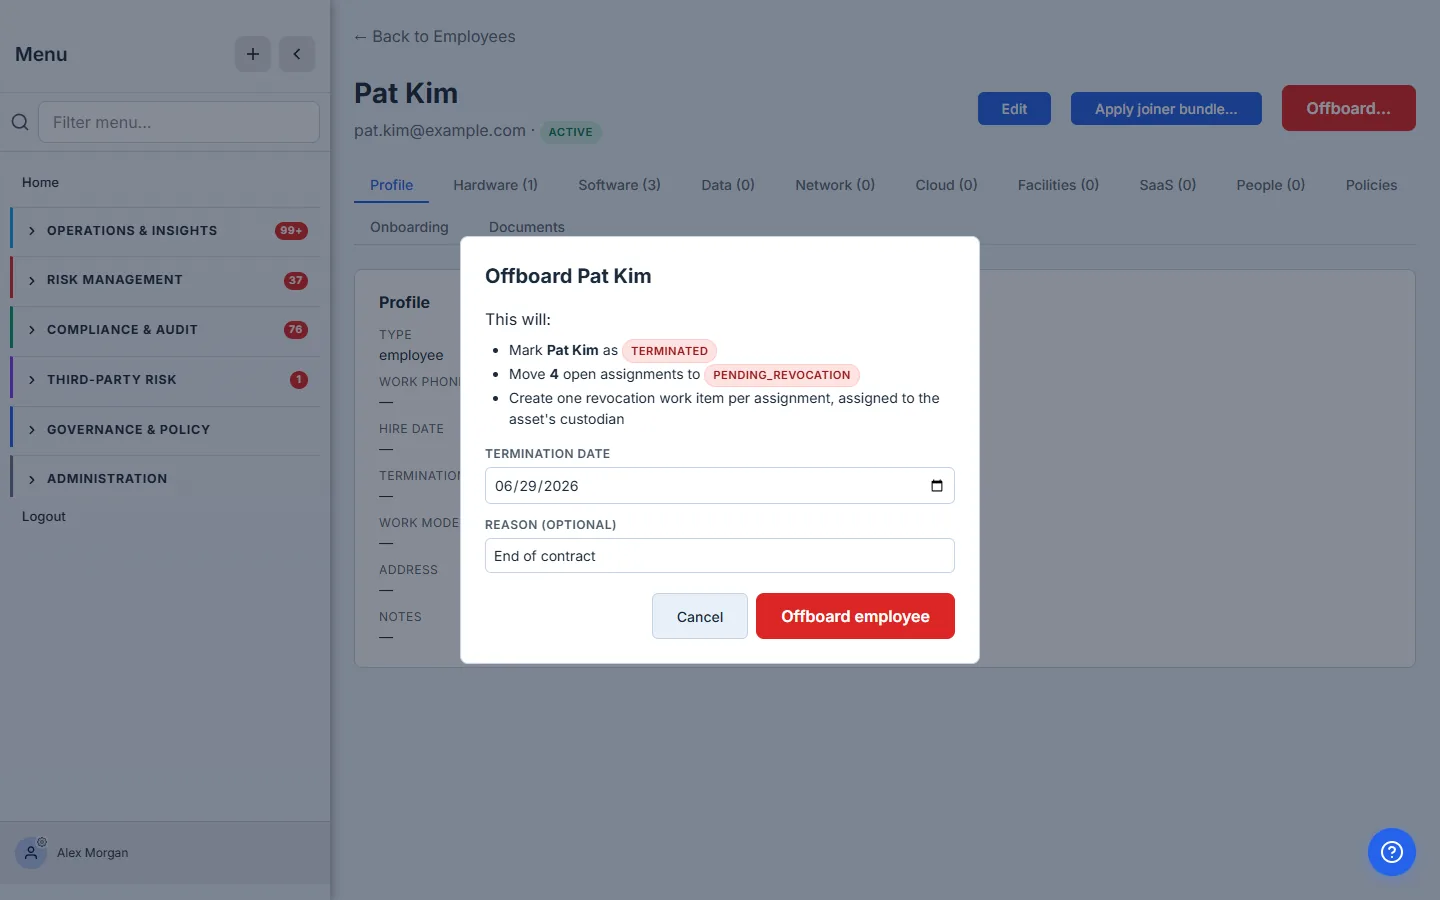
Those recovery items land right back in your Provisioning Queue as Recover (and Revoke) rows — so the person who issued the laptop is the person asked to get it back.
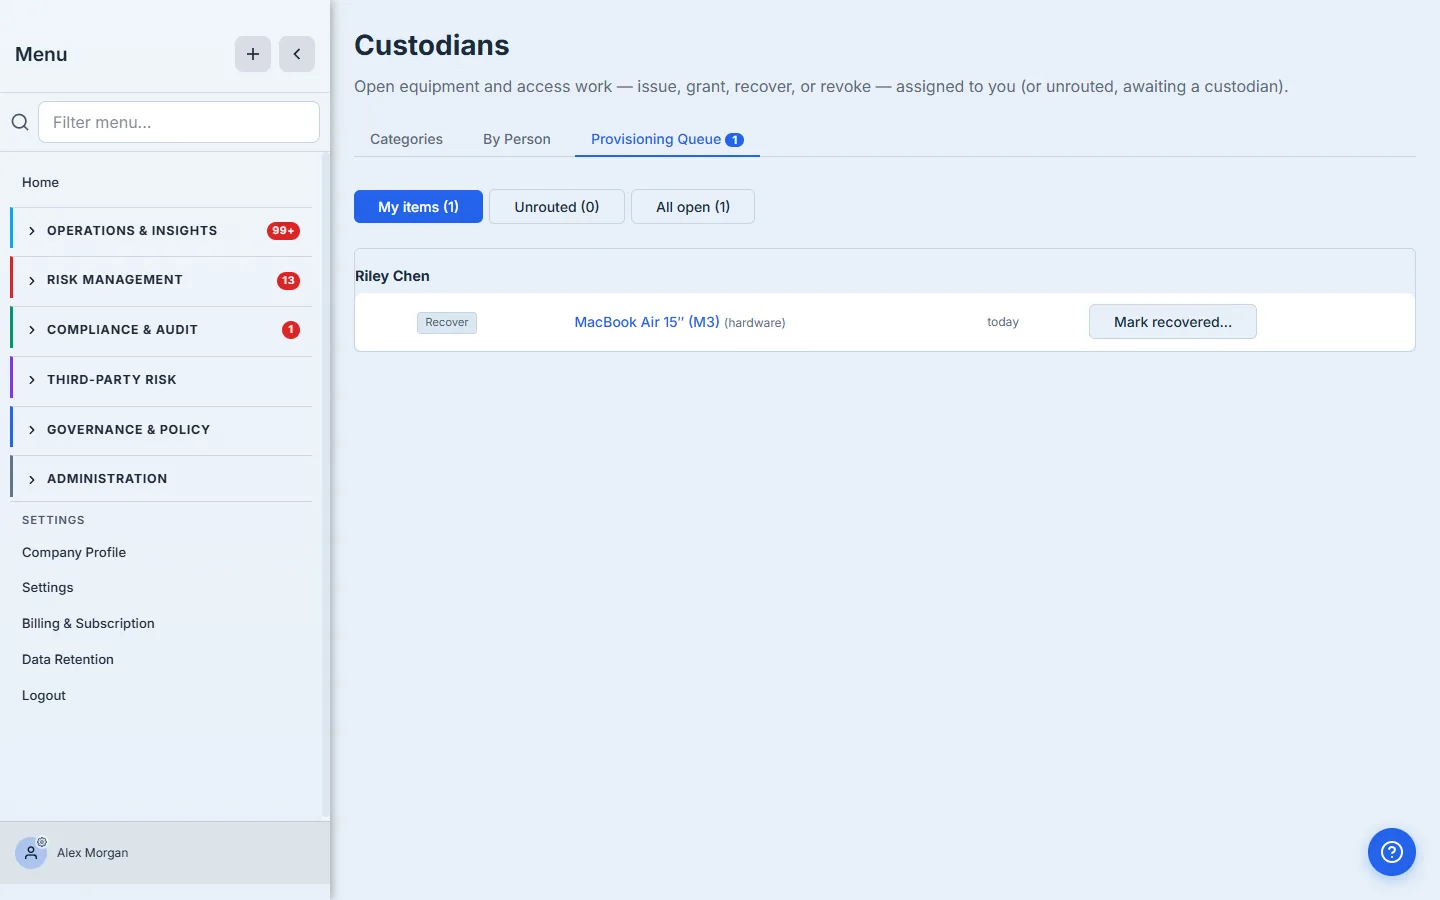
You work them exactly like Step 7: Recover Asset… with the device’s condition, Revoke Access… with a reason. When the last one closes, the leaver holds nothing — and you can prove it. That’s ISO 27001 A.5.11 and SOC 2 CC6.3, done as a byproduct of the workflow instead of a frantic exit-day checklist.
Step 9 — The ledger and the audit trail
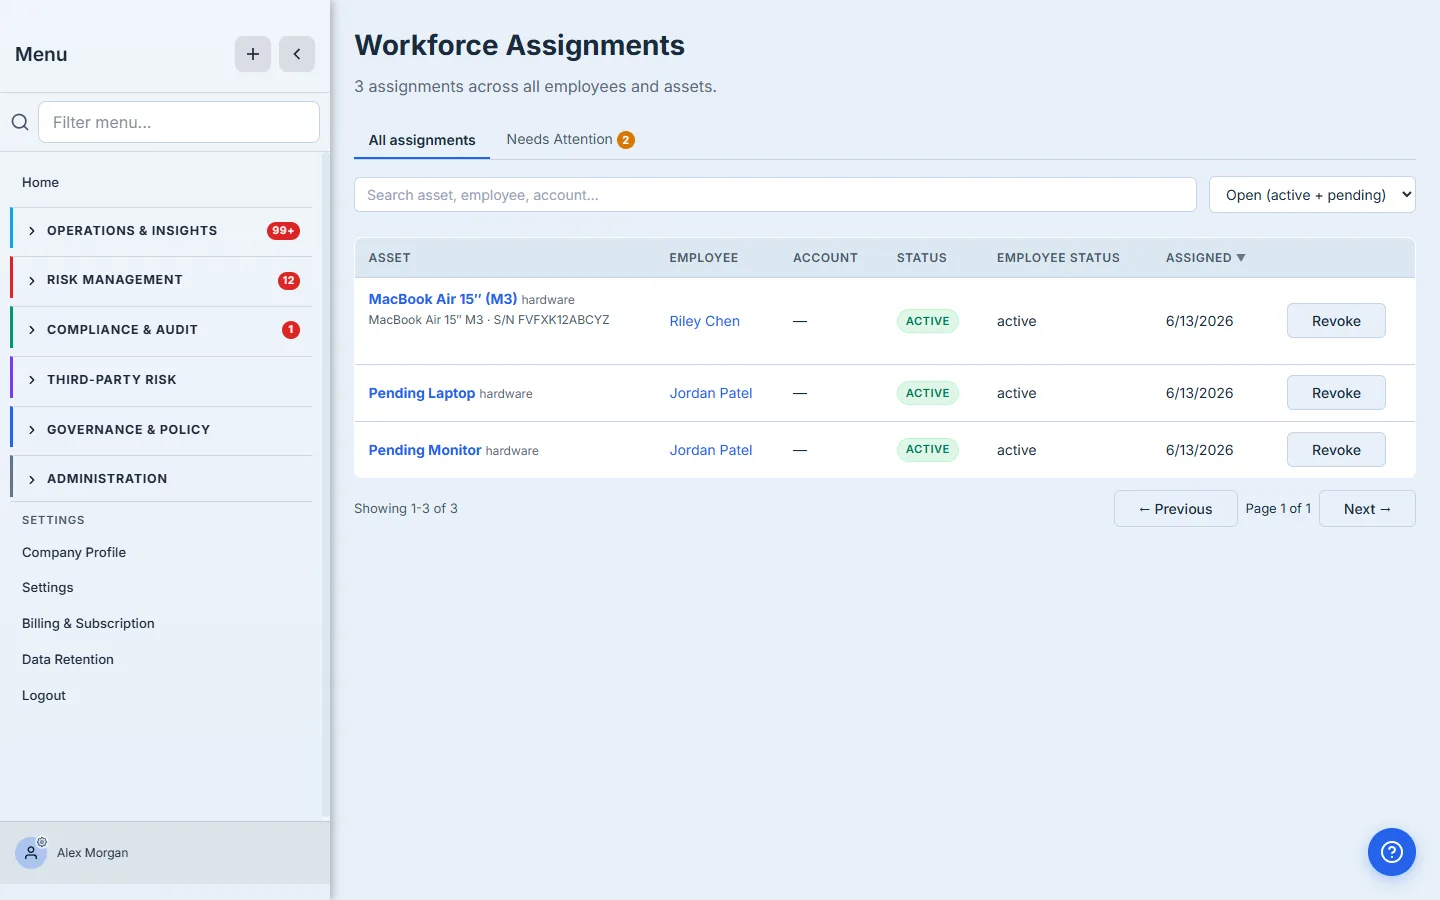
Two views give you the program-wide picture. The Assignments ledger (/app/workforce/assignments) is every assignment across every person and device, filterable by status — open, active, pending, revoked, returned — so “who has what right now” and “what’s still outstanding” are one query, not a reconciliation.
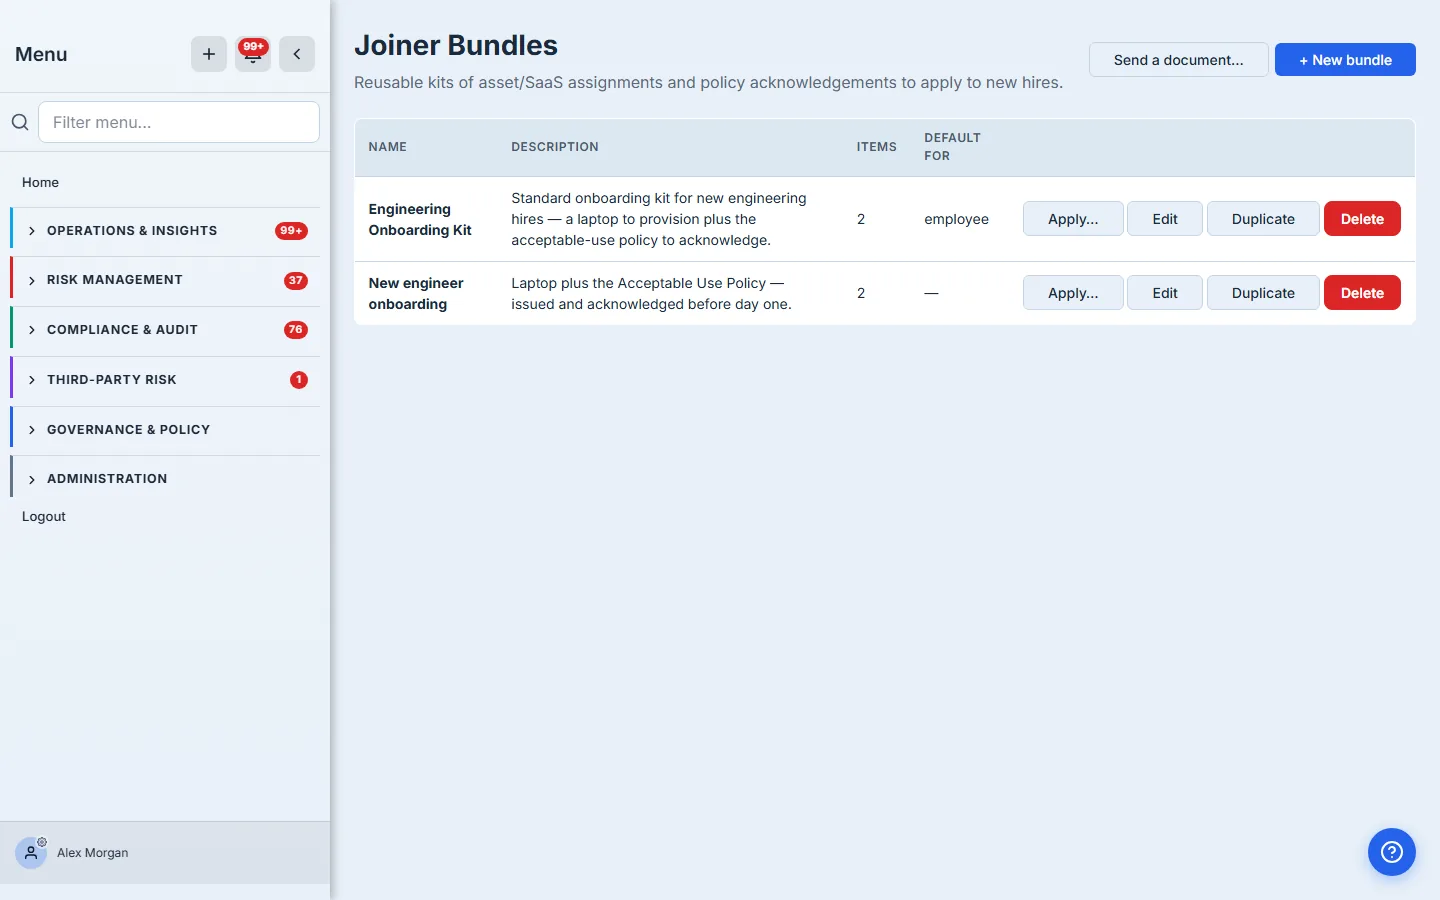
And the Joiner Bundles page (/app/workforce/bundles) is where the reusable kits themselves live — each bundle’s equipment line items and the policies it attaches, ready to Apply to the next hire in one click. Once applied, each onboarding’s live progress — Provisioning → Awaiting employee → Complete, with its equipment / receipt / policy status — tracks on that employee’s own Onboarding tab (shown above).
What you walk away with
- One queue for every equipment task you own — issue, grant, recover, revoke — fed automatically by custody, not by people remembering to tell you.
- Custody by category and sub-type, with nearest-ancestor inheritance, so you set only what’s different and Talarity flags any owner who can’t be reached.
- A serial-level record for every device — which machine, by serial and asset tag, went to which person, on which date — stamped at the moment of handover.
- Return vs. revoke kept distinct, with condition (good / damaged / lost) and reason captured, so the inventory tells the truth.
- Offboarding that reclaims itself — one recovery item per device, routed to its custodian — and a ledger that proves, on any date, exactly who holds what.
Set up your custody this afternoon. Open /app/workforce/custodians, claim the categories you own, and carve out the sub-types that belong to someone else. The next new hire — and the next leaver — routes straight to the right person, by serial, with the receipt already written.