The SEC’s amendments to Regulation S-P give firms a specific, dated obligation about the people they hand customer information to. 17 CFR 248.30(a)(5) requires written agreements with service providers to protect that information and to notify you when it is breached — and (a)(5)(ii) puts a 72-hour clock on that notification. It is not a policy you write once; it is a document you have to hold, per vendor, and be able to produce.
Most firms track it in a spreadsheet: a tab of vendor names, an owner column, a status column reading Received or Sent for signature, and a Notes cell holding a link to somebody’s trust portal. It works until it doesn’t — the sheet drifts from the signed PDFs sitting in a shared drive, nobody can say who was last chased, and answering “which critical vendors still owe us this?” means a manual reconciliation. Talarity treats the obligation as a rule instead: you declare it once, declare who it applies to, and every matching vendor gets its own copy to satisfy, with the evidence attached to the vendor it belongs to.
This article walks the whole loop: defining a requirement, scoping it to your critical vendors, chasing and evidencing it on one vendor, then filtering and reporting across all of them. Vendor tags — the vocabulary you can also scope a requirement by — are covered where they touch this flow; managing that vocabulary is its own workflow.
Who’s involved
- Vendor manager — defines the requirement, picks who owns it, chases the vendors who haven’t answered.
- Requirement owner — the named person on the hook for a given vendor. Gets the reminders and the nav badge count.
- Responsible party — the person actually accountable, who may have no Talarity account at all. Named and reported, never emailed.
- Auditor — asks “show me the executed addendum for every critical vendor.” Pulls the report, follows any row to the document and the trail behind it.
What’s on the page
This flow lives across four surfaces:
- Requirement Definitions (
/app/settings/vendors/requirements) — where an obligation is defined and scoped. - Requirements (
/app/vendor-requirements) — every requirement against every vendor it applies to, filterable, exportable. - The vendor’s Requirements tab — where evidence, notes, comments and decisions live for one vendor.
- Vendor Management (
/app/vendors) — the register, now filterable by requirement and by compliance state.
Step 1 — Define the requirement
Open Third-Party Risk → Program Settings, on the Requirement Definitions tab, and click Add requirement. Give it a name a colleague would recognise and a citation — the clause you are answering to. The citation is not decoration: it is indexed, so searching Regulation S-P later finds this obligation rather than nothing.
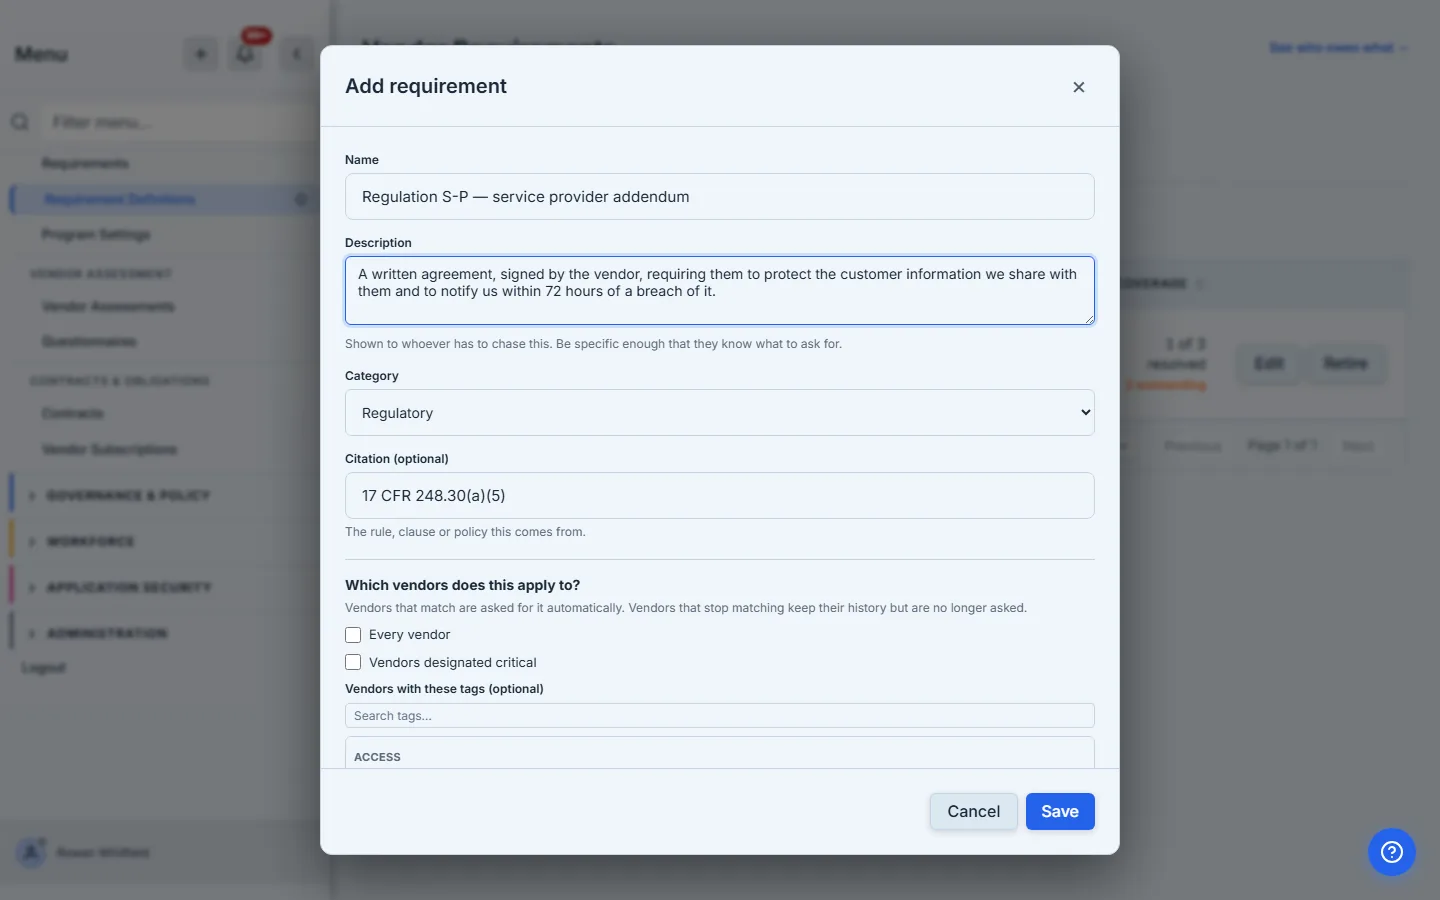
Talarity ships four Regulation S-P templates — the service-provider addendum, the 72-hour breach-notification commitment, a safeguards attestation and a disposal-practices attestation — under Add from template. Adopting one copies it into your organization, so editing your copy never touches anyone else’s.
Step 2 — Scope it to the vendors designated critical
This is the step that replaces the spreadsheet. A requirement declares who it applies to, and Talarity keeps that list current for you. Tick Vendors designated critical and every vendor carrying the critical designation gets its own copy — including the next one you designate, months from now.
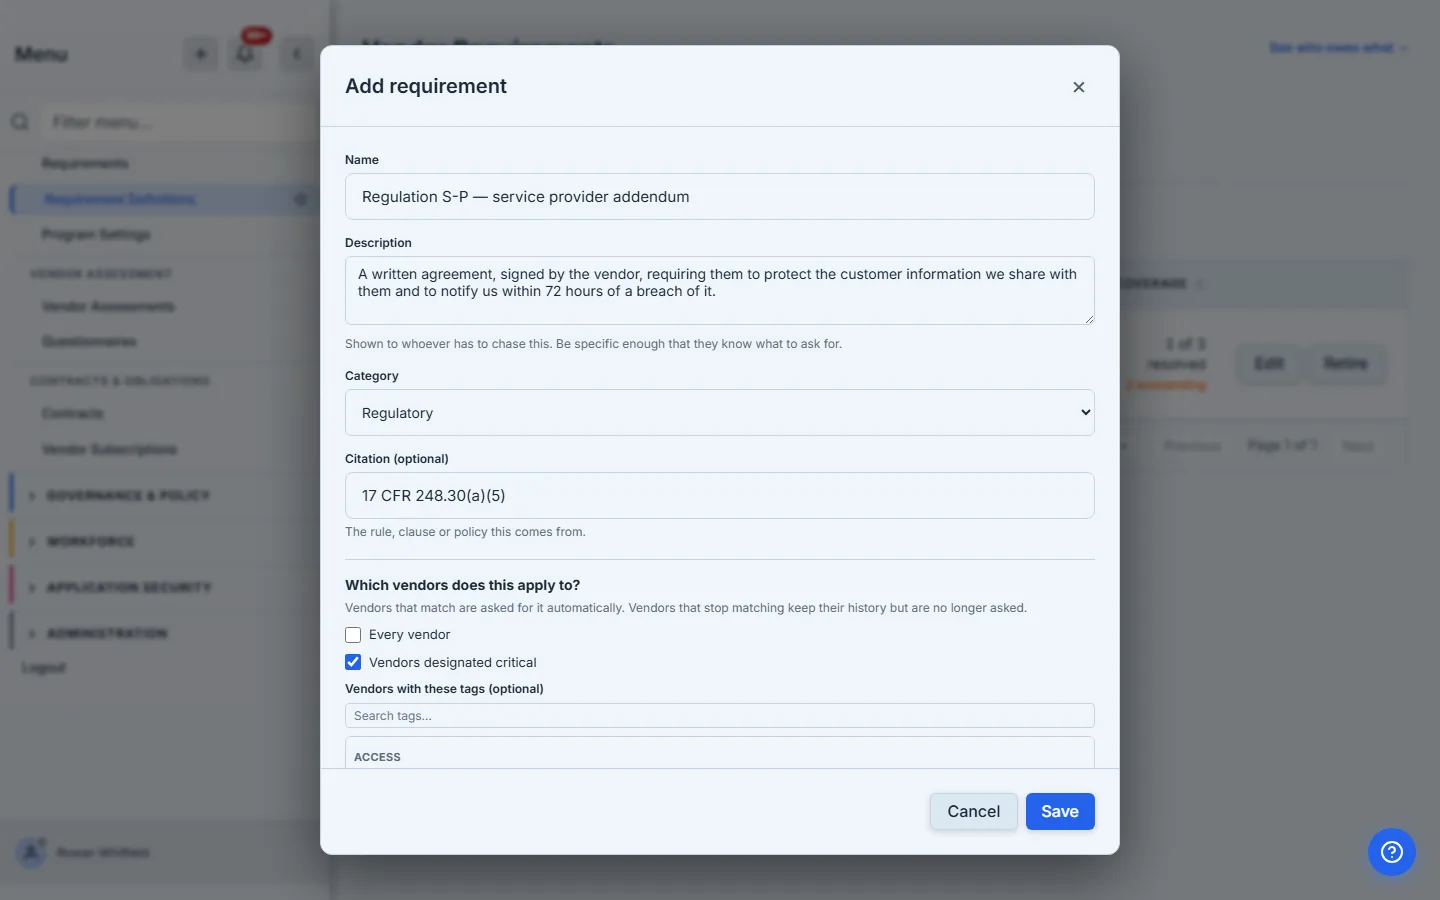
The other three scopes exist for the cases criticality doesn’t describe: every vendor, vendors carrying particular tags (chosen by name from your tag vocabulary, not by typing an id), or a named list. Leaving all four empty deliberately matches nobody — fanning an obligation across your whole vendor population is an explicit act, not the result of an unfinished form.
Empty applicability is not a mistake the product hides. Save a requirement that matches nothing and Talarity says so on the spot, rather than leaving a requirement in the list that looks configured and applies to no one.
Step 3 — Say what counts as satisfying it
An executed addendum is a document you hold, so tick A document must be uploaded. The alternative — Accept a link to the vendor’s published material — matters for the large vendors who decline per-customer paperwork and point every customer at the same public trust portal. The two are mutually exclusive on purpose: a requirement that must be evidenced by a signed agreement cannot also be closed out by a link to someone else’s website.
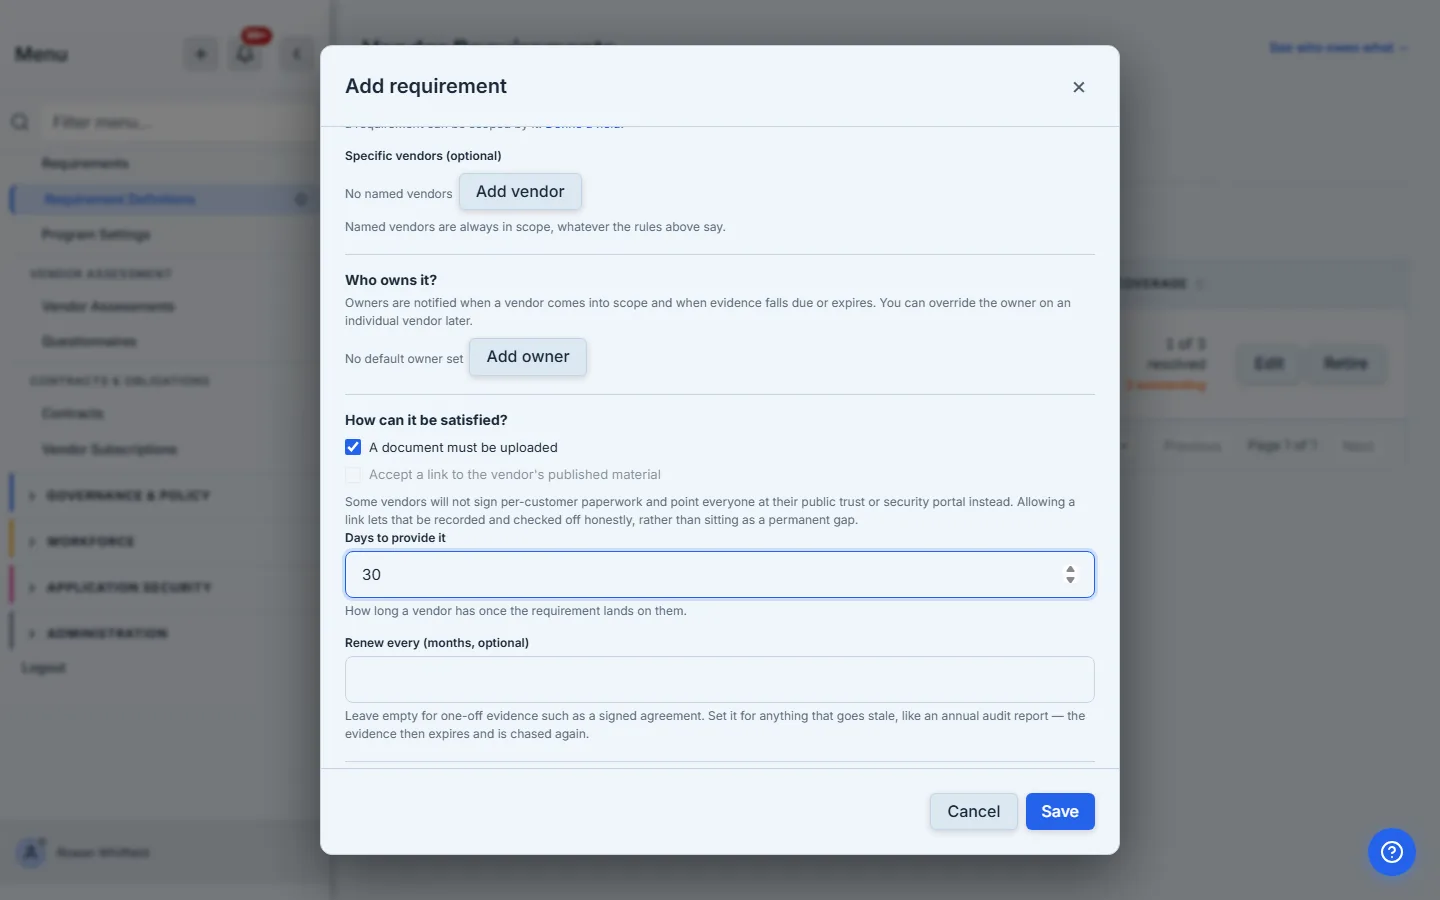
Set Days to provide it to give each vendor copy a due date, and Renew every if the evidence goes stale — an annual attestation should come back round; a signed addendum usually shouldn’t. Add owners here and every vendor copy inherits them, so the reminders and the nav badge have somebody to go to.
Step 4 — Save, and watch it land on the vendors
Saving fans the requirement out immediately, and Talarity tells you how many vendors matched. That number is the answer to “did I scope this correctly” — before you go looking for the rows.
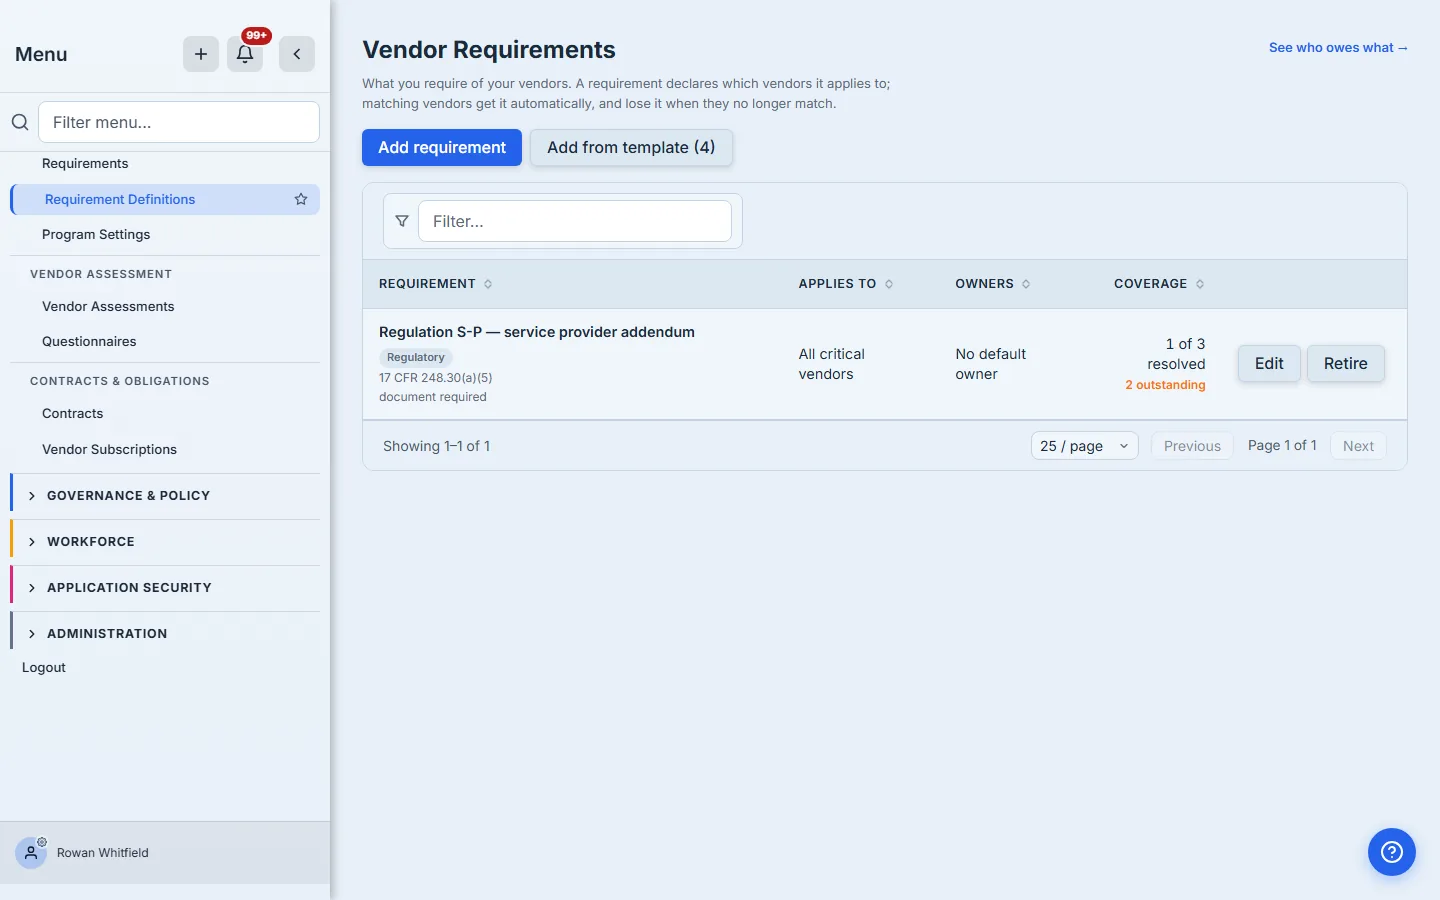
Behind the scenes, each matching vendor gets a row in vendor_required_artifacts carrying its own owner, due date, status and evidence. Vendors come into and out of scope on their own as criticality flips or tags change, with a nightly reconcile as the safety net — it repairs any drift it finds and reports how much there was, so a write-side hook that quietly stops firing shows up as a number rather than as silence.
Step 5 — See who still owes you what
Open Third-Party Risk → Vendor Assessments, on the Requirements tab. This is the view that answers the question the spreadsheet existed to answer, across every vendor at once.
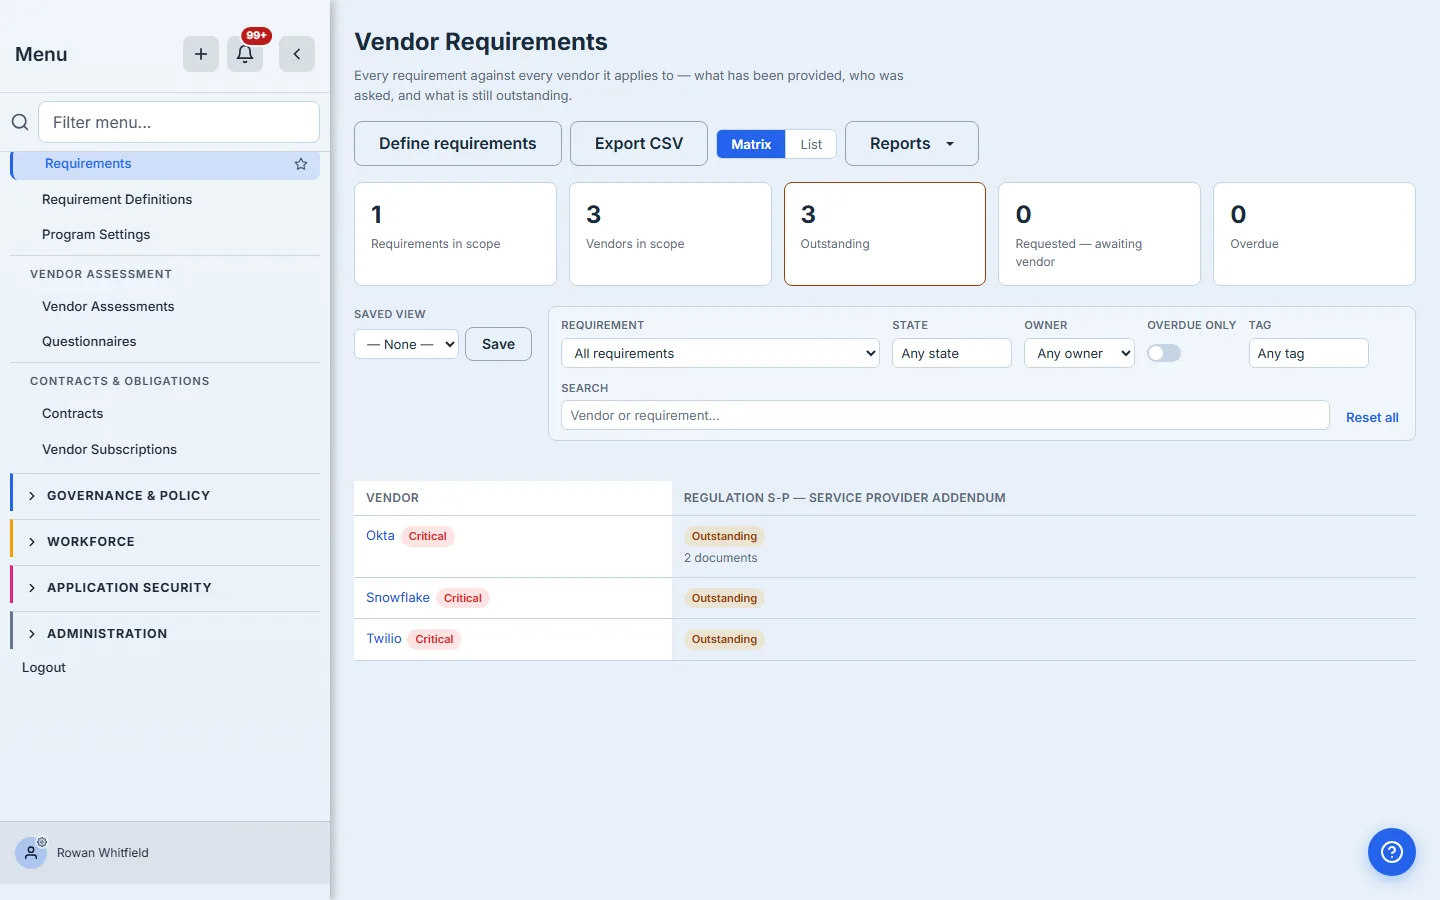
Nothing has been asked yet, so every cell reads Outstanding — which is itself the answer to the question the page exists for. As the programme moves, each cell fills in: the state, the owner, how many documents are attached, and when the vendor was last chased. Filter by requirement, by state, by owner (Mine is the same set the sidebar badge counts), by tag, or by overdue. Switch to List when you want to sort and scan rather than see the grid, save a filter you use every week as a view, and Export CSV to hand the current selection to somebody who lives in a spreadsheet.
Step 6 — Open a vendor and record that you asked
Click any cell to land on that vendor’s Requirements tab, focused on the requirement you clicked. When you send the addendum out for signature, record it: Mark as requested takes the date it went out and a note.
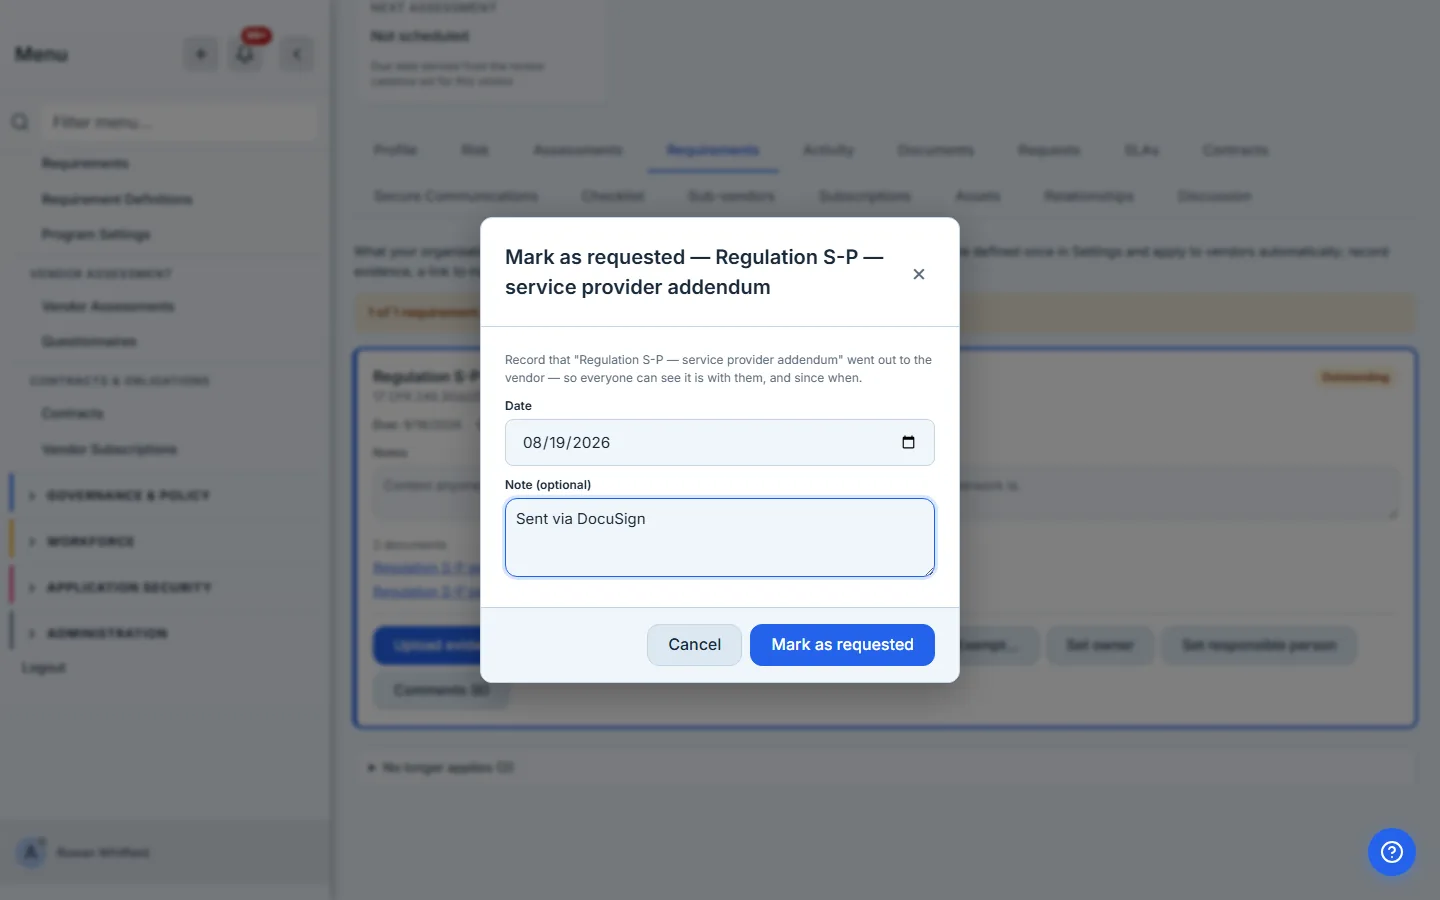
When the addendum goes to twenty vendors in one mail-merge, you do not want to record that twenty times: select the rows in List view on the Requirements page and Mark as requested takes the lot, skipping any that have already moved past being asked and telling you how many it left alone.
Requested — awaiting vendor is a real state, not a note in a cell, and it is where a vendor programme spends most of its life. It carries the date you asked and the date you last chased, so “nobody has asked yet” and “asked three weeks ago, chase them” stop looking identical. A requirement sitting requested with no answer for a fortnight brings itself back to its owner.
Step 7 — Attach the executed agreement
When the signed addendum comes back, Upload evidence puts it on the requirement. If the document is already on the vendor — someone filed it under Documents last week — Link existing document attaches it without a second upload.
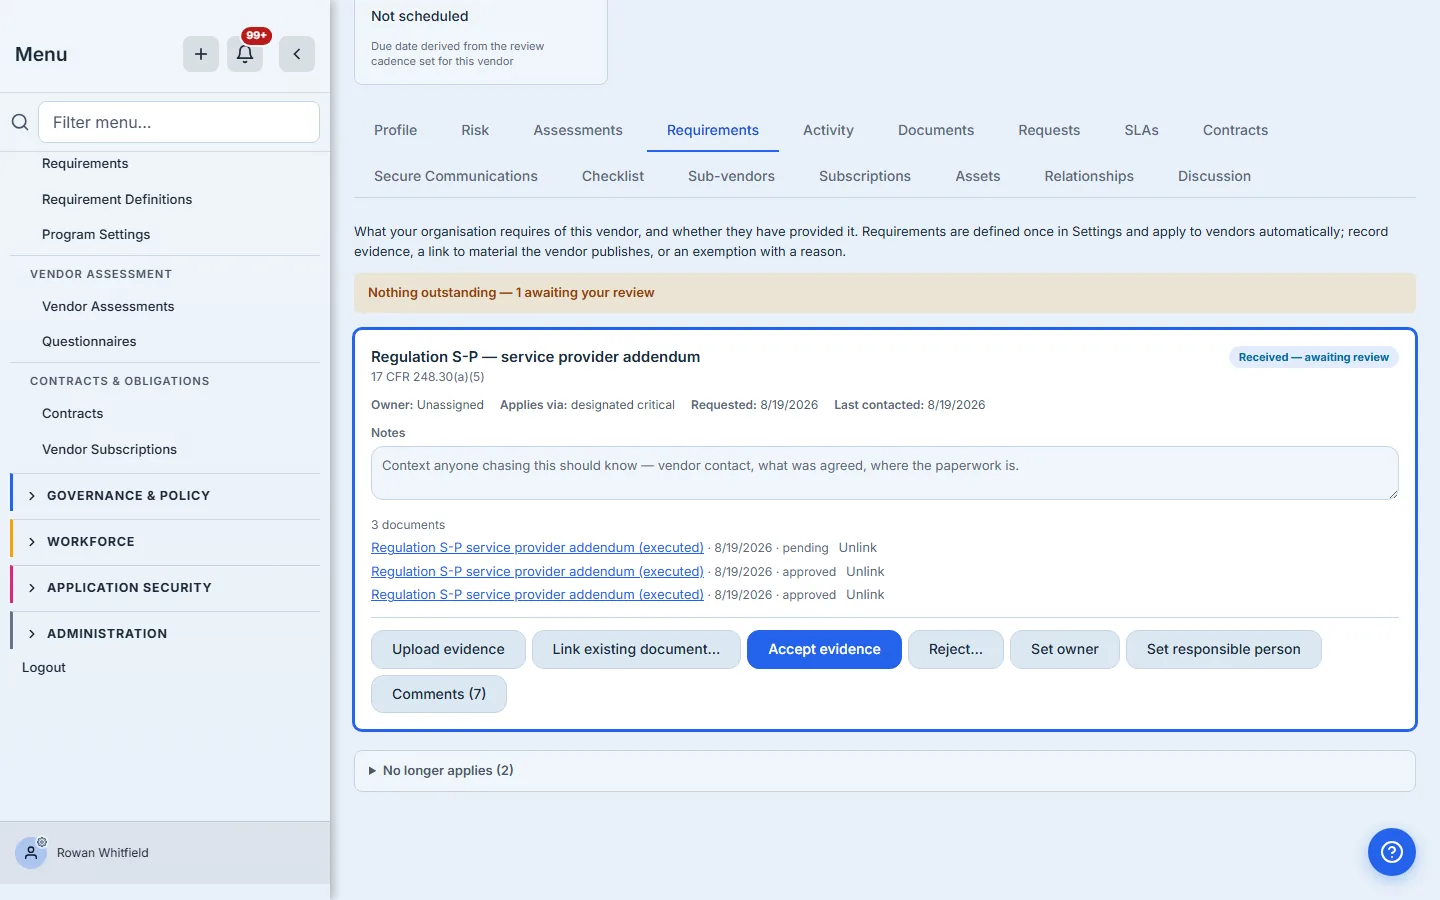
Evidence is a link, not a column, so one document can satisfy several requirements — which is how these obligations actually arrive. A single executed addendum often carries both the safeguards clause and the 72-hour notification commitment; attach it to both and neither is a duplicate.
Step 8 — Leave the context that isn’t a document
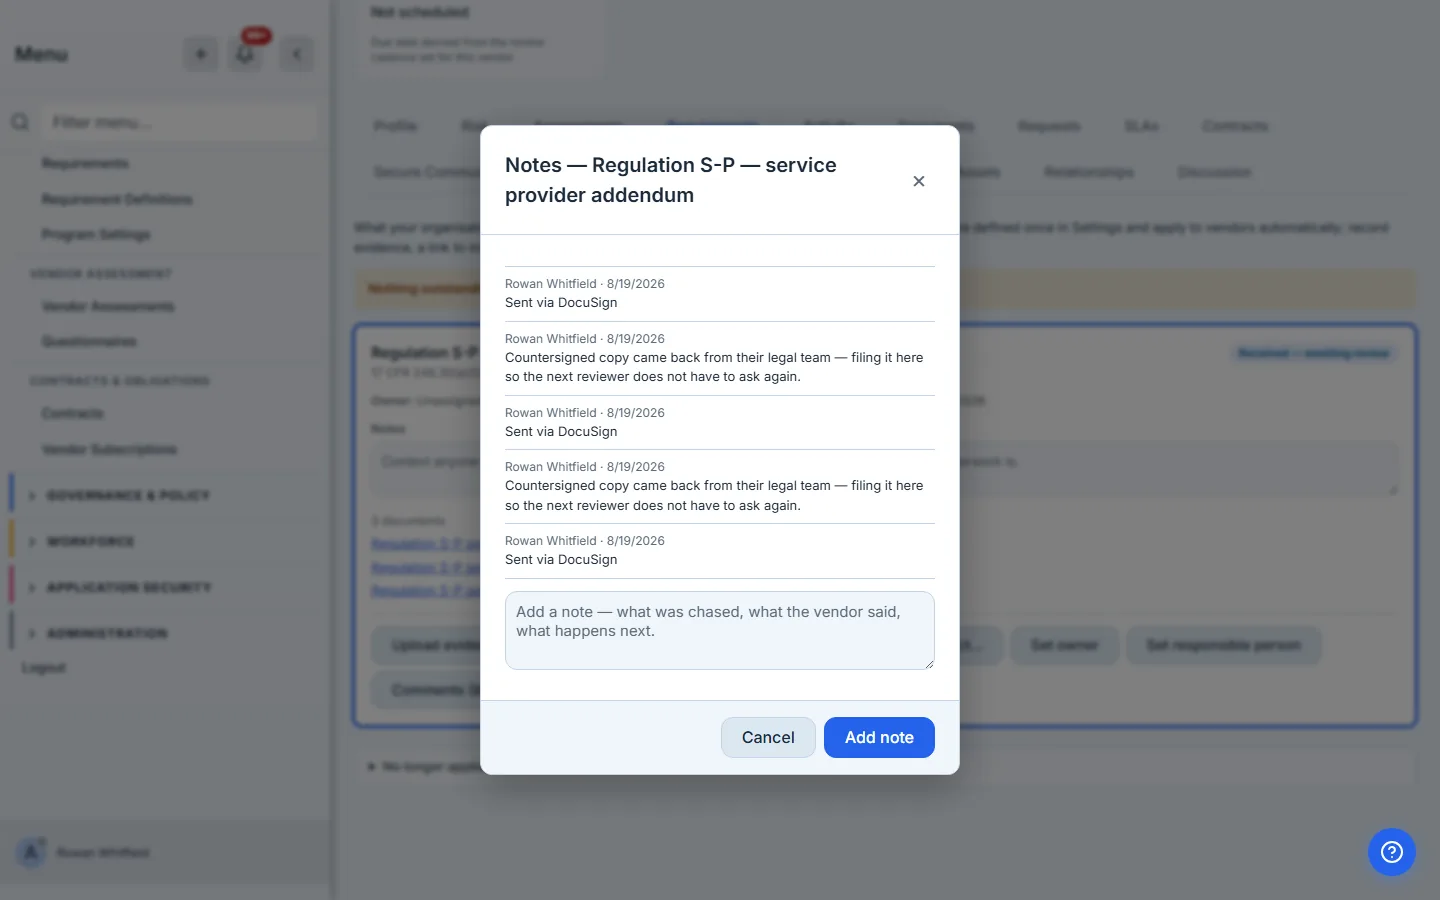
Two fields exist for the things a spreadsheet keeps in a Notes cell, and they are deliberately different. Notes on the card is the standing context — who the vendor contact is, what was agreed, where the paperwork lives. Comments is the conversation, per requirement, with a full history.
Step 9 — Accept it, or send it back
Accept evidence is the decision, and it lives on the requirement rather than on some other tab. Accepting stamps who accepted it and when, and — if the requirement renews — sets the next expiry from the cadence you configured.
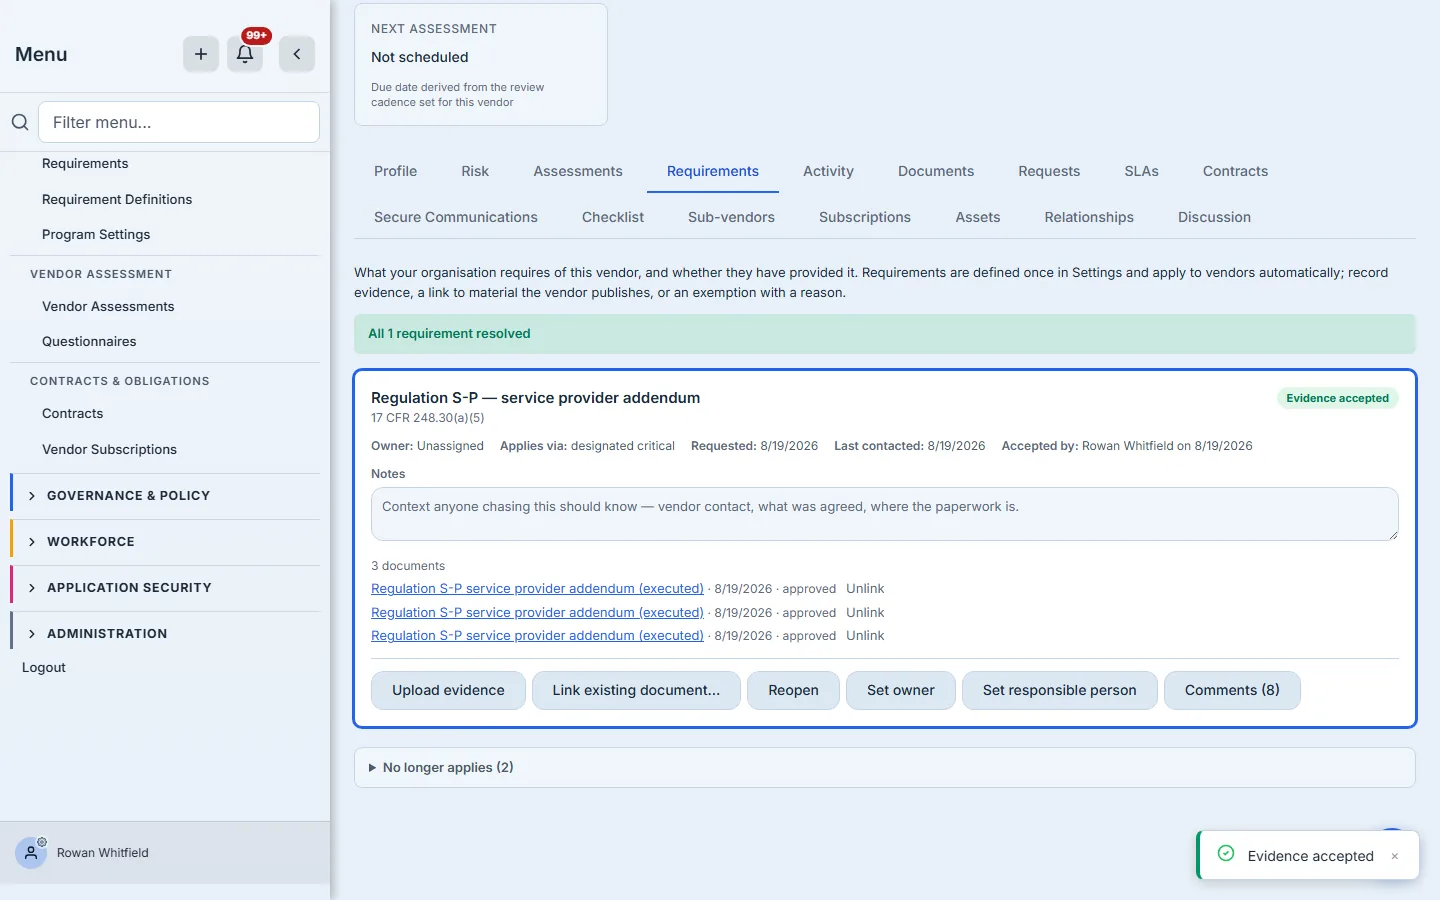
Reject requires a written reason, and that reason is what the vendor is told to fix, so it is shown on the card rather than filed away. An exemption works the same way: it needs a justification, because an exemption without one is indistinguishable from clearing a row to flatter a dashboard.
Step 10 — Filter the register to the vendors it applies to
Back on Vendor Management, the Requirements column shows each vendor’s position — how many of their requirements are resolved, how many are overdue, how many are sitting with the vendor. Resolved means accepted: evidence on file, a reference accepted, or a written exemption. Evidence that was rejected or is still in review is counted separately, because neither is done.
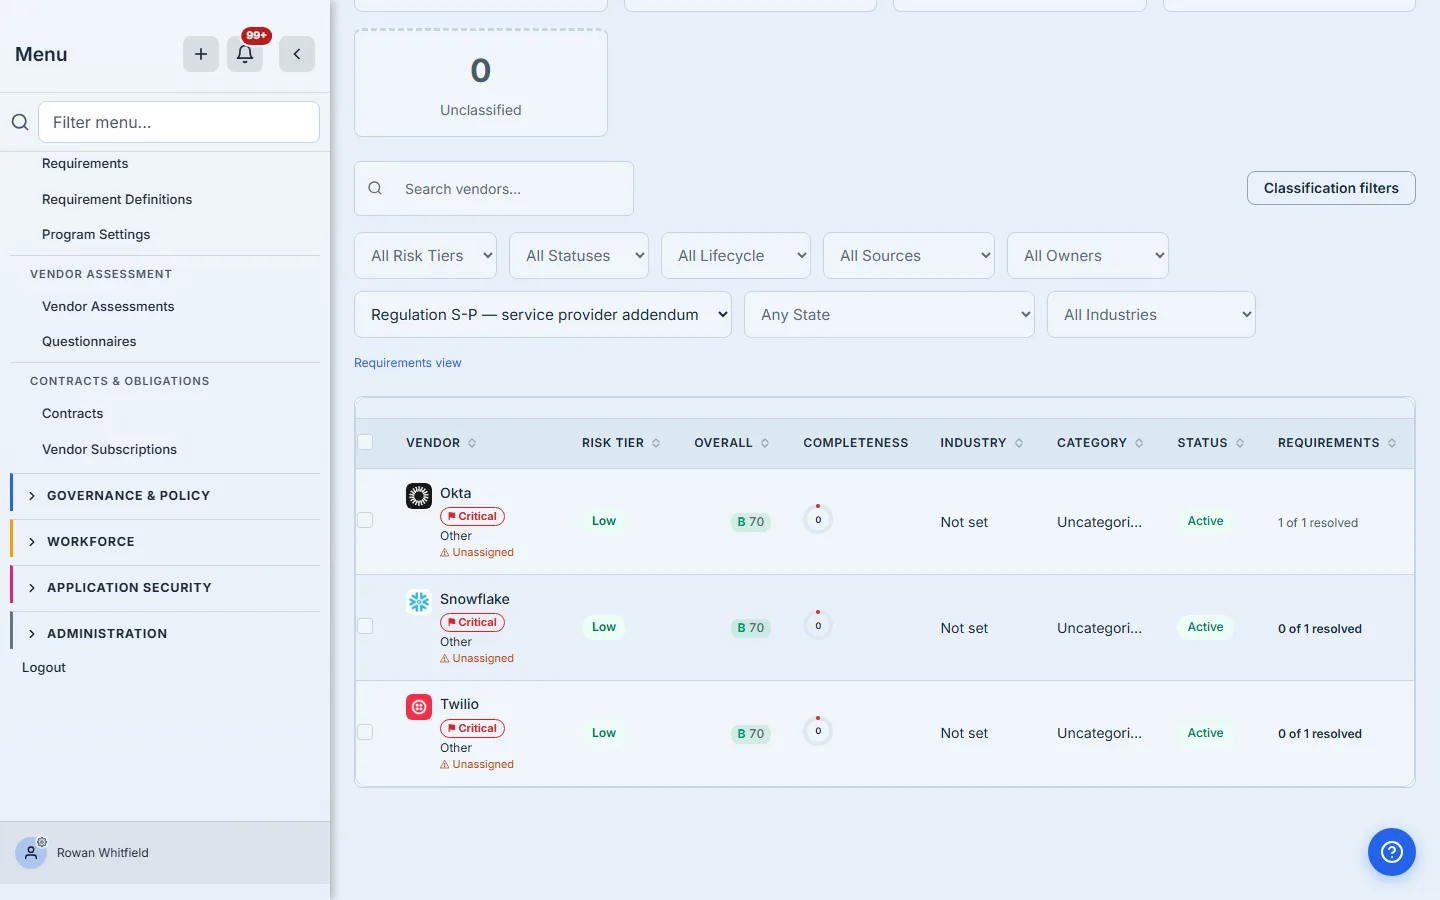
Pick the requirement from the filter and the register narrows to the companies it is required for — server-side, so the answer is not limited to the rows this page happened to load.
Step 11 — Then filter by compliance
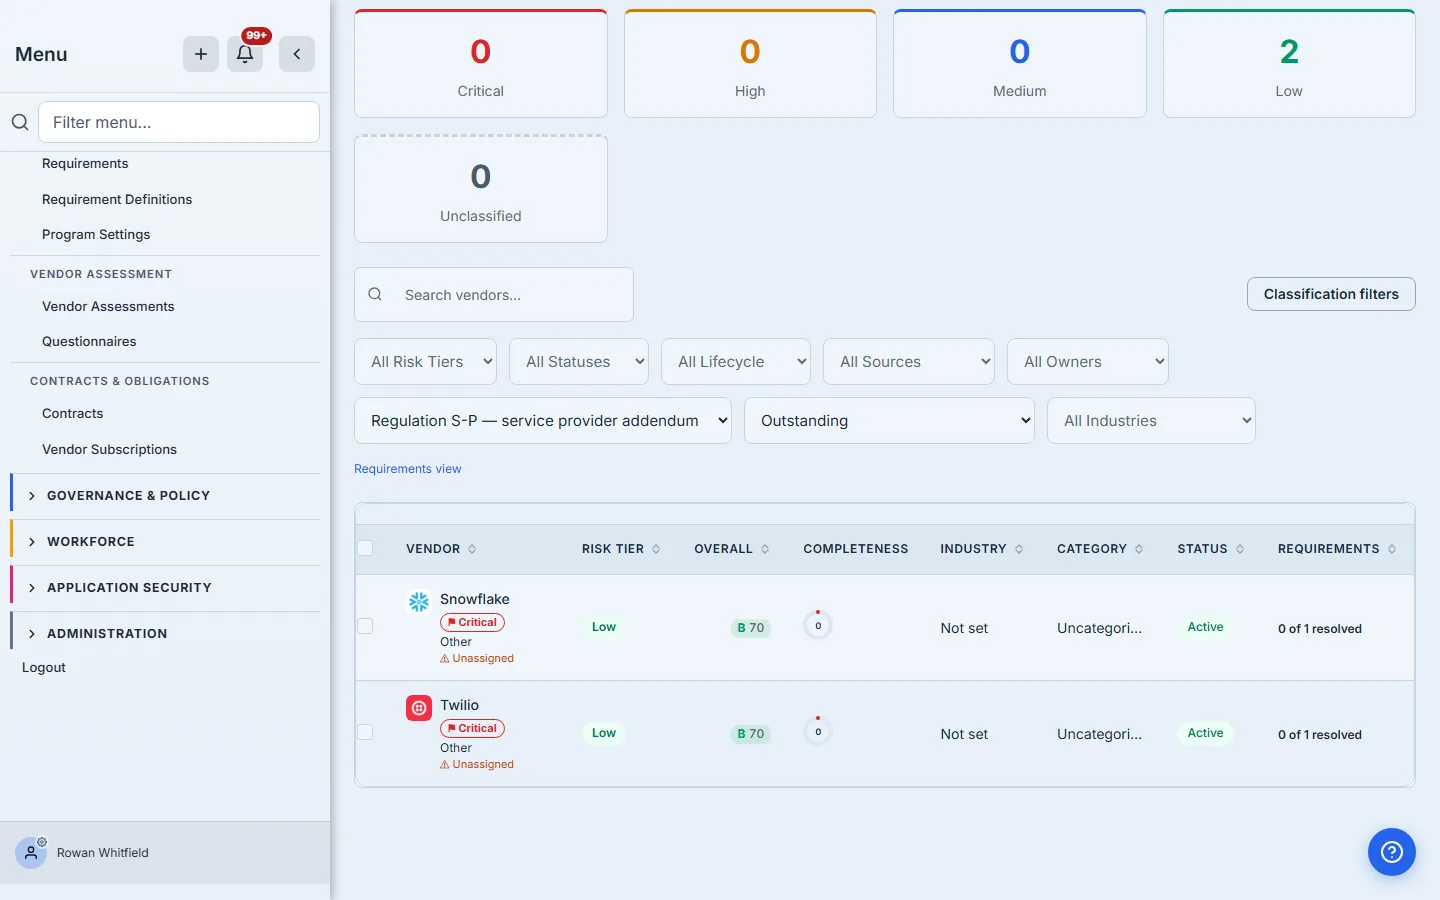
Add the state filter and the register narrows again, to the vendors in that position on that requirement. Choosing a state on its own — without a requirement — asks the broader question: every vendor with something outstanding, whatever it is.
Step 12 — Generate the report
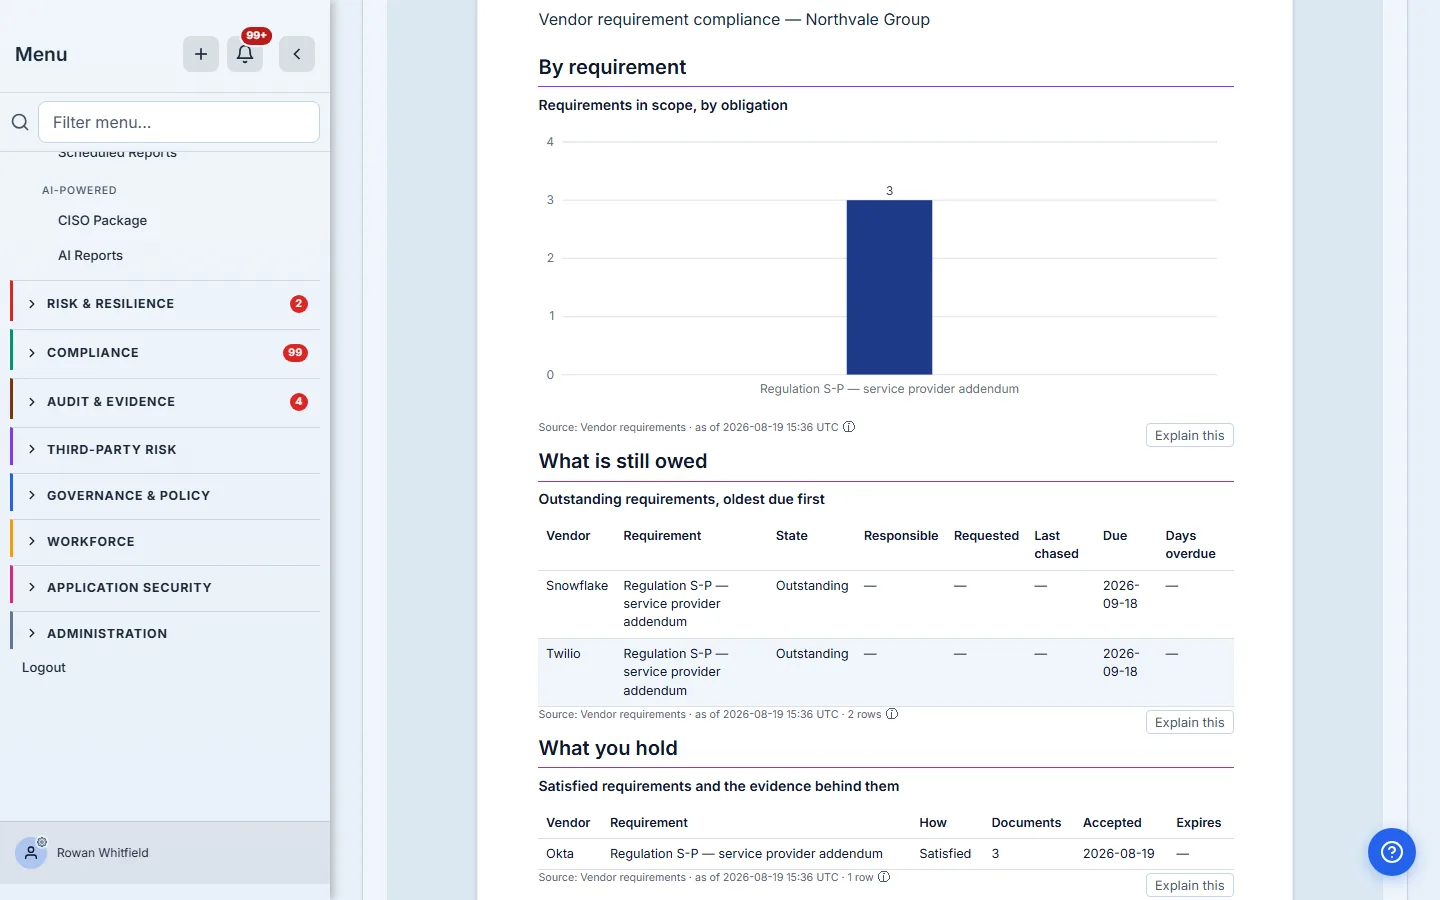
Open the report library and run Vendor requirement compliance. It opens with the four numbers a reviewer asks for — in scope, evidenced, still owed, awaiting the vendor — then breaks the programme down by state and by obligation.
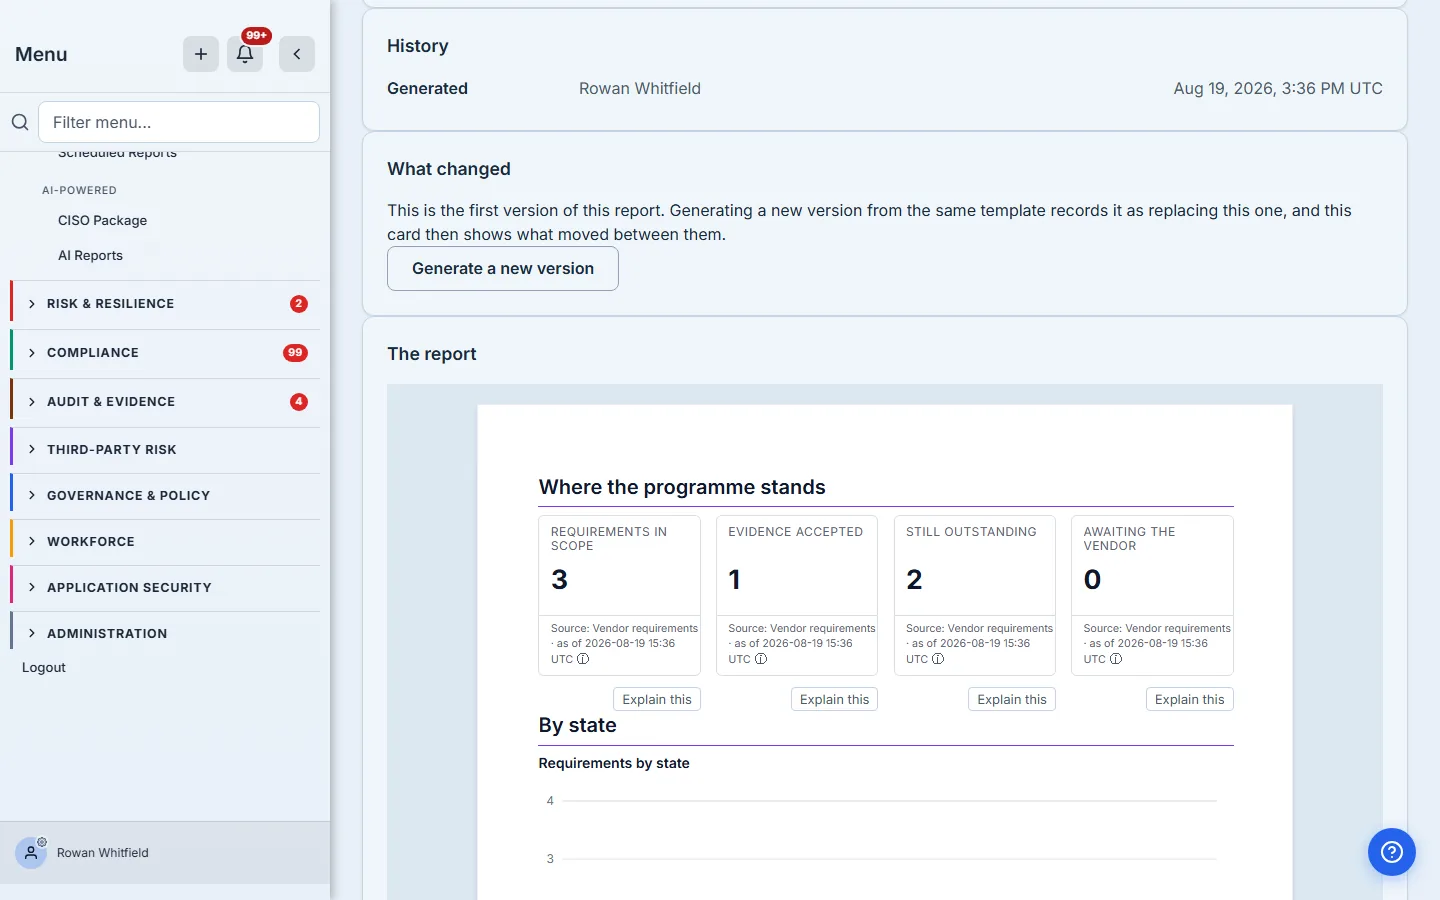
Below that are the two tables the conversation actually turns on: what is still owed, oldest due first, with when each vendor was asked and last chased; and what you hold, with the document count and expiry behind each accepted requirement.
Step 13 — The trail behind every decision
The vendor’s Activity tab is the receipt. Every requirement decision, every tag change, every field edit, with who did it and when — and, where it applies, what the value was before.
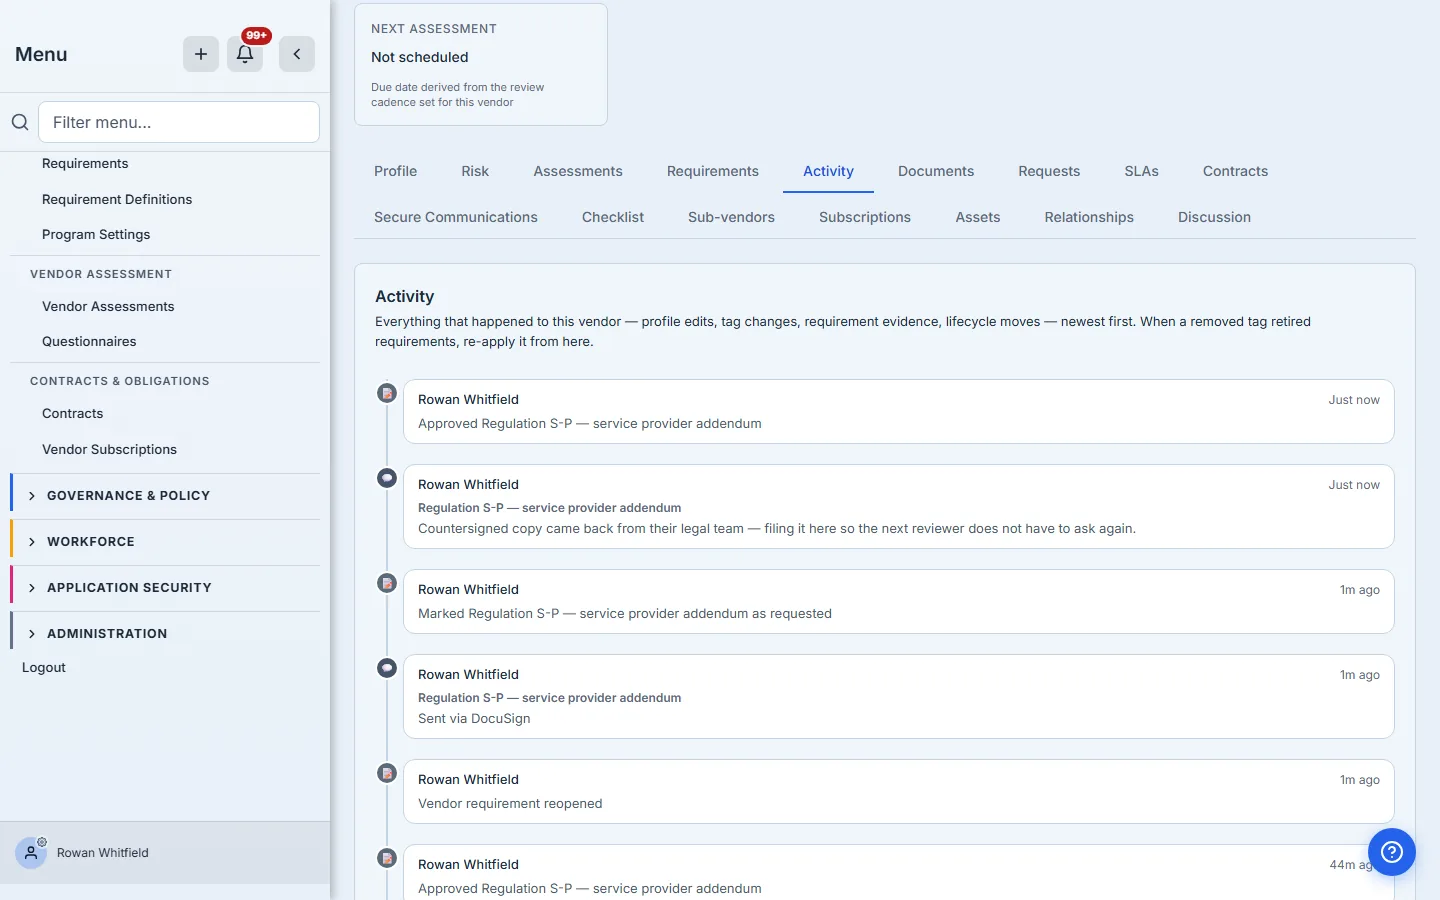
This is also the answer to a question that used to have none. If somebody removes a tag that a requirement is scoped by, the requirement stops applying to that vendor — and the feed names the tag that went, so re-applying it is one click. The requirement comes back in the state it was retired in, with its evidence, notes and owner intact.
What you walk away with
- One requirement definition that scopes itself — new critical vendors are asked automatically, without anyone updating a list.
- One row per vendor carrying its own owner, due date, evidence and history, instead of a status word in a shared cell.
- A real requested state with the date you asked and the date you last chased, and a reminder that brings a stalled one back to its owner.
- Evidence linked, not copied — one executed agreement can satisfy every requirement it covers.
- A register you can filter both ways — the vendors an obligation applies to, and the vendors in a given position on it.
- A report that answers “who still owes us what” with the dates behind it, and an audit trail that survives somebody changing their mind.
What this article does not cover
- Managing the tag vocabulary itself — creating, editing and retiring vendor tags lives in Settings → Vendors → Program Settings, and is its own workflow.
- Tier policies, which also generate required artifacts from a vendor’s risk tier. Requirements and tier policies coexist deliberately; applying a tier policy never retires a requirement.
- Custom fields on a requirement, which let you record your own attributes against an obligation.
Define yours this afternoon. Open /app/settings/vendors/requirements, click Add from template, and adopt the Regulation S-P service-provider addendum. Scope it to your critical vendors and Talarity will tell you, immediately, how many of them owe you one.