Evidence is the currency of every audit. A SOC 2 Type II report is a year of evidence; ISO 27001:2022 Clause 7.5 requires documented information to be controlled — available where it’s needed, protected, version-stamped, and retained on a defined schedule; PCI DSS v4 and HIPAA both attach explicit retention periods to the proof you keep. Auditors don’t want claims. They want the artifact, and they want to see — on each one — when it expires, who owns it, and who’s allowed to read it.
Most teams keep that evidence in a shared drive: a “Certifications” folder, a “Policies” folder, three copies of the SOC 2 with slightly different names, and a cyber-insurance certificate that lapsed in March that nobody noticed until renewal. Talarity treats every artifact as a first-class record instead — typed, owned, expiry-tracked, access-governed, and reusable — and keeps all of it in one place: the Artifact Repository at /app/artifact-repository.
This article walks the repository end to end: uploading and classifying an artifact, finding anything across the library, tracking expirations, firing renewal reminders, governing who can see what, and reusing one document across many frameworks. Three adjacent flows have companion articles, and we’ll point to them at the boundary rather than repeat them: linking evidence to unlock a gated assessment, importing a policy so it lives in two places at once, and the full access-rules deep dive — including what a locked-out member sees.
Who’s involved
- Compliance lead — owns the repository: sets the reminder defaults, writes the access rules, and answers “where’s the current SOC 2?” in one click.
- Artifact owner — the person on the hook for a given certificate or report. Gets the renewal reminders and the auto-generated renewal work item before it expires.
- Evidence collector — uploads new proof and tags it so it surfaces under the right type and framework.
- Auditor — pulls the artifact, its expiry, its owner, and its access trail at audit time. A well-kept repository turns “send me your evidence” into a single afternoon instead of a scramble.
What’s on the page
Open the Artifact Repository (/app/artifact-repository).
- Tabs — Dashboard (posture + expirations), All Artifacts (the full list with Type / Status / Source filters), Artifact Types, Reminder Defaults, Access Rules, Type Permissions, Connections, and Explorer.
- Dashboard cards — Total Artifacts, Recently Added, Valid, Expiring Soon, and Critical / Expired, plus a per-type tile grid and a framework-coverage strip.
- Header actions — Add Artifact, Upload Evidence, Bulk Import, and search.
- Per-row actions — download, edit, manage access (the lock icon), and reminders.
Step 1 — Open the repository and read the Dashboard
The repository opens on the Dashboard — the at-a-glance posture of your evidence. Five cards across the top: Total Artifacts, Recently Added (last 7 days), Valid, Expiring Soon (the next 90 days), and Critical / Expired. Below them, a tile per artifact type with its count and how many are expiring, a Recent Artifacts rail, and a framework-coverage strip.
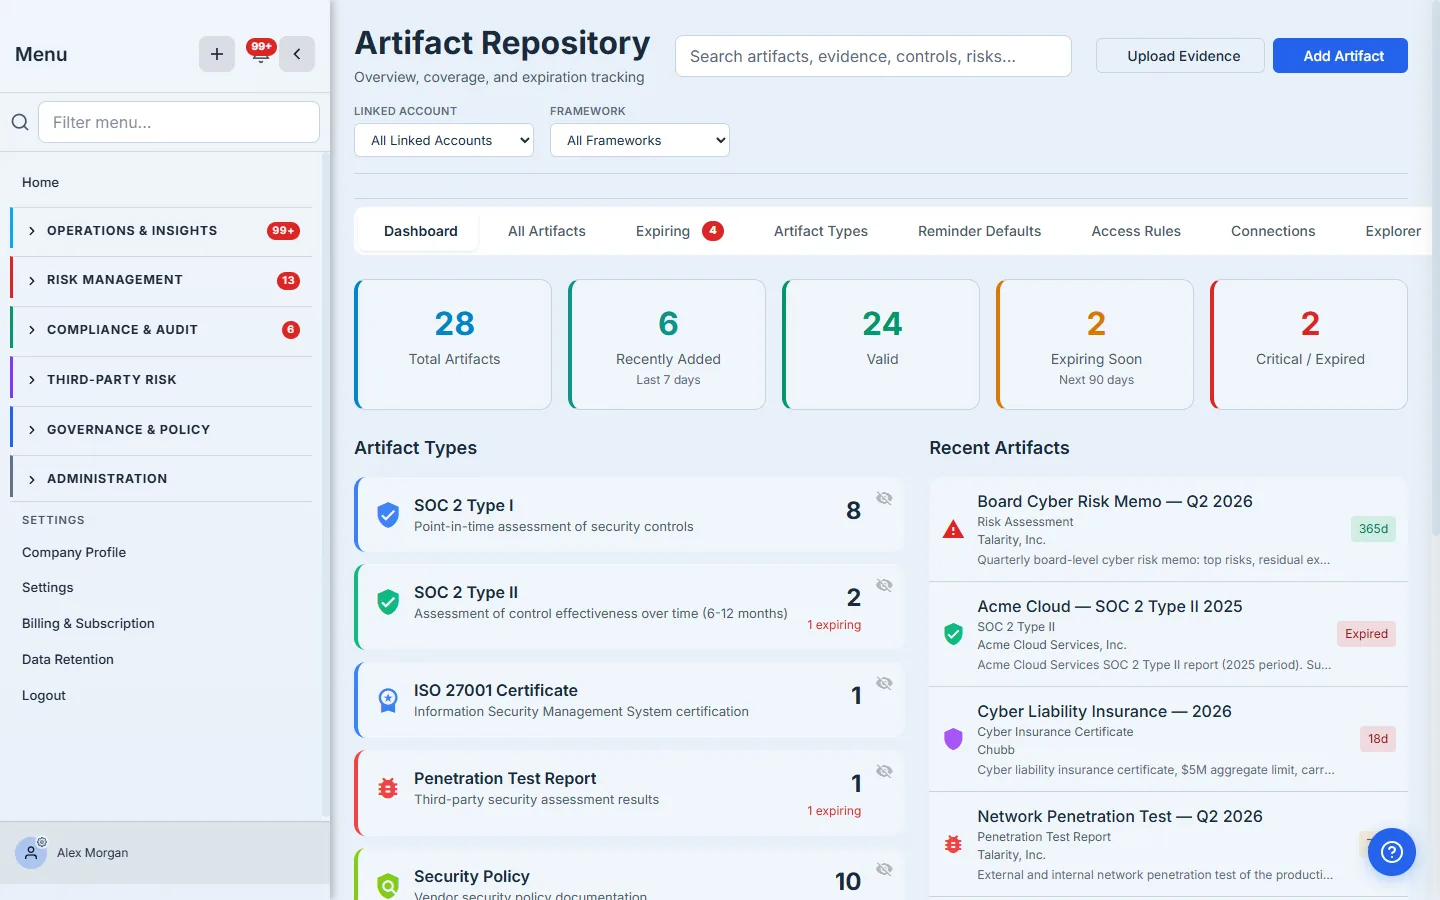
Two controls in the bar above the tabs quietly do a lot. Framework is a lens — pick SOC 2 and the counts and tiles narrow to artifacts relevant to that framework. Linked Account is the cross-org scope: if your organization has linked child accounts, you can view your own artifacts, a specific partner’s, or everything you’re entitled to see across the group. Leave both on “All” and the Dashboard is your whole library.
Step 2 — Add an artifact
Click Add Artifact (or Upload Evidence — both open the same form). The point of the form is that an artifact is more than a file: it’s a file plus the metadata an audit needs.
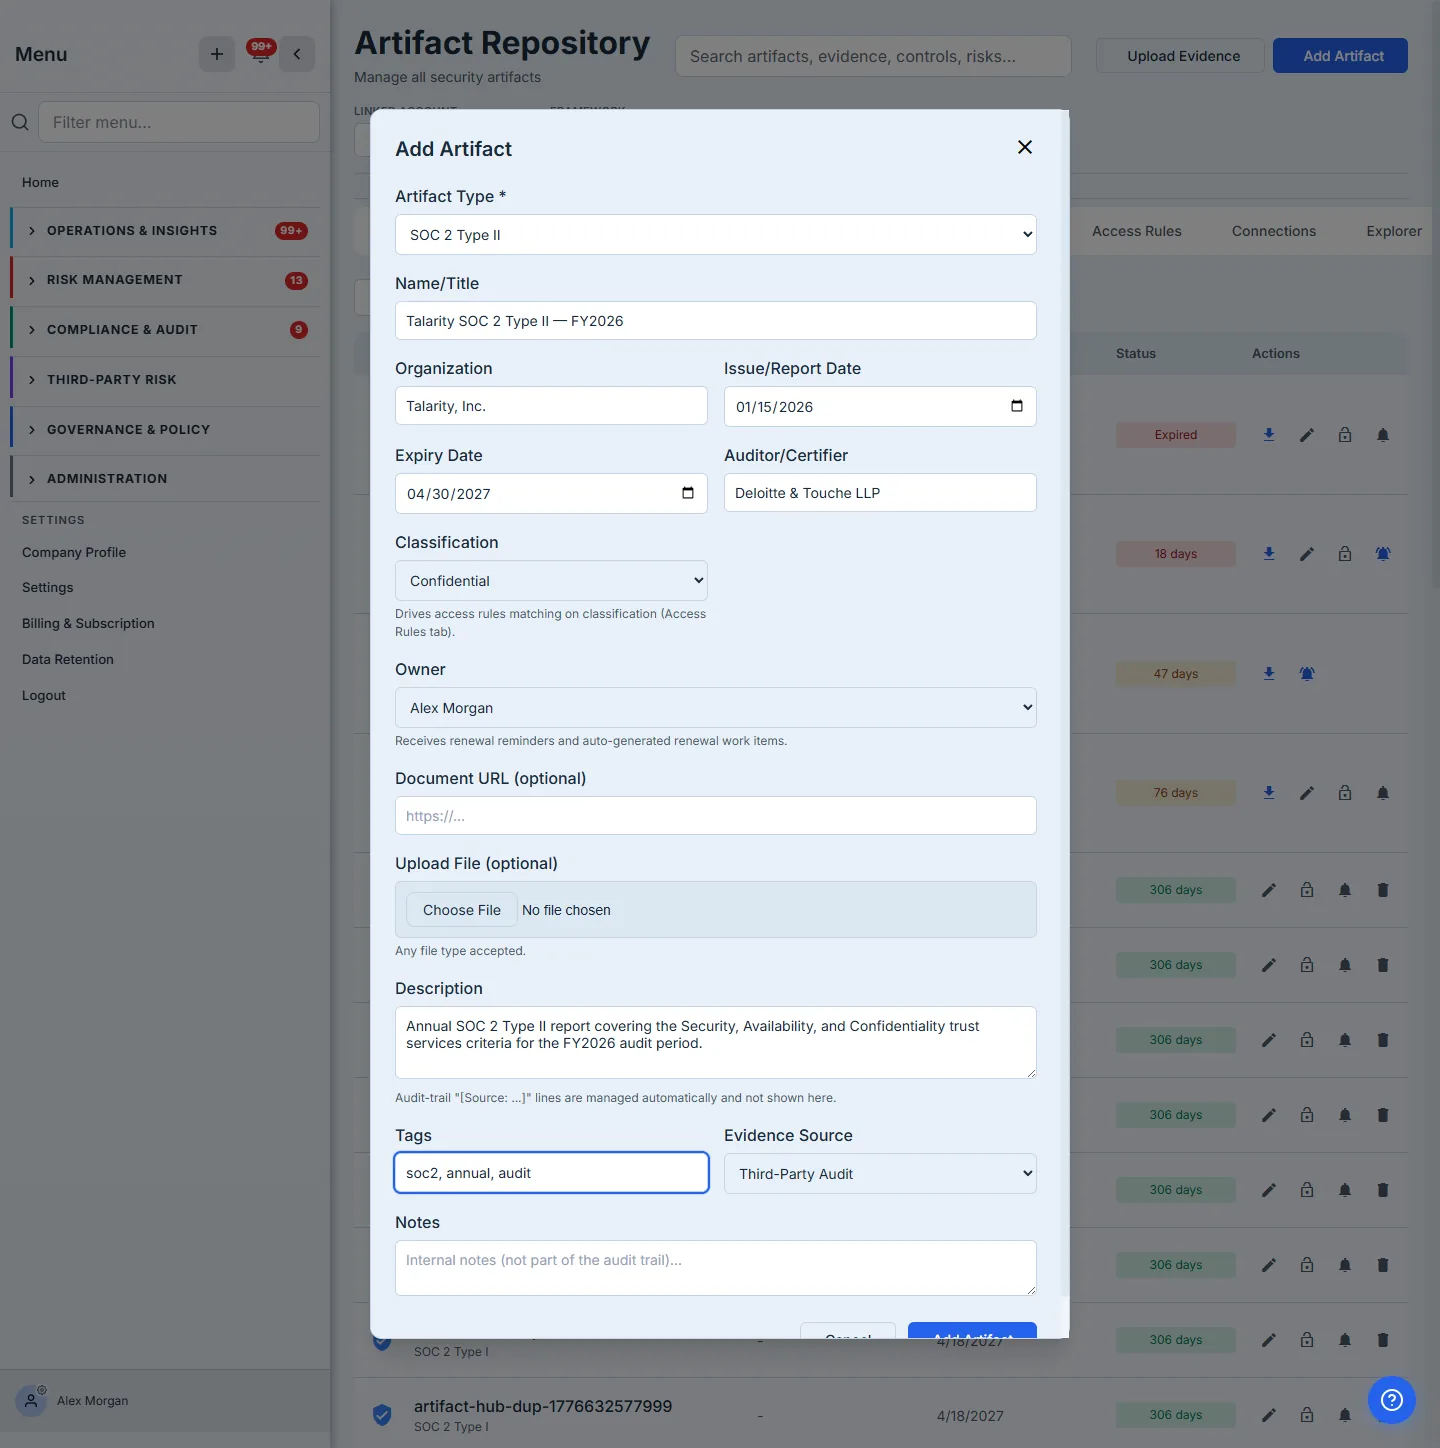
The fields that earn their keep:
- Artifact Type (required) — picks the bucket (SOC 2 Type II, ISO 27001 Certificate, Penetration Test Report, …). The type carries a default validity period and a default reminder cadence, so choosing it well means the rest of the form is half-filled already.
- Expiry Date — the field that drives every reminder downstream. Set it now. A SOC 2 good through next April, a pen test good for 90 days, an insurance cert good for a year — each anchors its own renewal cadence to this date.
- Owner — the person who’ll be on the hook when it lapses. “Receives renewal reminders and auto-generated renewal work items,” as the form says. Most teams leave this on themselves and forget; pick the person who will actually renew it.
- Classification — Public, Internal, Confidential, or Restricted. This isn’t decoration: access rules match on it (Step 8), so classifying a board memo Restricted is what later makes a rule able to find and lock it.
- Evidence Source — the provenance quality: Self-Reported, Internal Review, Automated Collection, Third-Party Audit, or Regulatory Body. An auditor reads a third-party-audited artifact very differently from a self-reported one.
Drop in the file (any type — PDF, DOCX, a scanned cert), add a description and tags, and click Add Artifact. Behind the scenes Talarity stores the file in encrypted object storage, fingerprints it with a SHA-256 hash so the same document isn’t stored twice, and writes the metadata row that every downstream view reads from.
Step 3 — Find anything in All Artifacts
The All Artifacts tab is the working list. Three filters sit across the top — Type, Status (Valid / Warning / Critical / Expired), and Source — and each row carries the artifact at a glance: its type and source-quality badge, the file name and size, a description preview, tags, the owning organization, the expiry date, a colour-coded status badge, and a row of actions (download, edit, manage access, configure reminders, delete).
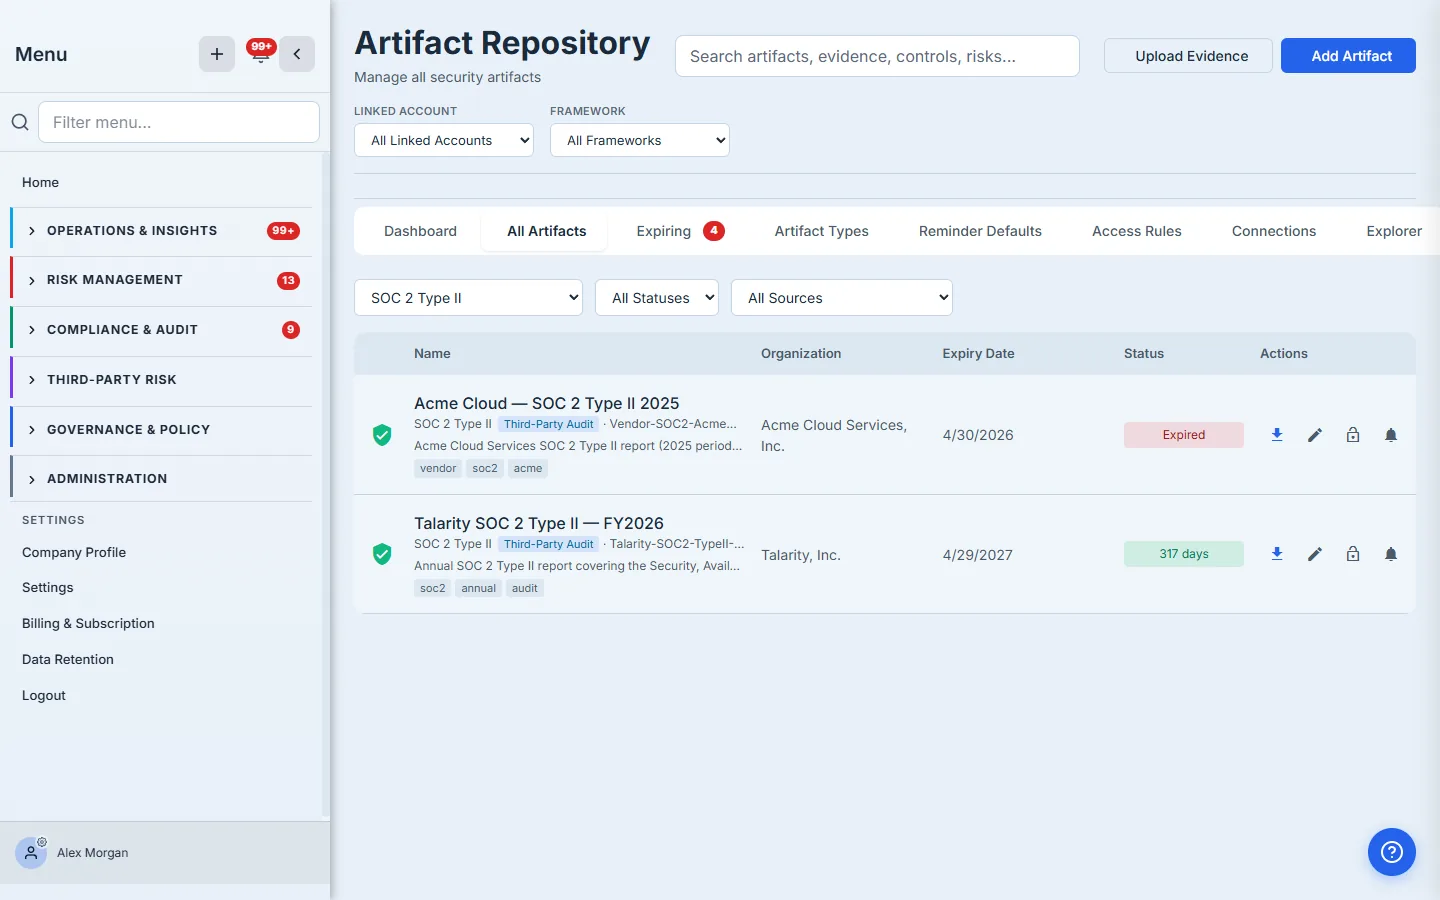
The filter that does the most work is Source. Artifacts don’t only arrive by upload — every part of the platform deposits evidence here with a provenance stamp. Filter to Incident, Remediation, Work Item, Audit Finding, Contract, Policy, DSAR, Risk Register, Assessment Response, or Assessment Run and you see exactly the evidence that flowed in from that workflow, alongside Manual Upload, Vendor Portal, and Automated Collector. The repository is the single home; the rest of Talarity fills it.
The repository protects what’s in use. An artifact that’s linked to a control, an assessment, or a policy shows an In use marker and its delete button turns into a lock — you can’t delete evidence out from under a live citation. Unlink it first, and the list tells you exactly where it’s linked so you know what you’re about to break.
Step 4 — Organize by type
Open the Artifact Types tab to see the taxonomy the whole repository is built on. The built-in types cover the artifacts a GRC program actually collects — SOC 2 Type I and II, ISO 27001 / 27017 / 27018 certificates, penetration tests, vulnerability scans, HIPAA BAAs, PCI DSS AOCs, GDPR DPAs, cyber-insurance certificates, audit reports, policies, procedures, and more — each with a default validity period and the frameworks it maps to.
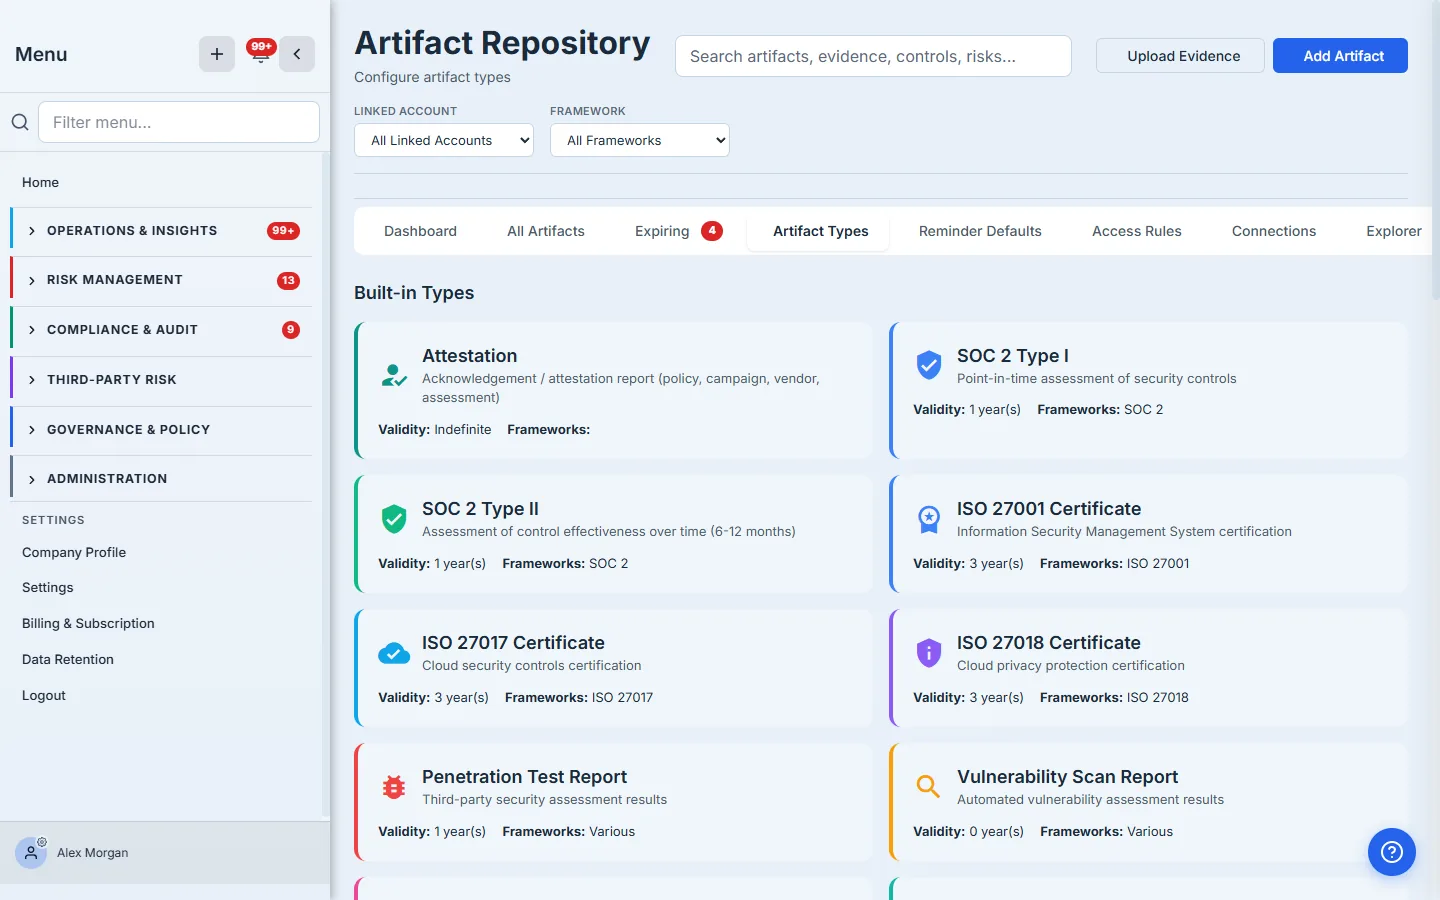
When your evidence doesn’t fit a built-in bucket, make your own. New Artifact Type takes a name, a short description, a validity period (in days or years), the frameworks it supports, and a colour.
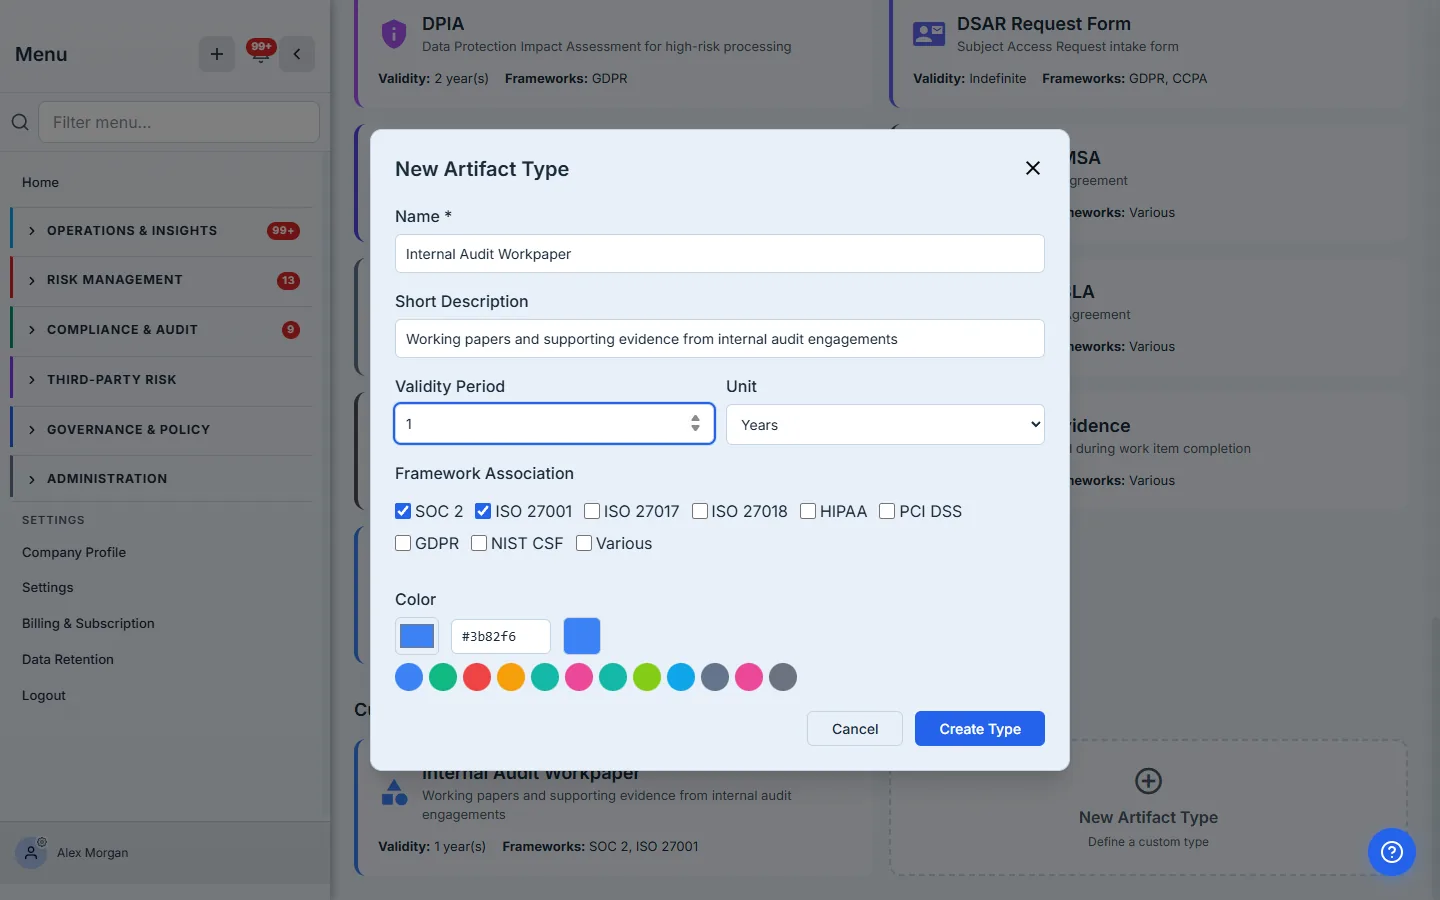
Why bother typing things precisely? Because the type is load-bearing: it sets the default validity (so the expiry is pre-filled), it sets the default reminder cadence (Step 7), and it drives the Dashboard tiles and the framework coverage view. Type once, benefit everywhere. Types you don’t use can be hidden from the Dashboard so the view stays about your evidence.
Step 5 — Track expirations
The Expiring tab is the single screen for “what’s about to lapse.” It groups everything with an expiry date into four buckets by urgency: Expired, Critical (within 30 days), Warning (within 90 days), and Upcoming (within 180 days).
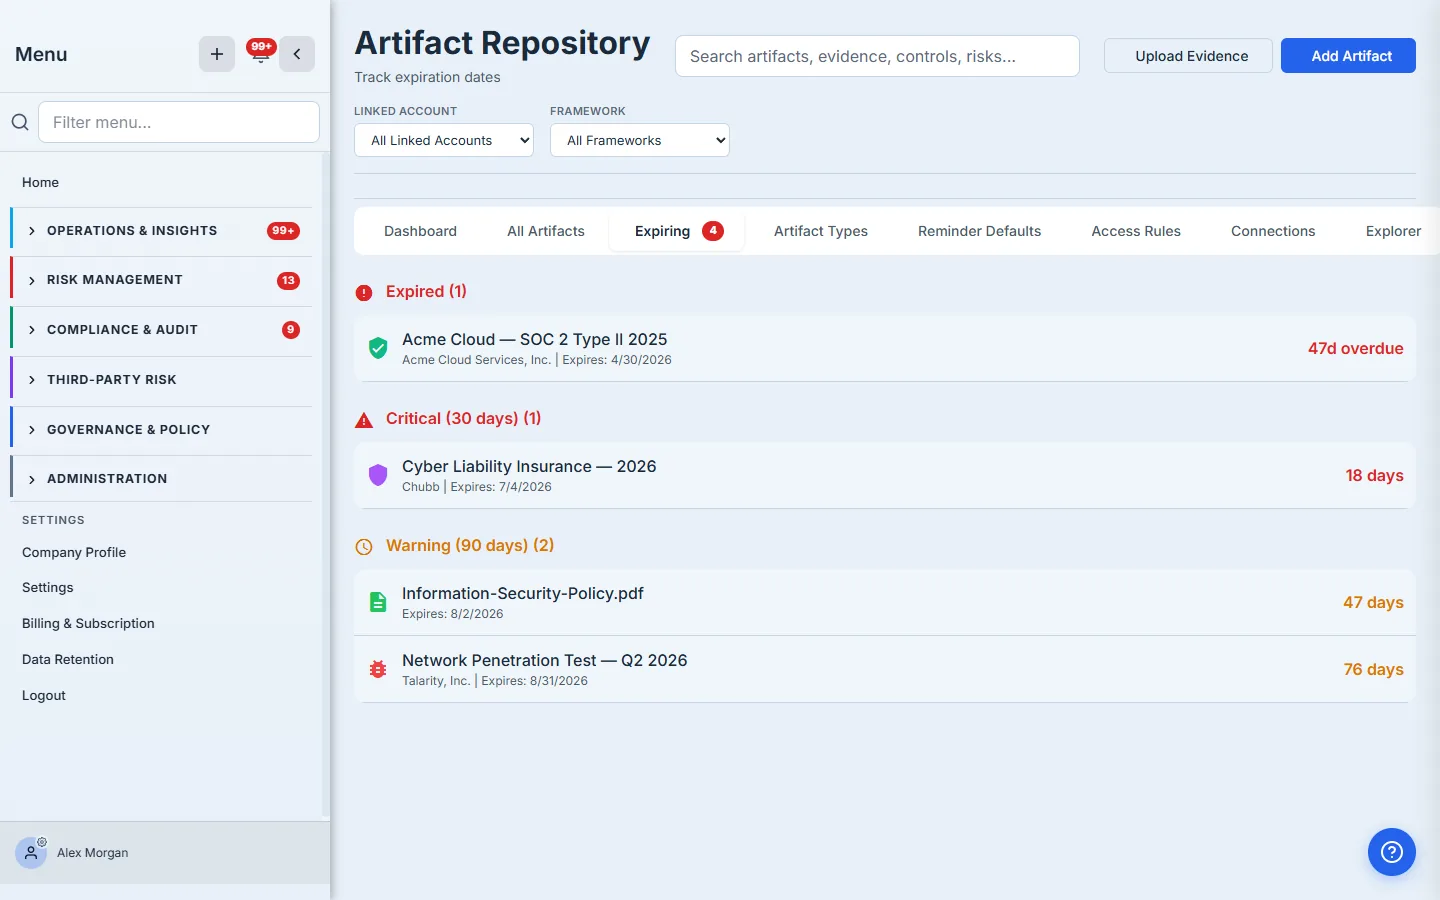
This is the view that prevents the two classic findings: the SOC 2 that quietly went stale and the cyber policy that lapsed between renewals. An expired report isn’t just untidy — to an auditor it’s a control gap, and to the board a lapsed insurance certificate is a real exposure. The bucket tells the owner how much runway is left; the reminders in the next step make sure they don’t have to keep checking.
Step 6 — Never miss a renewal
On any artifact, the bell icon opens its reminder configuration. Turn reminders on, set the lead days before expiry — 90, 60, 30, 14, 7 is a sensible default — and Talarity fires an email and in-app notification at each tier as the date approaches.
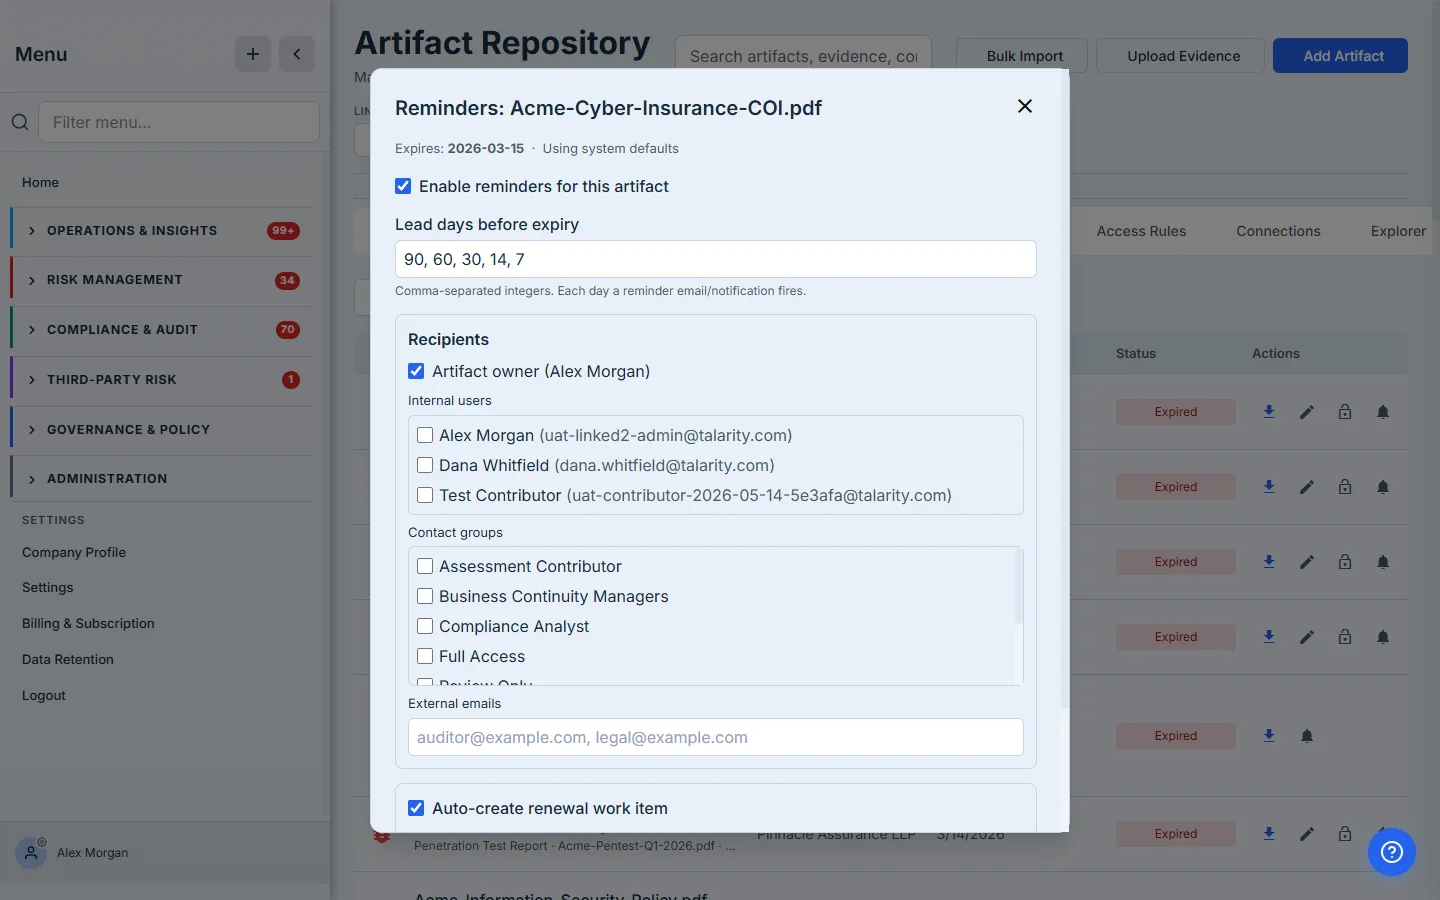
Two parts of this panel are worth dwelling on:
- Recipients aren’t just the owner. Add specific internal users, entire contact groups, or external emails — the auditor of record, outside counsel — so the right people hear about a renewal without anyone forwarding anything.
- Auto-create renewal work item is the difference between “we got a reminder” and “someone is doing it.” Flip it on and N days before expiry Talarity spawns a real work item assigned to the owner (or whomever you name), so the renewal lands in a queue with an owner and a due date — not just an inbox.
The panel also tells you where the schedule comes from — a per-artifact override, the org default for this type, or the system default — and a Send now button fires the reminder immediately, with a History of every reminder that’s already gone out.
Step 7 — Set the cadence once, not fifty times
You don’t want to configure reminders on every SOC 2 by hand. The Reminder Defaults tab sets the cadence per type, and every new artifact of that type inherits it.
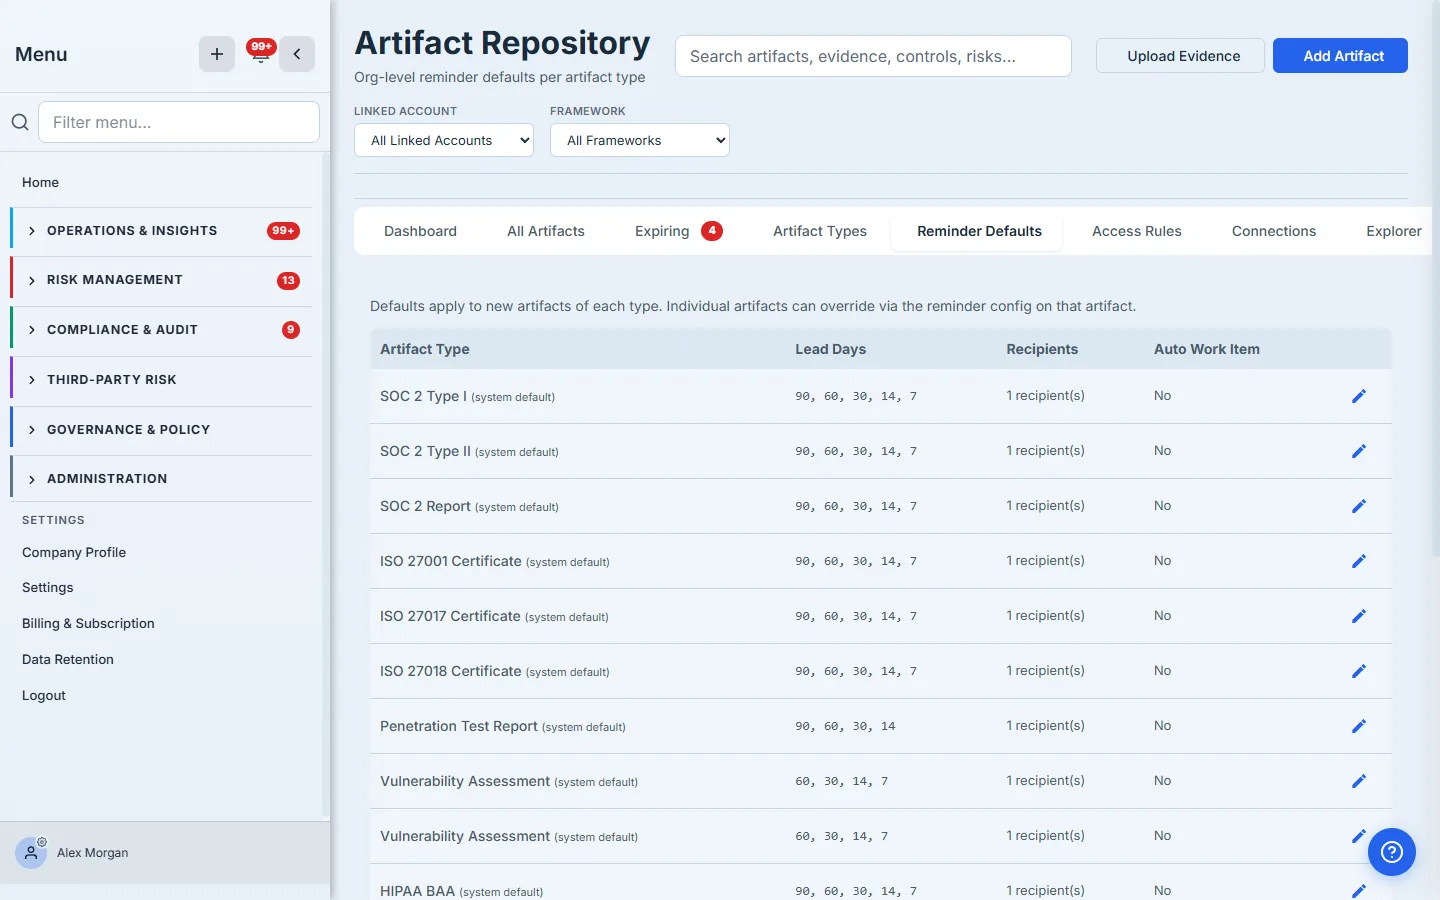
Open the editor for a type and you get the same controls as the per-artifact panel — enabled by default, lead days, default recipients, and whether to auto-create the renewal work item.
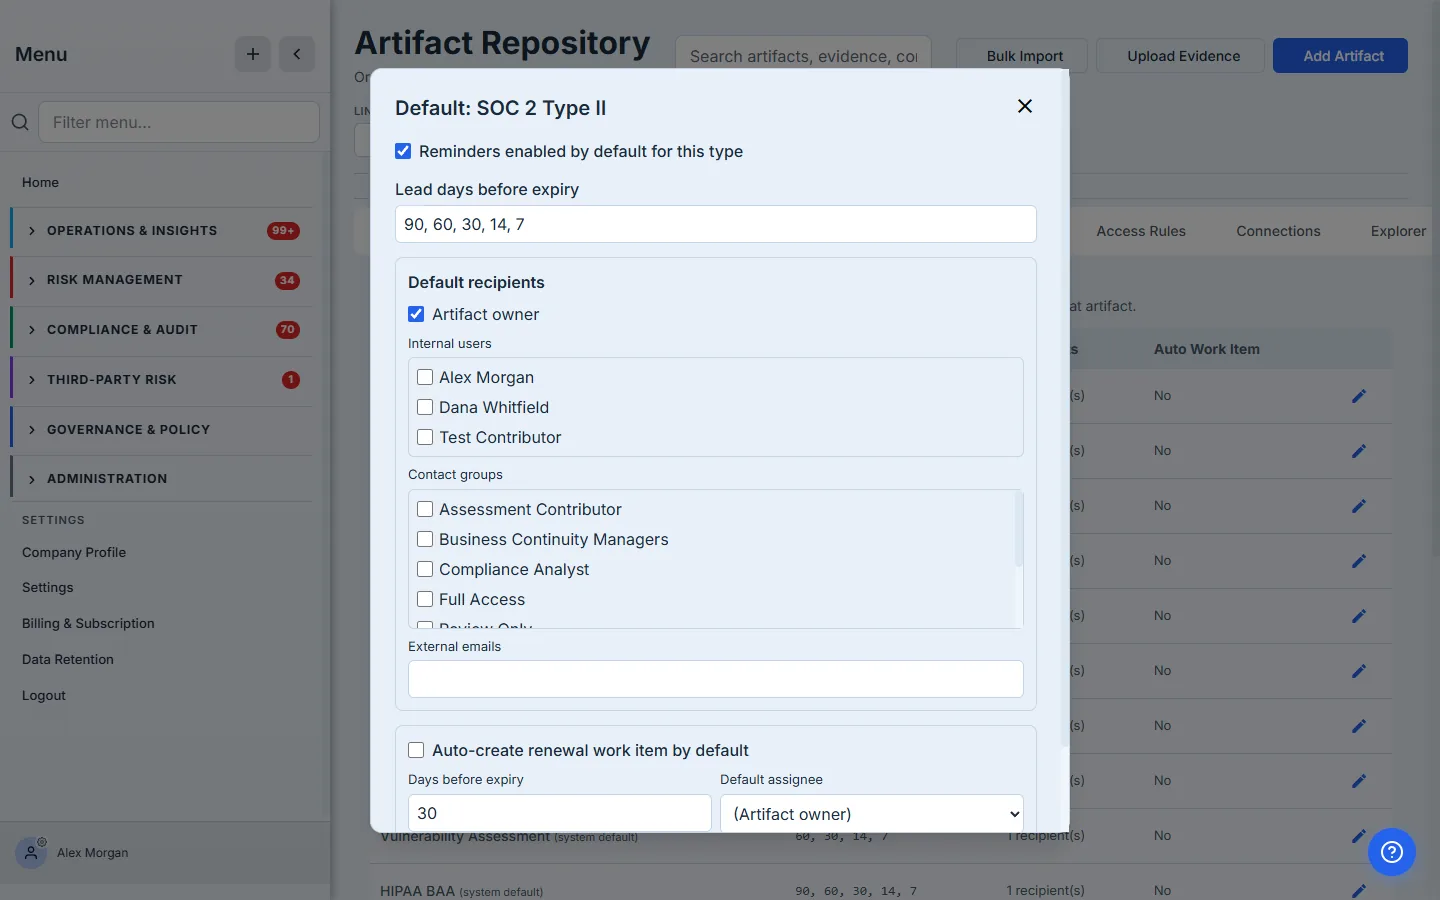
Set SOC 2 Type II once to remind 90/60/30/14/7 days out and auto-create a work item 30 days before expiry, and every SOC 2 you ever add inherits it. An individual artifact can still override its own schedule (Step 6) when it needs to — defaults are the floor, not a cage.
Step 8 — Govern who can see each artifact
Not every artifact should be visible to everyone. A board cyber-risk memo, a customer’s confidential report, a payroll record — ISO 27001:2022 (A.5.12 classification, A.8.3 access restriction) and SOC 2 CC6.1 both expect access to be granted by need-to-know, not by default. The Access Rules tab makes that a property of the repository rather than a folder convention.
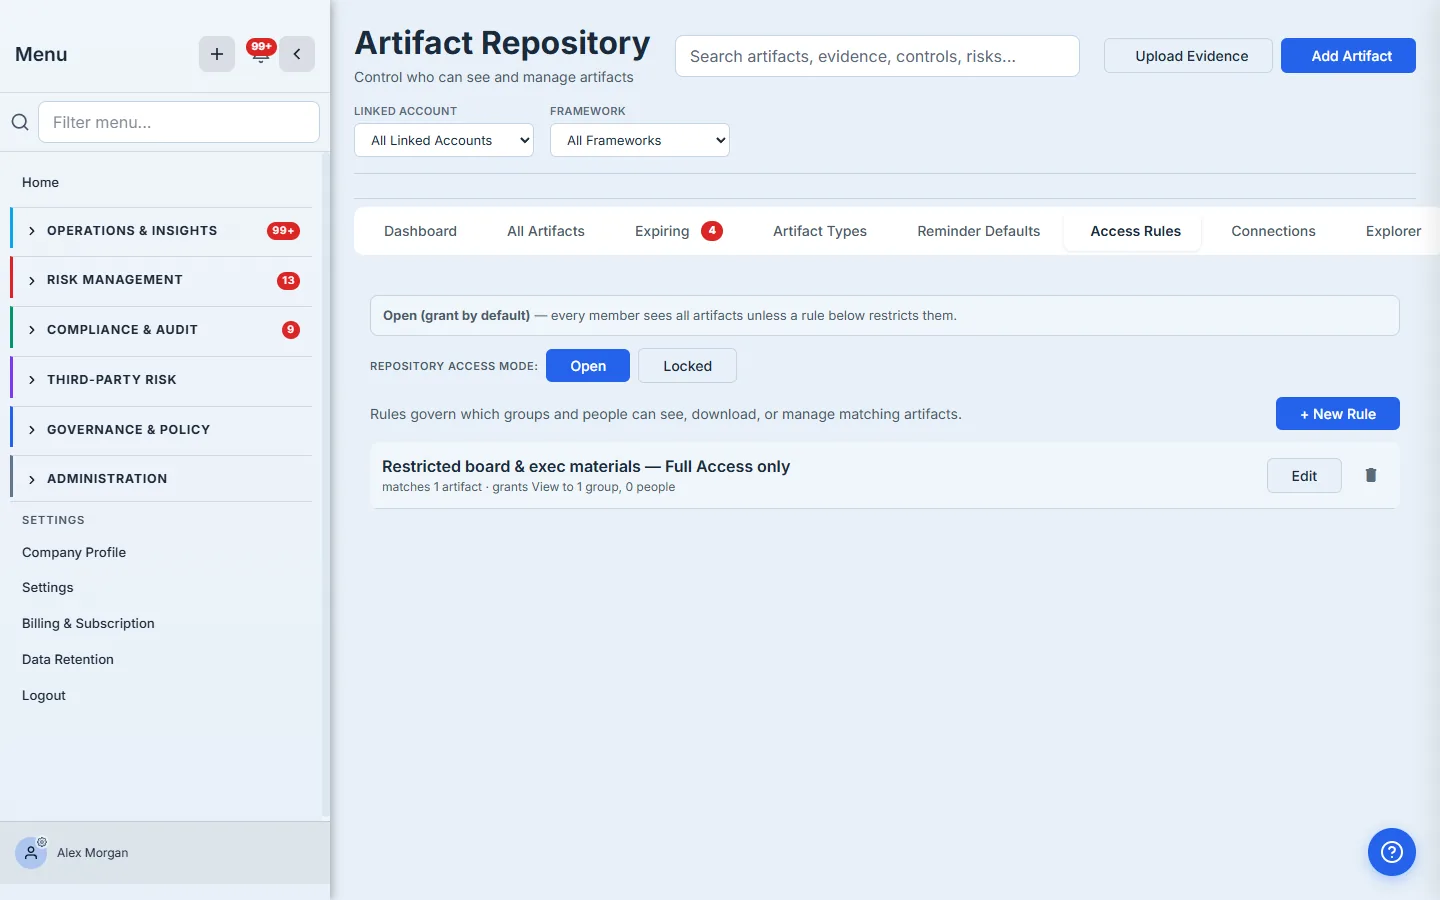
First, the posture. The Repository access mode toggle picks what happens when no rule matches an artifact: Open (every member sees everything unless a rule restricts it) or Locked (artifacts are hidden from non-admins unless a rule grants access). Then you write rules.
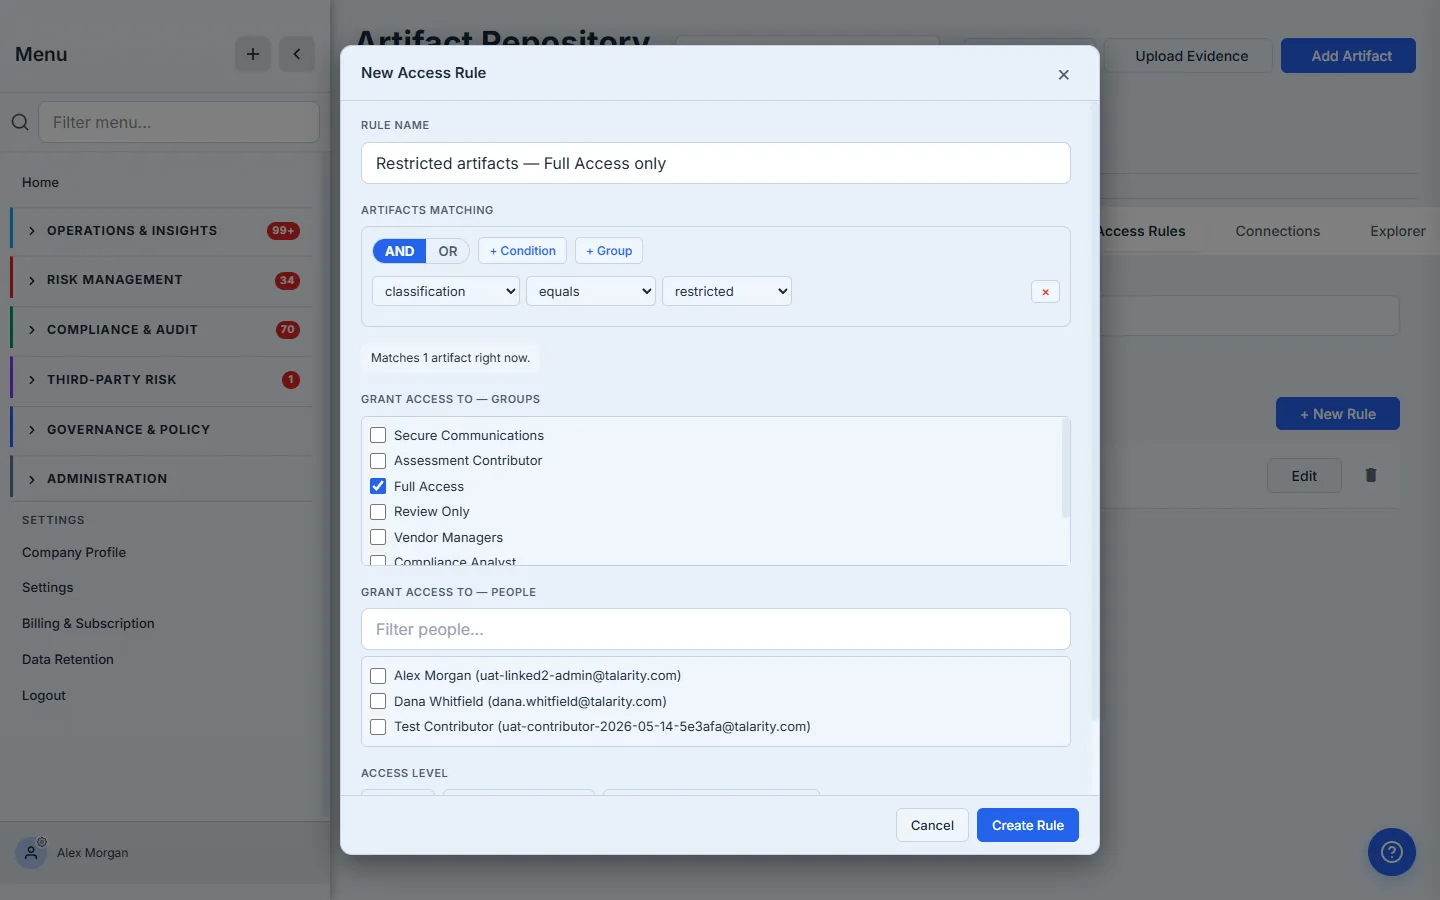
A rule matches artifacts by their metadata — classification, category, tags, document type, owner, expiry date, and a dozen more fields — and grants the matching set to chosen groups and people at a level of View, View + Download, or View + Download + Manage. As you build the condition, the modal previews “Matches N artifact right now” so you can confirm the predicate selects what you intend before you save. Here a single rule says anything classified Restricted is visible only to Full Access, at View level — and it immediately matches the board memo we classified in Step 2.
When a rule is the wrong shape — a single sensitive document that shares no classification with anything else — lock that one artifact directly. The lock icon on its row opens a per-item dialog: set the classification, flip Restrict this artifact to specific groups / people, pick the level, and choose the principals. A per-item override is authoritative — for that one artifact, the rules are skipped and this dialog is the final word.
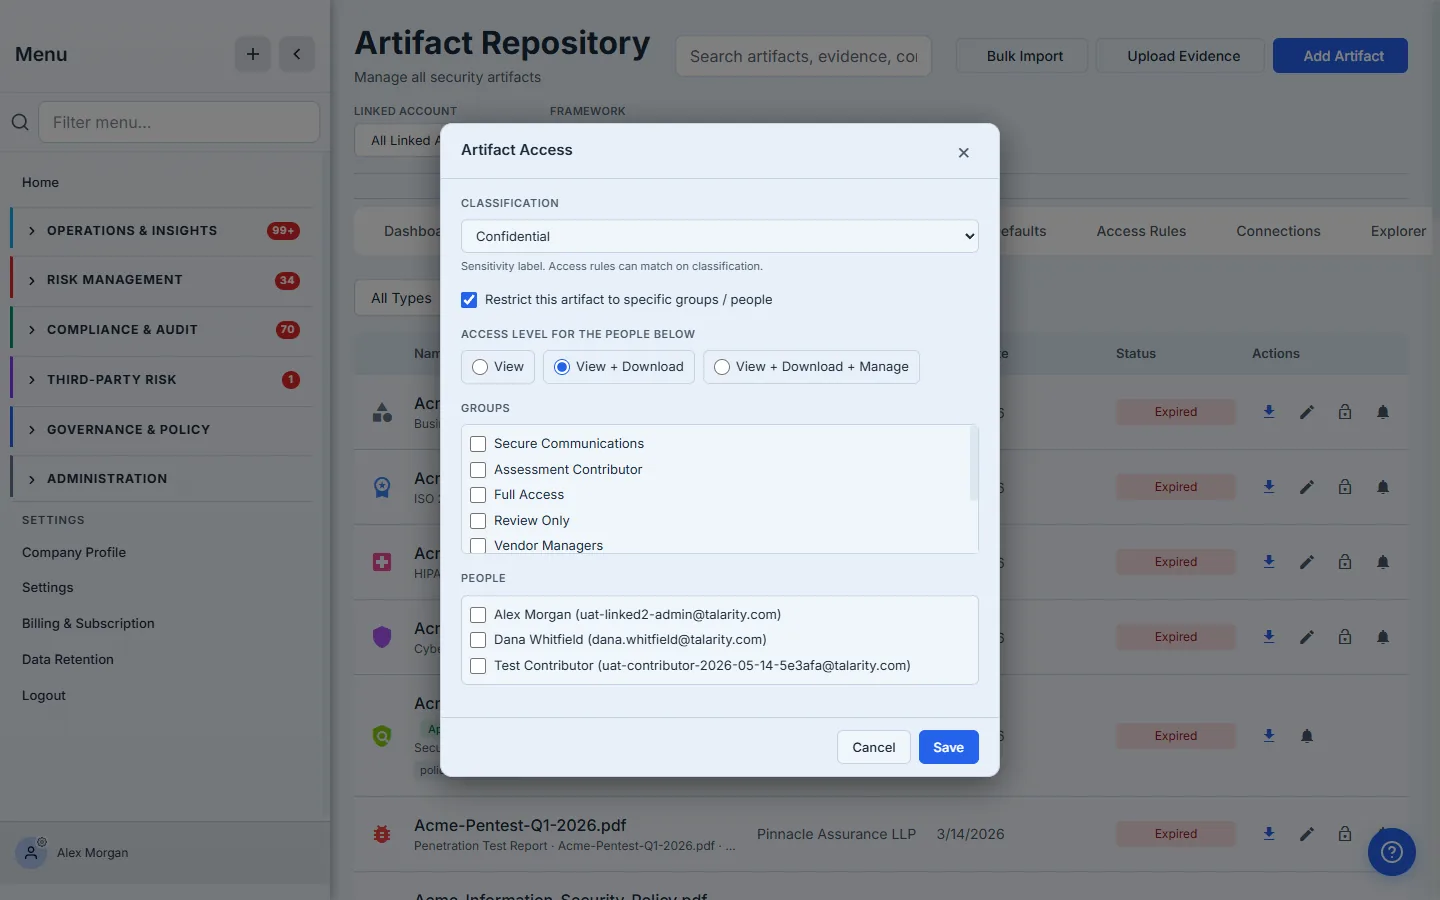
There’s a deliberate, important subtlety here: a grant of View is not a grant of Manage. Even a Full Access admin who’s granted only View on a restricted artifact can’t change its access settings — so least-privilege holds even against the people who wrote the rule. The full mechanics — what a non-member actually sees (the restricted rows vanish from their list entirely, filtered at the database, not greyed out), the “Full Access is not a bypass” rule, and the audit trail on every grant — are covered in Lock down a document to one team.
Step 9 — One artifact, many links
The payoff of doing all of this properly is reuse. An artifact lives once in the repository and is linked from everywhere it’s needed — the SOC 2 that satisfies a CIS control, the ISO control on a different framework, a vendor questionnaire, a risk in the register. Open any artifact’s edit view and the Used In panel shows every place it’s cited, alongside an Access summary of who can see it and at what level.
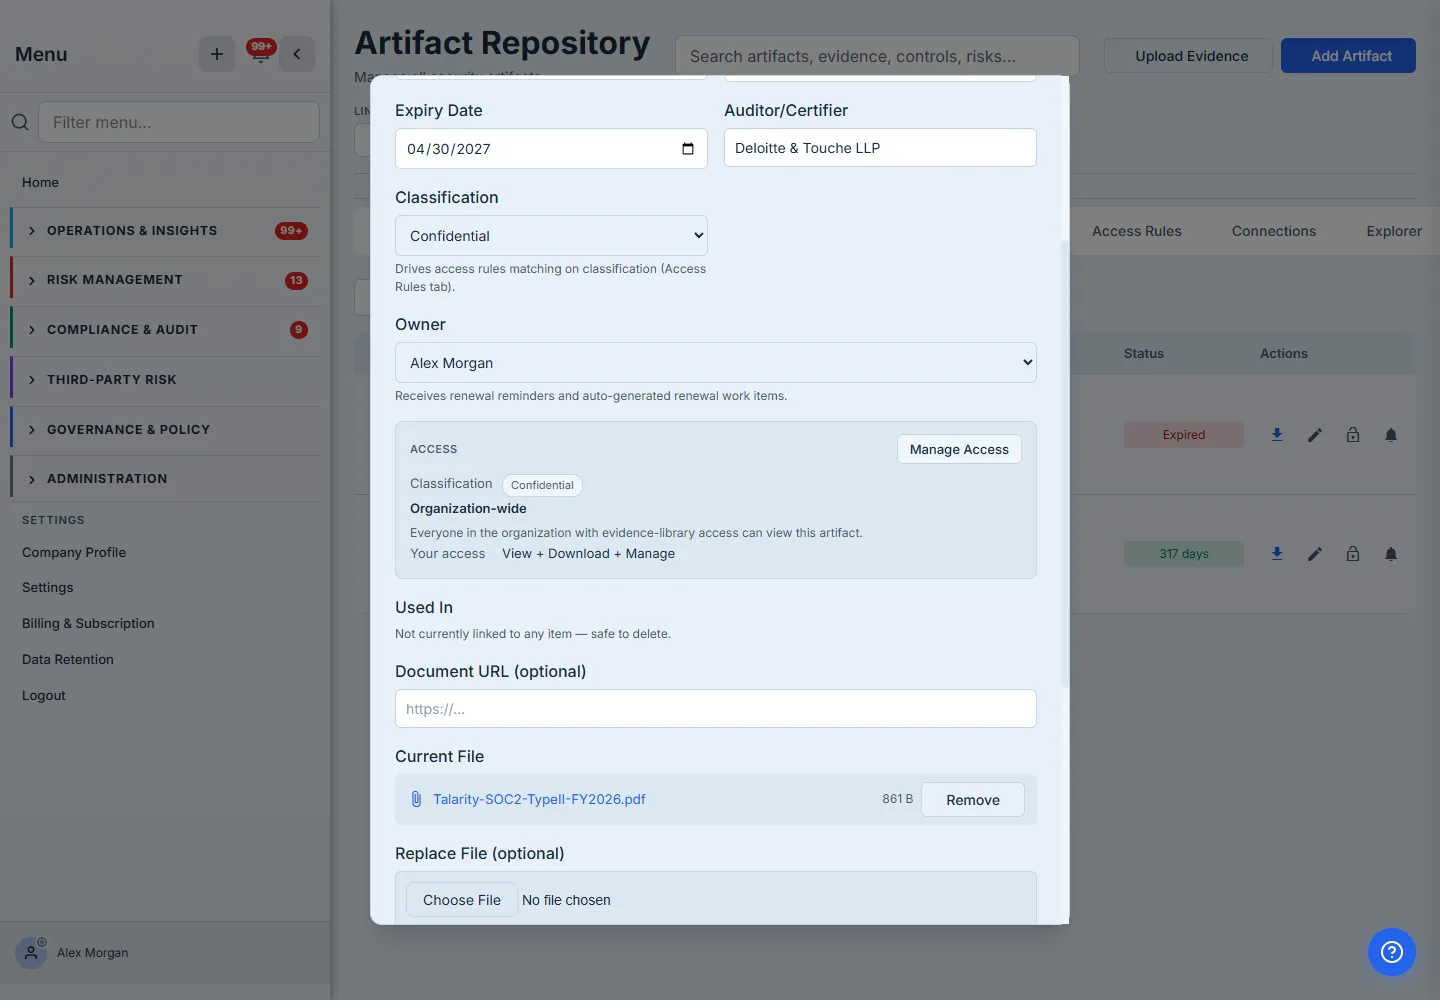
Here the SOC 2 isn’t linked yet, so the panel says “safe to delete.” The moment you link it — from a gated assessment’s evidence picker, a control, a policy, or a risk — that line flips: the panel lists every consumer and the delete button locks, so you can never orphan a live citation. The same physical file, fingerprinted once, can back a CIS control and the matching ISO 27001 control and next year’s audit — uploaded once, reused everywhere, every link pointing at the single source. The two flows that create those links in earnest each have their own walkthrough: evidence that unlocks a gated assessment and a policy that lives in the repository and the Policies tab at once.
(Two more tabs sit at the end of the row — Connections maps how artifacts relate to the entities that cite them, and Explorer drills into framework coverage. Both are part of the wider Data Hub and are a topic of their own.)
What you walk away with
- One home for every artifact — certificates, reports, policies, insurance, contracts — typed, owned, and searchable, instead of three folders and a guess about which copy is current.
- Expiry that tracks itself — a four-bucket view of what’s lapsing and tiered reminders that reach the owner (and a real renewal work item) before it does.
- Defaults you set once — reminder cadence per artifact type, inherited by every future upload, overridable per artifact.
- Access by need-to-know — Open or Locked posture, rules that match by classification and a dozen other fields, per-item locks for one-offs, and View / Download / Manage levels that hold even against admins.
- Upload once, reuse everywhere — one fingerprinted file linked from every control, assessment, and framework that needs it, protected from deletion while it’s in use.
Open /app/artifact-repository this afternoon and add the one artifact an auditor always asks for first — your current SOC 2 or ISO certificate. Pick the type, set the expiry, name the owner. The first upload takes about two minutes; from then on, Talarity tracks the date, reminds the owner, and hands the same file to every framework that needs it.