An auditor rarely asks “do you have that control?” They ask how you tested it, on what population, how the sample was chosen, and what happened to the items that failed. Those four questions are where most control programmes come apart — not because the control is weak, but because the testing that proves it lives in a spreadsheet, a screenshot folder, and somebody’s memory of which rows they looked at.
This walkthrough follows a single control through the full cycle: authoring the procedure, drawing a defensible sample, running the test against it, raising an exception when the control does not hold, and verifying the fix afterwards. Each stage hands something concrete to the next.
Who’s involved
- The control owner — writes and versions the test procedure, and owns the remediation when a test fails.
- The tester — draws the sample, runs the test, and records the result against the draw that selected the items.
- A verifier — confirms a remediation independently, because the person who fixed something is not the person who should confirm it.
- Auditors — who ask which population was sampled, by what method, and whether the draw can be reproduced.
What’s on the page
Control testing spans a few surfaces, because the stages genuinely belong to different people. The routes are stable; the sidebar groups several of them under a hub, so the name you click is not always the name of the page:
- Test Procedures (
/app/grc/test-procedures) — the written method, versioned. Editing one creates a new version rather than overwriting the old, so a test run last quarter still points at the text that was in force then. - Sampling (
/app/grc/sampling) — reached from Audit Management in the sidebar, where it is the Sampling tab. Import a population, draw a selection from it, and attach the result to a workpaper. - Control Testing (
/app/control-testing) — reached from Control Testing Dashboard. Start a test on a control, apply a procedure to that test, and record the result. - Control Exceptions (
/app/control-exceptions) — where a control that is knowingly not being met is recorded, with a risk level and an expiry. - Remediation Verification (
/app/remediation-verification) — the Verification tab under Work Items: the queue of fixes waiting for someone other than their author to confirm them.
Start with the procedure, and version it
Open Test Procedures. There are three ways in, and the differences matter more than they look.
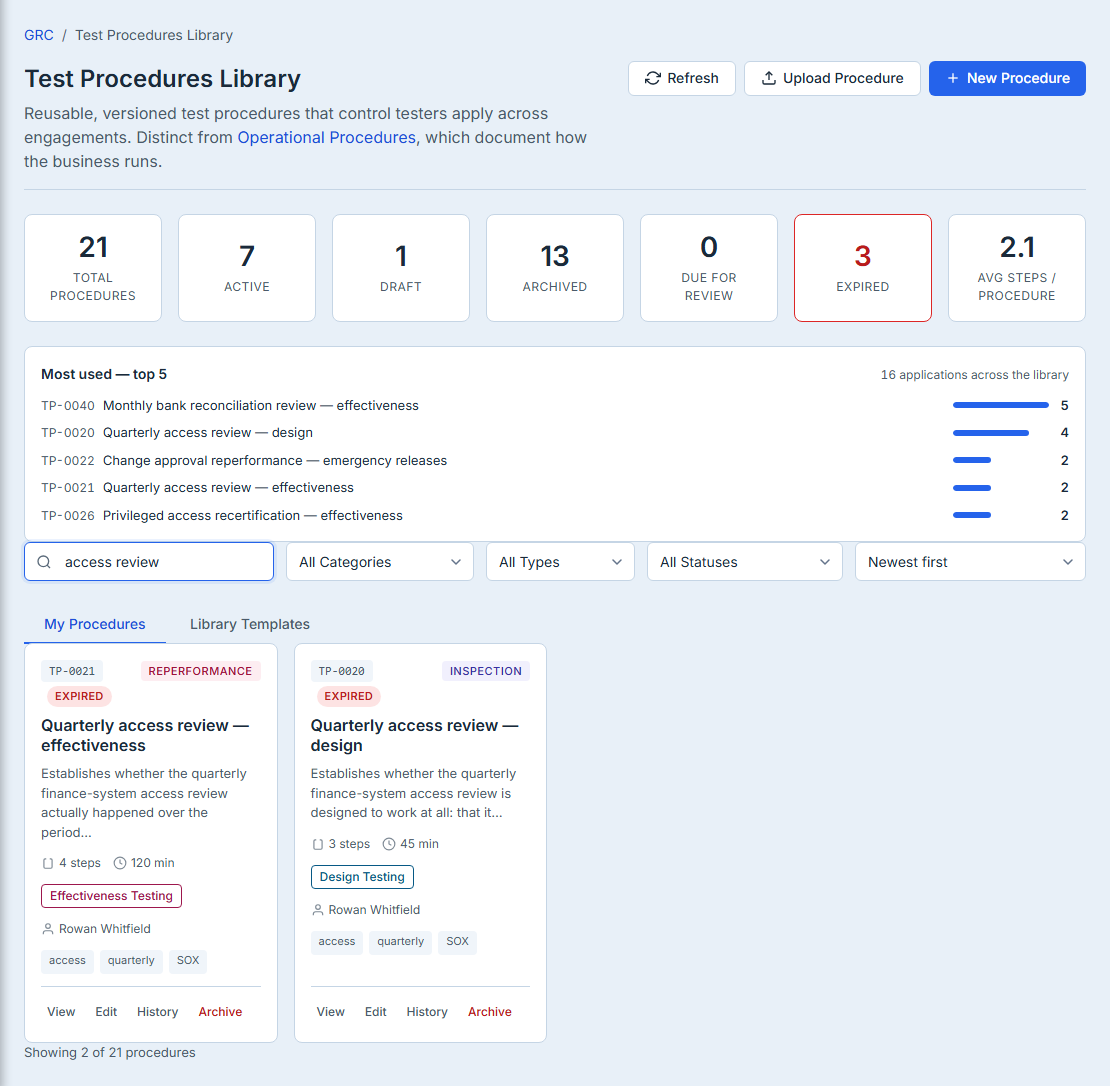
New Procedure authors a step-by-step procedure inside the platform: what you examine, how many items, what counts as a pass. Upload Procedure does something different — it stores a finished document — a PDF or a Word file, typically — in the Artifact Repository and registers it. An uploaded procedure has no steps, so when you later apply it to a test the checklist arrives empty. If you want the working checklist this walkthrough ends with, author it with New Procedure.
Archive on a card retires a procedure without destroying it — the summary cards above count thirteen archived — and an archived procedure can be restored from the Test Procedures page, so archiving the wrong one is recoverable.
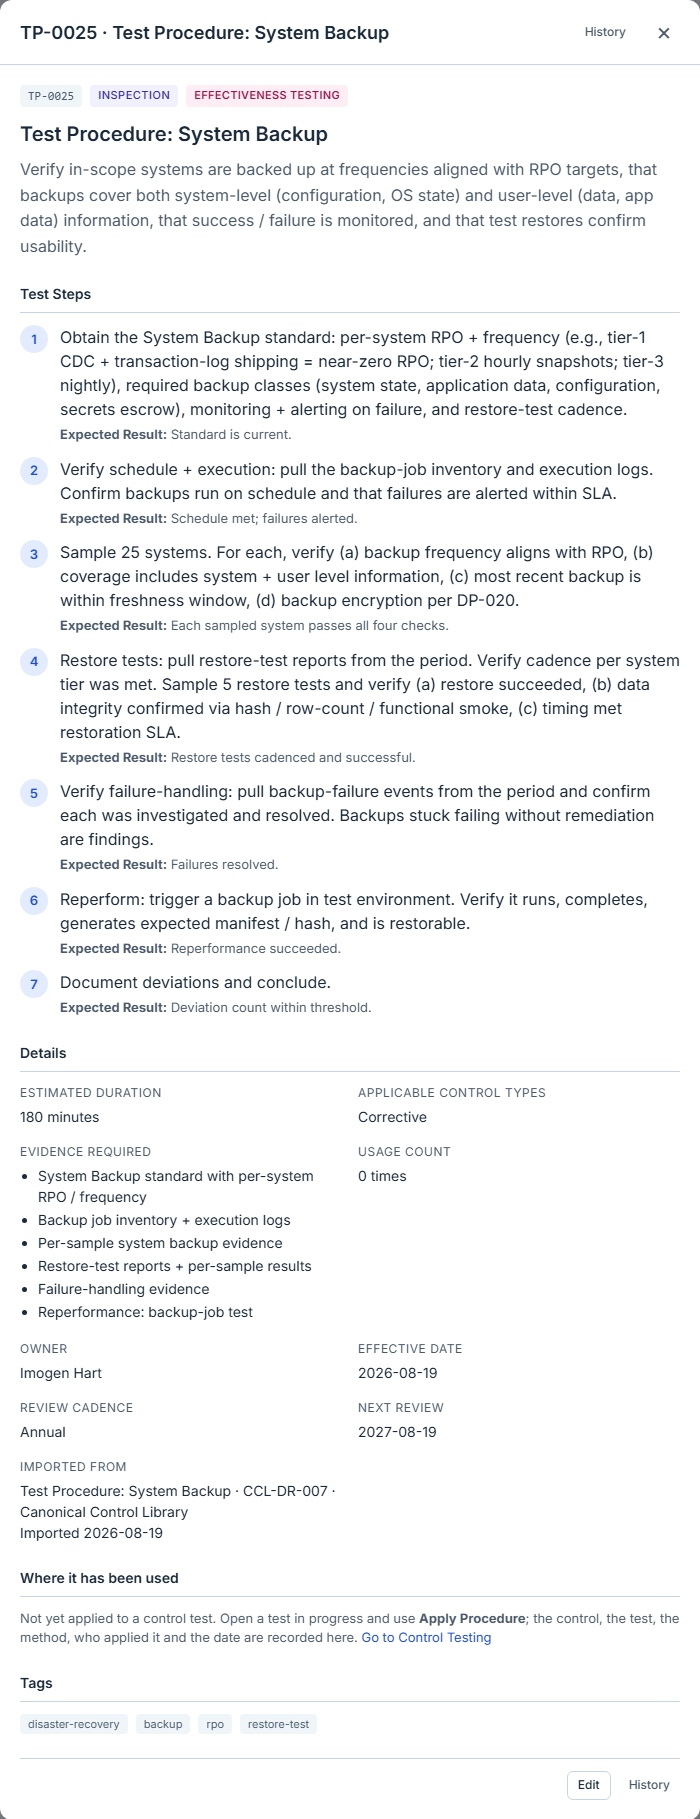
The reason to keep the method here rather than in a document is the version history. Every card on My Procedures carries a History button beside View, and it lists that procedure’s revisions. (Cards on the Library Templates tab carry Preview and Import instead — a platform template has no revisions of yours until you import it and start editing your own copy.) When a test cites a procedure it cites the version — so “we tested this quarterly” survives the procedure being rewritten in March.
Draw the sample where the draw is recorded
Open Sampling. The page has two panels that are easy to confuse, and only one of them draws anything.
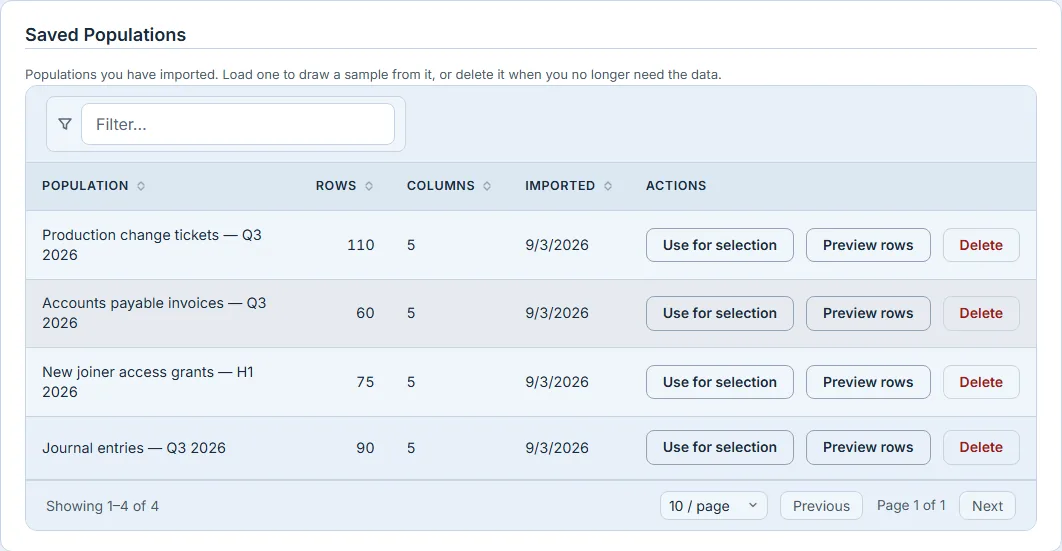
The Sample Size Calculator is a planning aid. Give it a population size, a confidence level and your tolerable and expected deviation rates, and it tells you how many items to examine. It computes a number; the calculation itself is not stored, though Save as Plan beneath the result opens a plan form with the population, the size and the confidence level carried across. It does not carry the tolerable and expected deviation rates, so if those matter to your working papers, write them into the plan yourself. The calculated size also drops into the Selection Engine’s Sample Size field below if you have not typed one, so the number you planned with is the number you draw with.
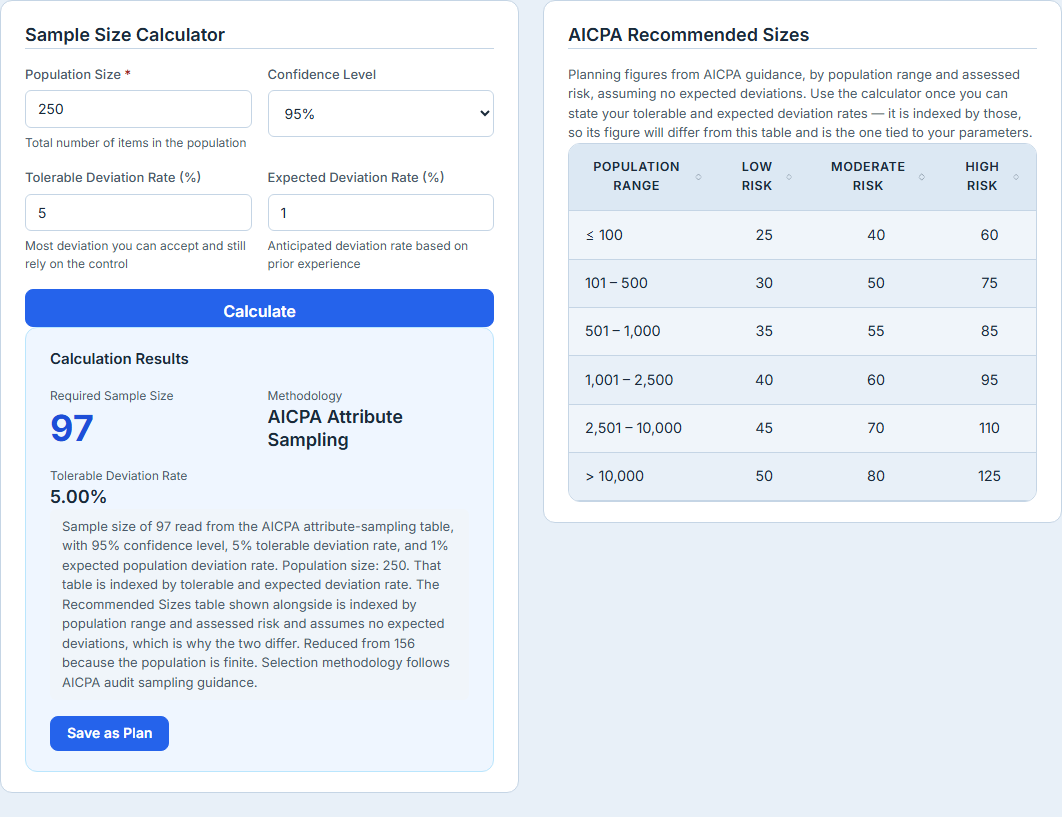
The draw is the Selection Engine beneath it. Run Selection stays disabled — reading import a population first — until the engine has a population to draw from, and there are two ways to give it one. The first time, importing uploads a CSV. After that the population is saved, and the way back to it is Use for selection on its row in Saved Populations, the panel above. Reach for that rather than importing the same file twice: a second import is a second population, and the whole point of this page is that a draw traces to a recorded one. Then choose a method and a size and press Run Selection. That is the button that stores the draw: the method, the size, and the seed that produced it. Two of the methods ask for one more column before they will run — Monetary-Unit needs the amount column, and stratified needs the column to stratify on.
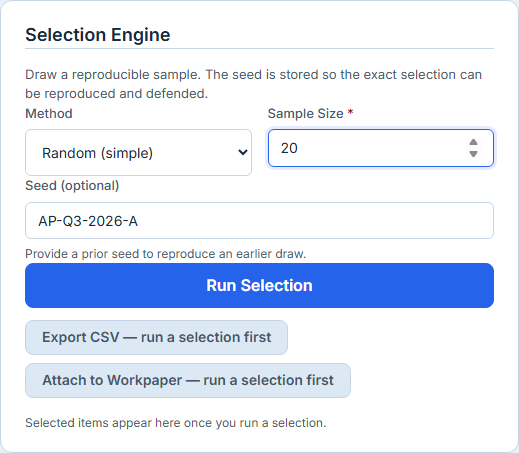
That seed is the point. “We picked 25 invoices” invites the question of which 25 and why those. A stored seed makes the draw reproducible — the same population and the same seed give the same rows back, which is a materially different conversation with an auditor than a spreadsheet of row numbers.
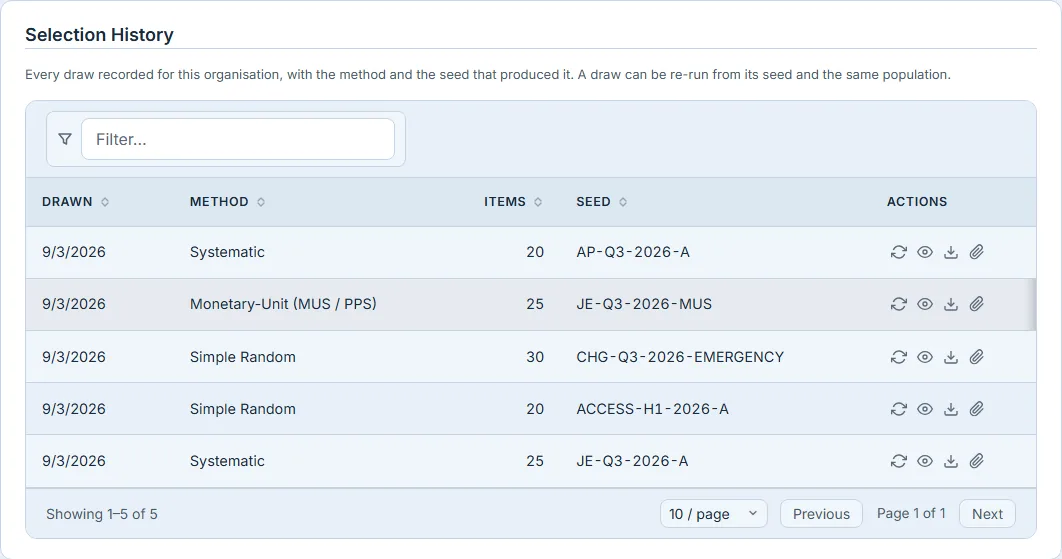
Selection History is where those draws are read back. Each row keeps its method and seed, and offers four actions as icon buttons in the Actions column — they are the four icons closing each row above, and hovering names each one: Re-run this draw, View selected items, Export CSV, and Attach this draw to an audit workpaper. The export is what hands an auditor the sampled rows themselves rather than a screenshot of them. It is not the only export in the flow — the control register and the remediation planner each export their own CSV — but it is the only one that answers which items did you look at.
One practical note about this table and the exceptions register further down: on a 1440-wide window both ask for slightly more width than the panel they sit in — 59 pixels here, 11 on the register — so the panel scrolls sideways. In practice the columns compress and everything, including the row actions, still renders; what you may need the scroll for is the last few pixels of padding. Worth knowing mainly because nothing on the page announces it: there is no persistent scrollbar or edge shading at rest.
Attach to Workpaper binds a selection to the workpaper it supports. That needs a workpaper to exist first, from Audit Workpapers — a day-one organisation has none, and the panel says so and tells you the draw is safe to attach later.
Run the test against the sample you drew
Open Control Testing and pick the control you are testing.
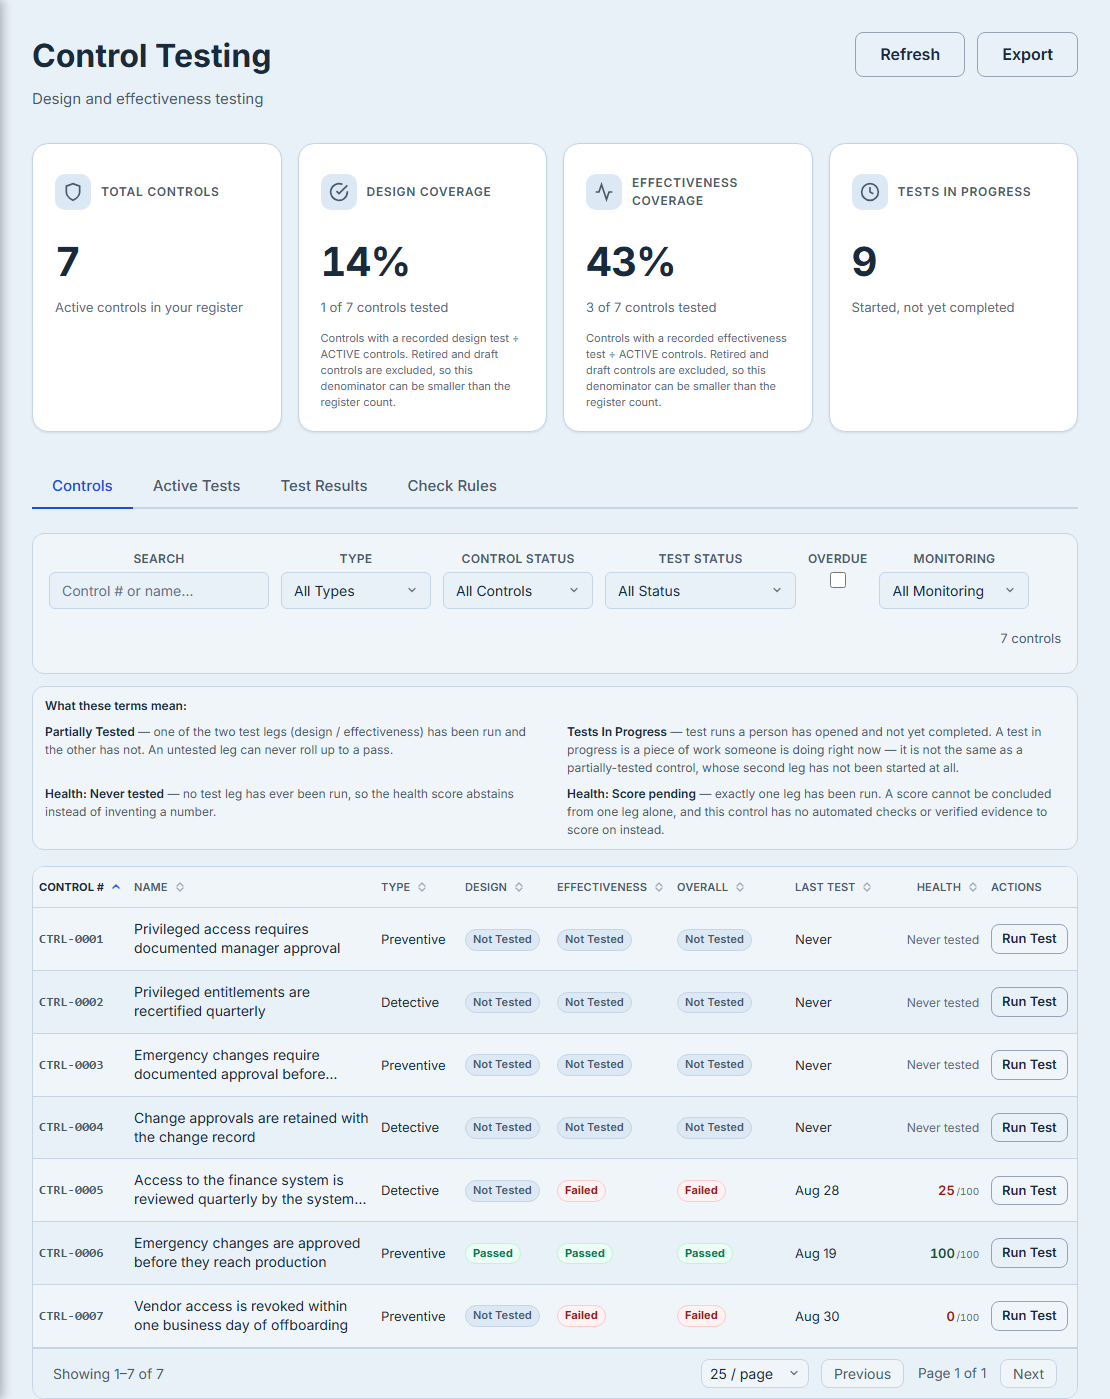
Run Test offers two cards: a Design Test, which asks whether the control is built to work, and an Operating Effectiveness Test, which asks whether it did. Choose the effectiveness test and it asks which drawn selection it examines. This is the hand-off the whole walkthrough is built around — and it is worth starting the test from Run Test for exactly that reason. The Start OE Test shortcut on a control’s own detail panel opens the test without asking, and a test started that way carries no selection.
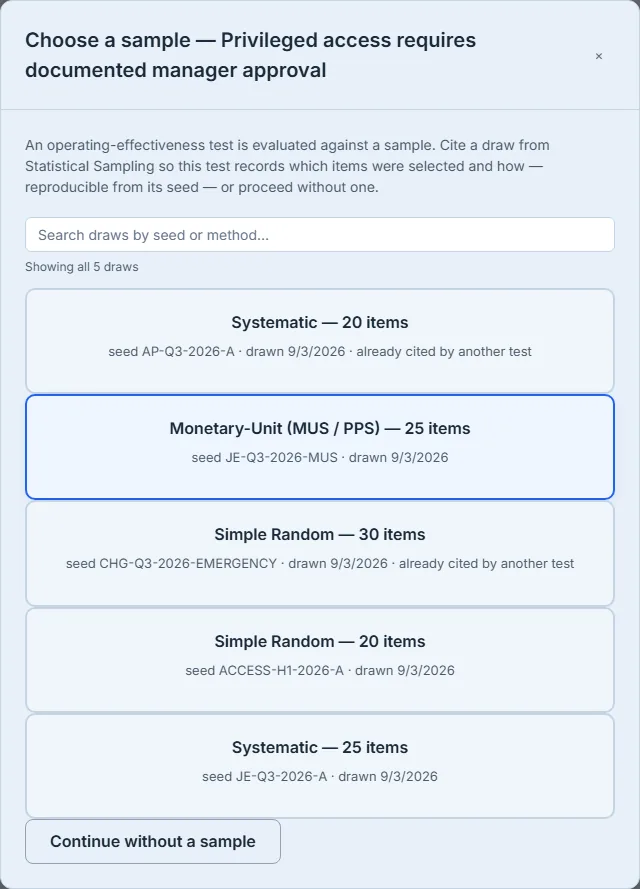
Pick the sample from the previous step and the test records its size, method, seed and the selection it came from — taken from that draw rather than retyped, which is what stops a test claiming a sample size the draw never produced. The test detail shows you the size; the method and the seed stay with the draw in Selection History, which is where you go to reproduce it.
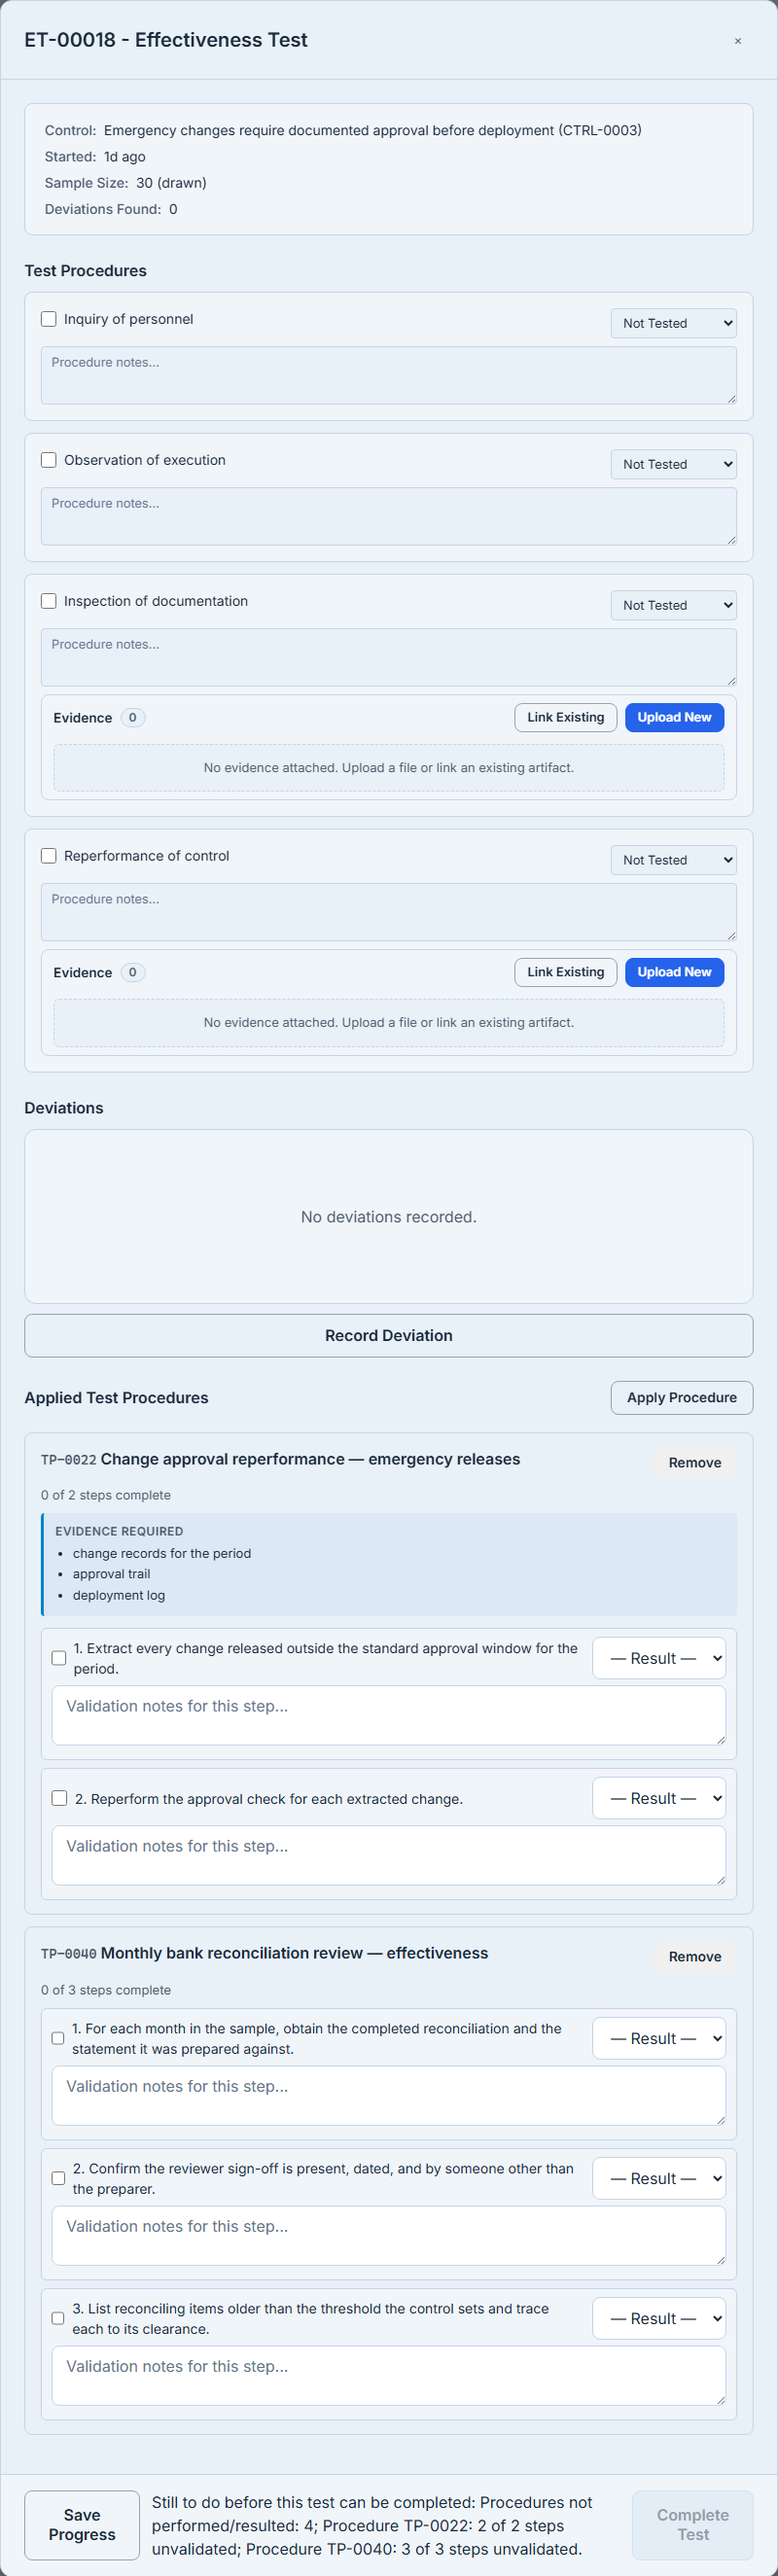
There is also Continue without a sample. Some tests genuinely do not sample — an inspection of a single configuration, a walkthrough of one process. Taking that option records that the test was run without a selection, which is an answer; the thing to avoid is a test whose sample size was typed by hand and traces to nothing.
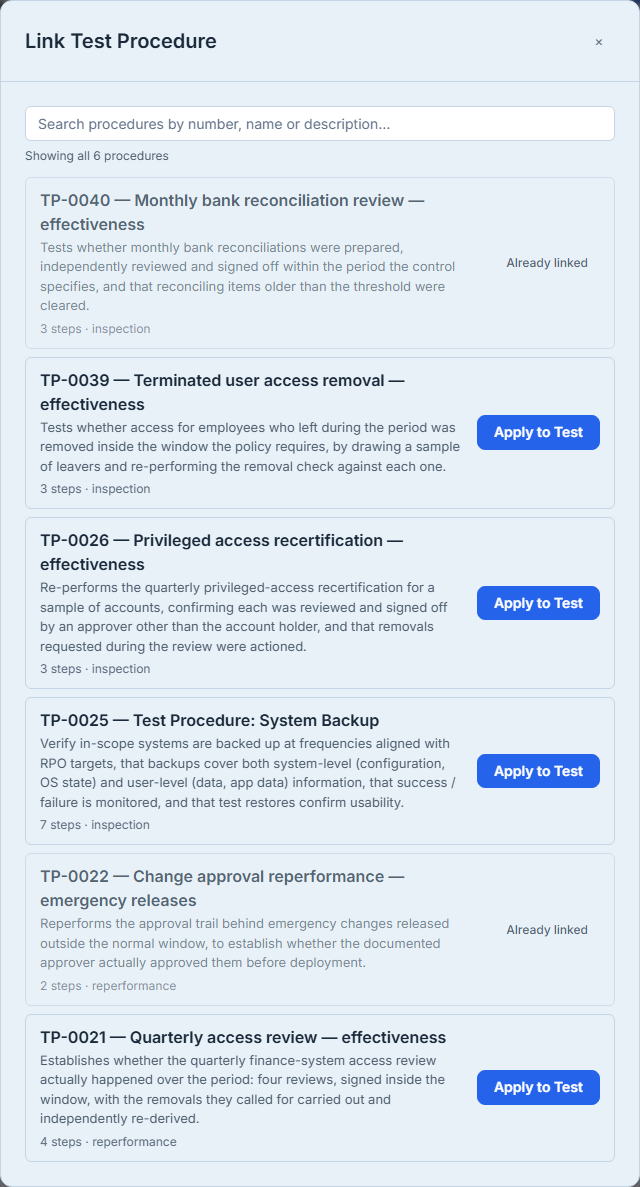
The procedure is attached to the test, not to the control, and only while the test is open. In-progress tests live on the Active Tests tab, not the Controls tab you started from. Open the test there and use Apply Procedure — the dialog it opens is titled Link Test Procedure: the steps and the evidence requirements are copied onto the test as a working checklist, pinned to the procedure version in force right now.
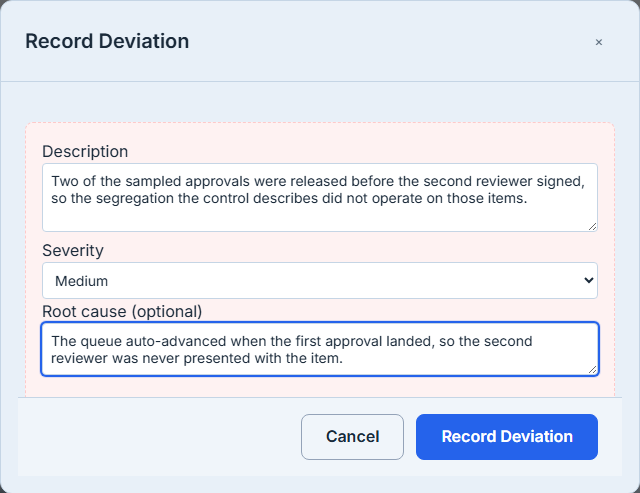
When an examined item fails, Record Deviation captures it inside the test — a description, a severity and a root cause. A deviation is not yet an exception; it is an observation about one item.
Be straight about how far the provenance reaches, because this is the seam. The test cites the draw it came from, but the deviation does not cite which item of that draw failed — there is no per-item picker on this dialog. If you need the record to say which of the twenty-five rows deviated, put it in the description, and keep the draw’s Export CSV beside the test as the list of what was examined.
When the control does not hold
A failed test is not automatically an exception. An exception is a deliberate statement that a control is not being met and that somebody has accepted the risk until a date.
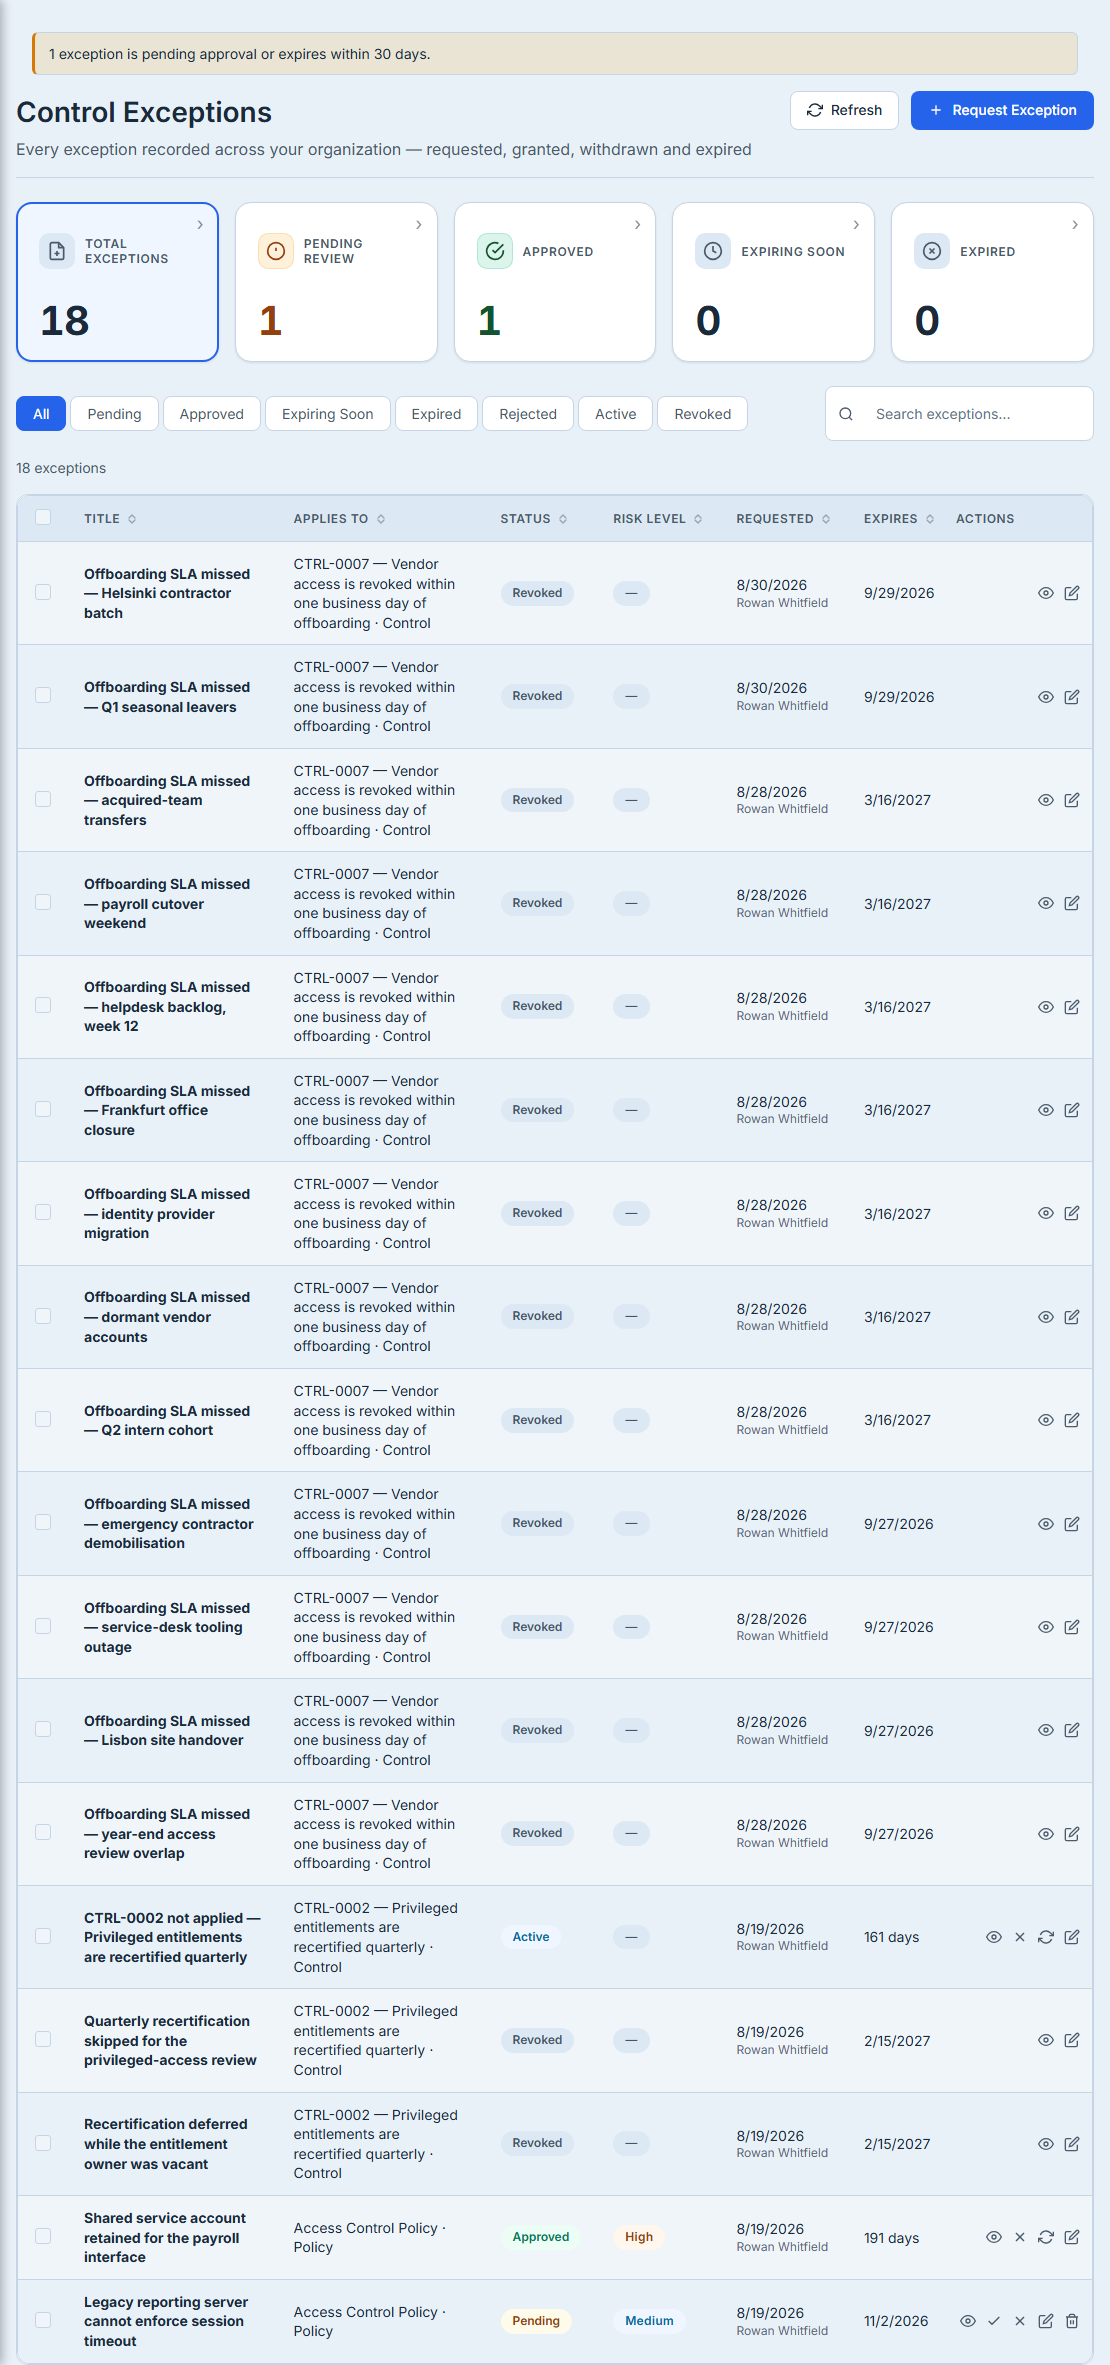
This table scrolls sideways for the same few pixels of padding as Selection History, and the same caveat applies: every column, Actions included, renders — nothing is hidden behind the scroll.
Open Control Exceptions. This is a register rather than a dashboard — on an organisation with nothing outstanding it reads No Control Exceptions, and a long list here is itself the finding. The register above belongs to a demonstration organisation, which is why it has rows at all.
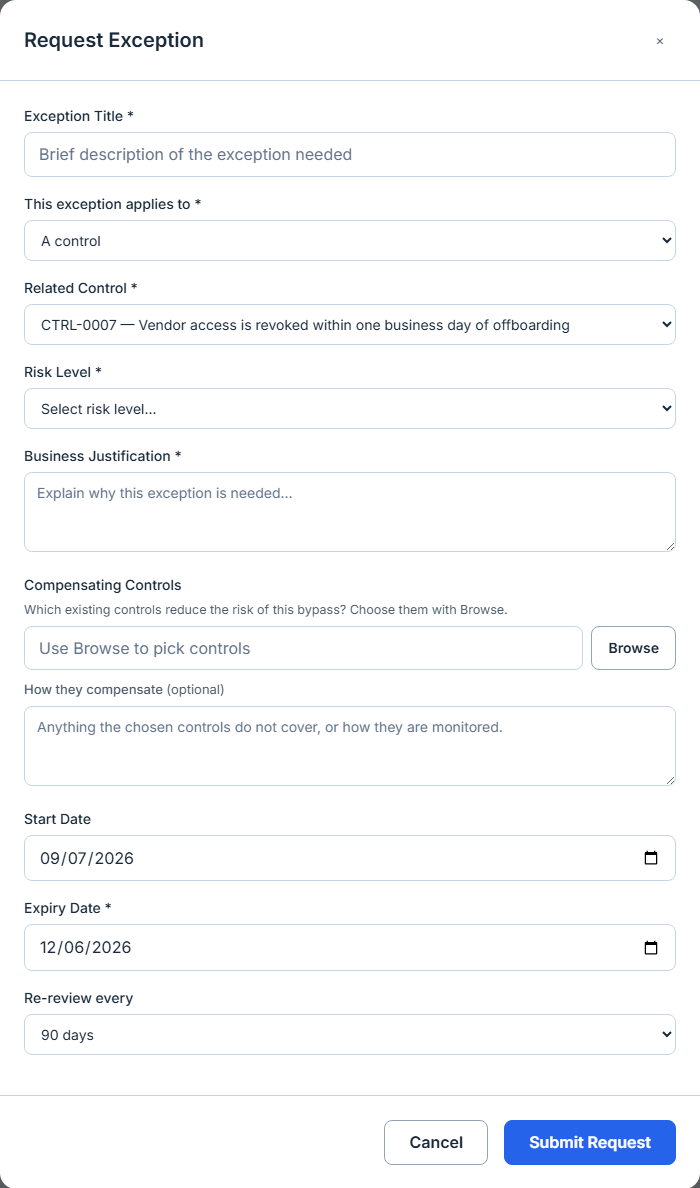
Risk Level is worth a word, because on a register with any history you will see dashes in that column. The platform requires a risk level on every exception raised through the request form — the one further down this page — but rows created before that requirement carry none. Rather than defaulting them to Low, or leaving the cell blank and letting it read as a rendering fault, the register draws a muted dash whose tooltip reads “No risk level recorded for this exception.” That is the right behaviour and it generalises: a governance register that invents a severity to fill a column is worse than one that admits the field was never answered.
One limit to know before you read the count as a total: the register loads the most recent hundred exceptions, and the line above the table says so when it has truncated. The status tabs and the search box narrow what is already loaded, so on an organisation with more than a hundred they will not reach the older ones either. The tiles above the table are counted separately and are not capped, so on a large register the Total Exceptions figure is the honest one.
Request Exception opens the request: what the exception covers, which control or policy it applies to, a risk level, the business justification, any compensating controls, and when it expires. There is no owner field — the platform records who raised it from your account. Expiry is required and must be in the future, and there is a re-review cadence beside it; the platform watches both dates, so an exception cannot quietly become permanent by nobody looking at it.
Submitting the form does not put the exception in force. It is recorded as pending, and someone with write access to the register approves or rejects it, adjusting the expiry if they wish — it is a permission on the page rather than an administrator role. Two rules sit on that decision: you cannot approve your own request, and once a named approver is assigned only an organisation or platform administrator can override them. Until a decision is made the control is neither tested nor excepted, which is the honest state — and it is why the register carries a review lifecycle of its own: Approve, Reject, Renew and Revoke, with a bulk review for a queue that has built up.
When an exception names compensating controls, the approver has Validate Controls on the review pane. That is the step worth insisting on: it checks whether the controls the requester named are themselves tested and operating, rather than taking the claim at face value. An exception justified by a compensating control nobody has tested is an accepted risk wearing a control’s name.
Fix it, and let someone else say it is fixed
Completing a test as failed or partial opens a finding and links it to that test. The finding is the record of the problem. The remediation plan — the work to make the control hold — is created separately, from New Plan in the remediation planner. There is no button on the finding that starts one.
The plan does carry a Linked Items panel, and it is worth being precise about what it reaches: Link items offers risks, controls, assets and KRIs — not findings. So the strongest link you can make from the plan is to the control the failed test was run against, which is the same control the finding names, and that is what to do. If you also want the finding itself findable from the plan, put its number in the plan’s title or description; nothing in the product writes that particular link for you today.
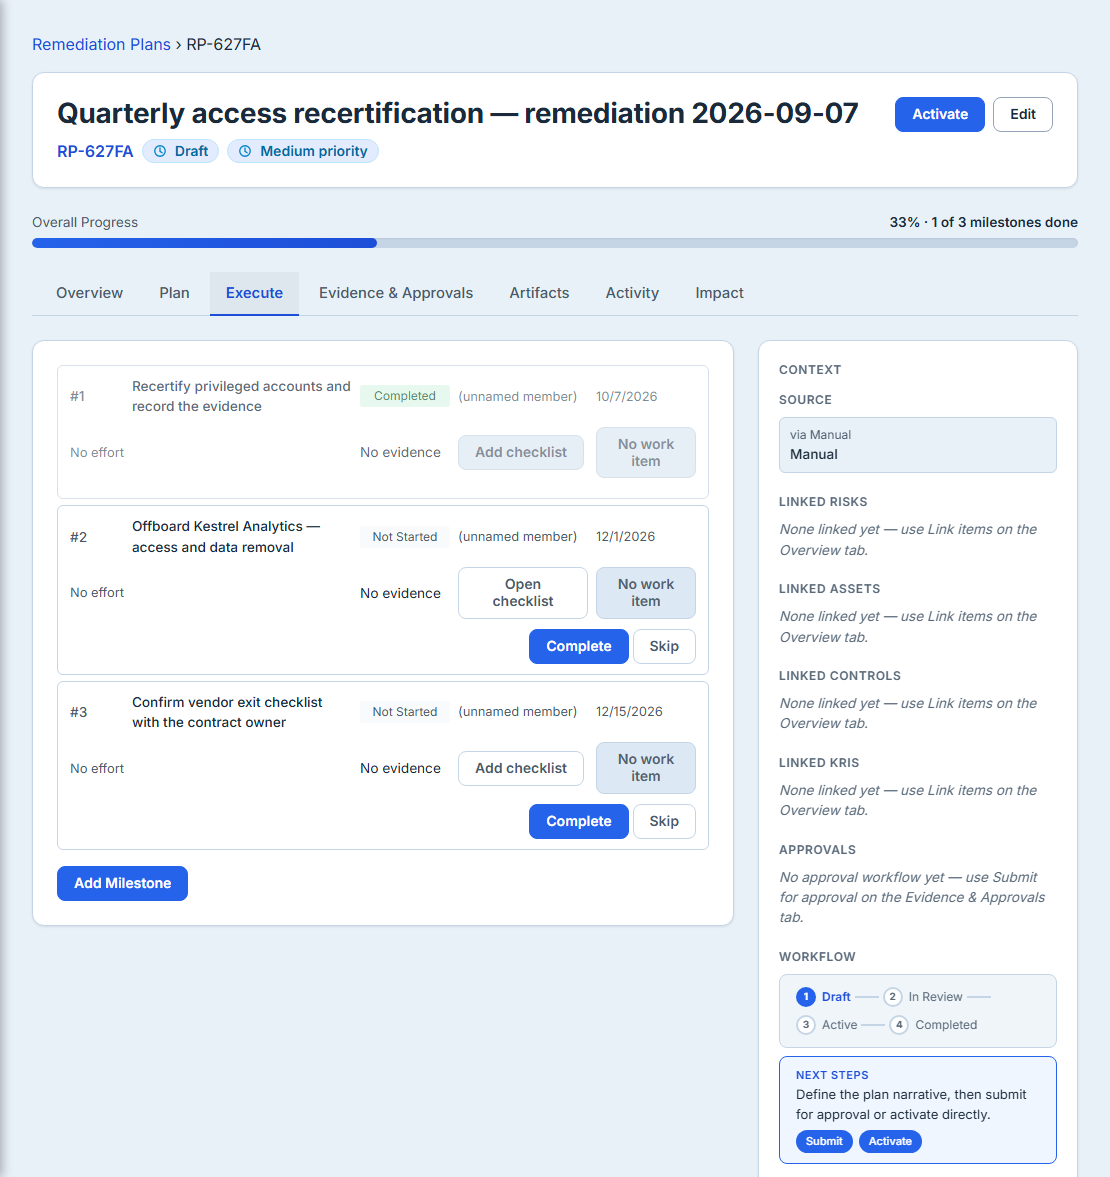
The plan breaks into milestones, and each is completed or explicitly skipped — a skip prompts for a reason and refuses a blank one, so a plan that ends early says why. Plan progress moves as milestones close, which is what makes “in progress” mean something to whoever reads it later.
The last stage is the one most programmes skip.
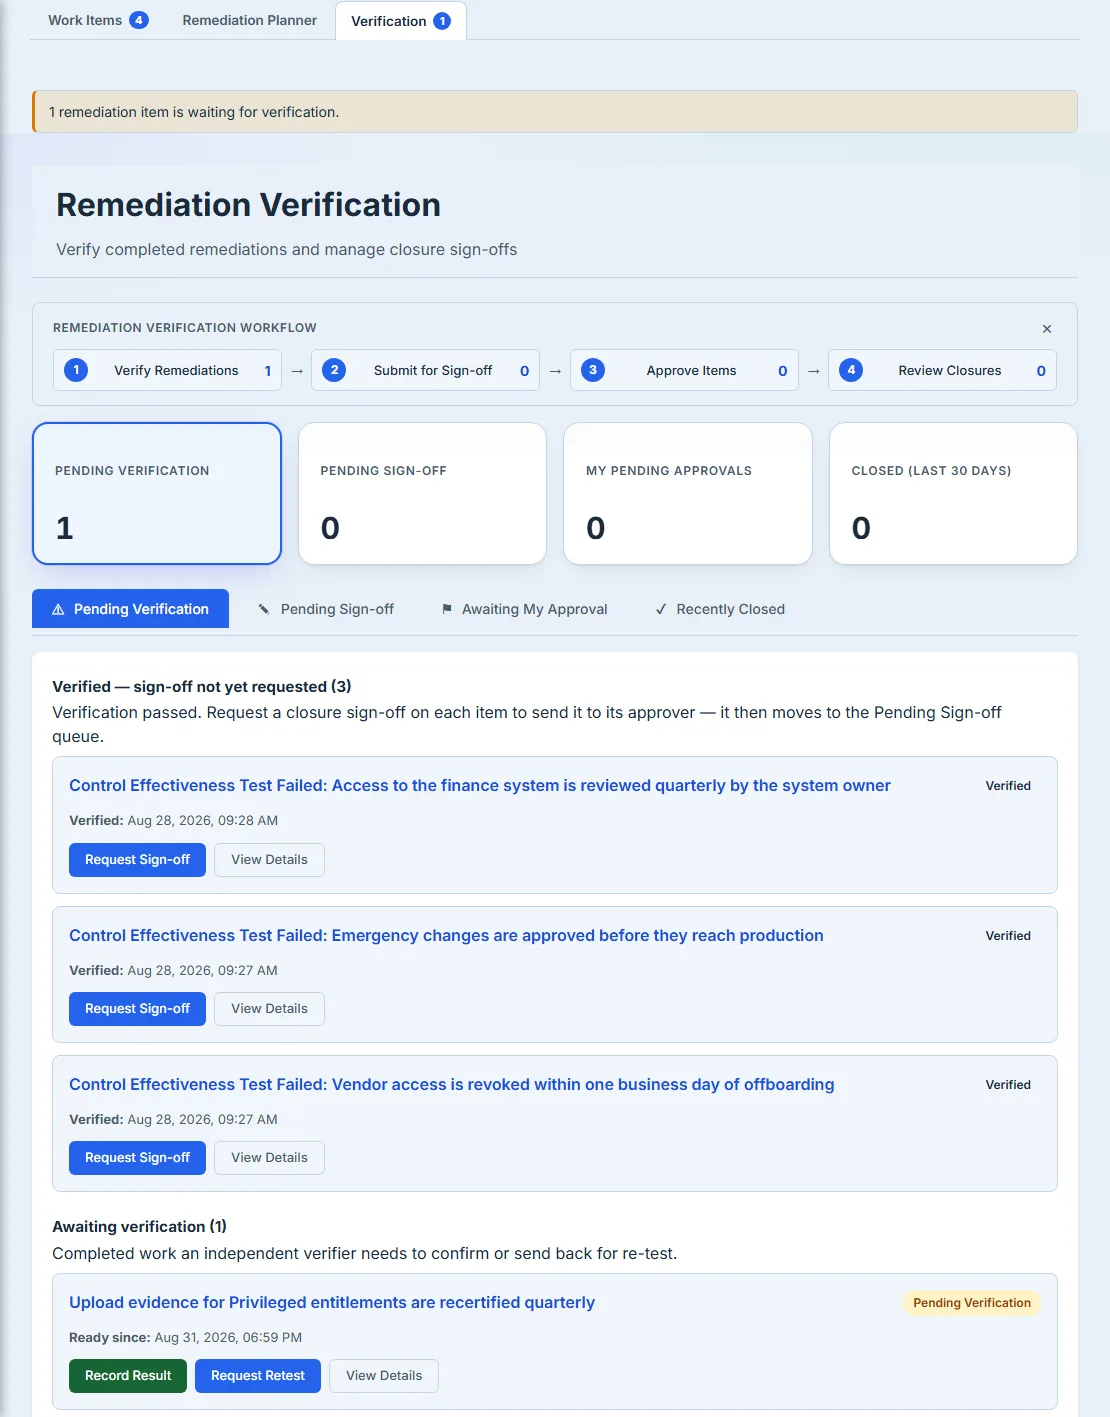
Open Verification under Work Items: fixes that claim to be done, waiting for confirmation. The independence here is enforced rather than encouraged — when someone records a result, the platform refuses anyone who performed the work, counting both the assignees and everyone who moved the item through its statuses, and there is no administrator override. (Asking for a retest is not gated the same way; anyone may ask for the work to be done again.) That refusal is the difference between a remediation log and evidence an auditor will accept.
Verification records the result against the original finding — the same work item the failed test opened — which closes the loop on the fix. The control test itself is not rewritten: proving the control now holds means testing it again.
That retest is not a fresh start, and the difference matters. A test completed as failed or partial marks the control for retest, and the next effectiveness test carries the failed test’s draw forward — the same population, method, size and seed, and the same pinned procedure versions — so the two runs are judged on the same items rather than on two different samples that happen to sit either side of a fix. That is the second reason the seed is stored. You can still cite a different draw and it takes precedence; the carried-forward one is what you get if you do not.
There is a stage beyond verification too, on the queue’s other tabs — a fix can be submitted for sign-off by a named approver before it is finally closed.
What this does not do yet
Worth being straight about the edges, because a walkthrough that only shows the happy path is not much use when you are deciding whether to adopt something:
- The stages hand data to each other, but they are not yet a single linked chain you can traverse in one view — control testing, exceptions and remediation each live on their own page. Linking is partly automatic, and the boundary is worth knowing: completing a control test as failed or partial creates the finding for you and links it to that test. A re-run is a new test, and completing it opens its own finding rather than reopening the first — so a control tested three times can carry three findings. A control exception is a third case: raising one creates no remediation plan, though the platform does open a task of its own when an exception falls due for review or expires.
- Global search reaches some of this and not the rest. Test procedures, remediation plans and work items — including the finding a failed test opens — are all searchable by name or by number, so
TP-0032or a plan number finds its record directly. One edge worth knowing: an archived procedure drops out of the search index, so the thirteen archived procedures in the library above are found from the Test Procedures page rather than the search bar. Control exceptions are searchable by title. Sampling draws and control tests are not. Those two are reached through their own pages, so a seed or a test you want to find again is found from Sampling or Control Testing rather than from the search bar. - There is no cross-organisation control-testing view, and that now includes the dashboards. A parent organisation’s Priority Controls table reads the parent’s own controls only: cross-org visibility was deliberately narrowed in a privacy redesign, and it flows per-entity rather than by pulling a child’s register into a parent’s widget. So comparing two children’s testing programmes means visiting both, and a parent should not read its own dashboard as a group-wide picture.
What good looks like
A control whose testing you can defend has four things attached to it: a procedure with a version, a sample with a method and a seed, a test result that cites both, and — where it failed — either a recorded exception with an expiry or a remediation somebody other than its author verified. None of those is exotic. They are just hard to keep together in a spreadsheet, and that is the whole reason to keep them somewhere else.