An API key is a privileged identity with no human attached to it, which is why the frameworks treat it as an access-control problem rather than an engineering detail. ISO 27001:2022 puts scope minimisation under A.8.2 Privileged access rights and the handling of the secret itself under A.5.17 Authentication information; SOC 2 asks the same questions as CC6.3 Role-Based Access and CC6.1 Logical Access Security. The two things an auditor wants to know about a machine credential are what it could reach and who can prove what it did.
Most API documentation can’t answer the first question reliably, because it’s a maintained copy of the API — written once, then drifting quietly as endpoints and permissions change. A reader follows it, requests the scopes it lists, and gets a 403 from an endpoint the page said they could call. The reference at /app/api-documentation is generated from the running API’s own OpenAPI specification on every page load, so the catalog you read and the contract the server enforces are the same artifact. This walkthrough goes from a switched-off API to a 200.
Who’s involved
- Integration developer — needs to know which endpoints exist, what each accepts and returns, and exactly which scopes to ask for.
- Organization admin — the only role that can enable public API access and mint keys; the secret passes through their hands once.
- Security reviewer — cares that the key is scoped to the minimum, pinned to known callers, and revocable in one action.
- Auditor — pulls the per-key usage record: which key called what, when, and whether anything was refused.
Who can open this page. The reference sits under Integrations, and reading it requires organization-settings admin access — the same permission that lets you mint keys. A user without it doesn’t get a blank page or a silent redirect; they get the explanation shown at the end of this article, naming the reason and offering a retry. Access is granted by group, not by job title, so if the developer doing the integration isn’t an org admin, the cleanest route is a group that carries organization-settings access rather than a temporary elevation — see least privilege in practice for how groups are built and assigned.
Step 1 — Turn the API on before anything else
Public API access is off by default and fails closed, at two independent levels: your organization has to enable it, and it has to be enabled for the platform. Open Settings › API Keys and switch on Public API access. If you haven’t set up the integrations side of the platform at all yet, connecting Talarity to your stack is the upstream primer — SSO, provisioning, keys and webhooks from one hub.
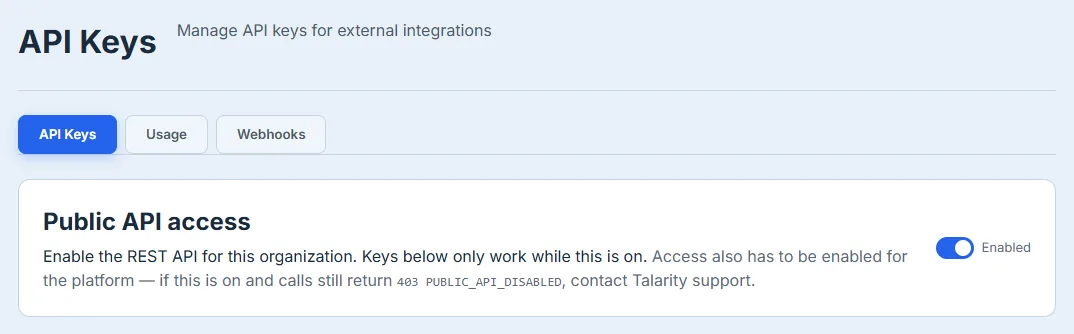
Skip this and the failure is confusing rather than obvious: a perfectly valid key with correct scopes returns 403 PUBLIC_API_DISABLED. That’s the first thing to check when a first integration attempt fails, and it’s why the Authentication tab now leads with it rather than starting at key creation.
Step 2 — Find your resource in the Categories rail
Open API Documentation from the Integrations section. The Categories rail lists every resource the live specification exposes, each with its endpoint count.
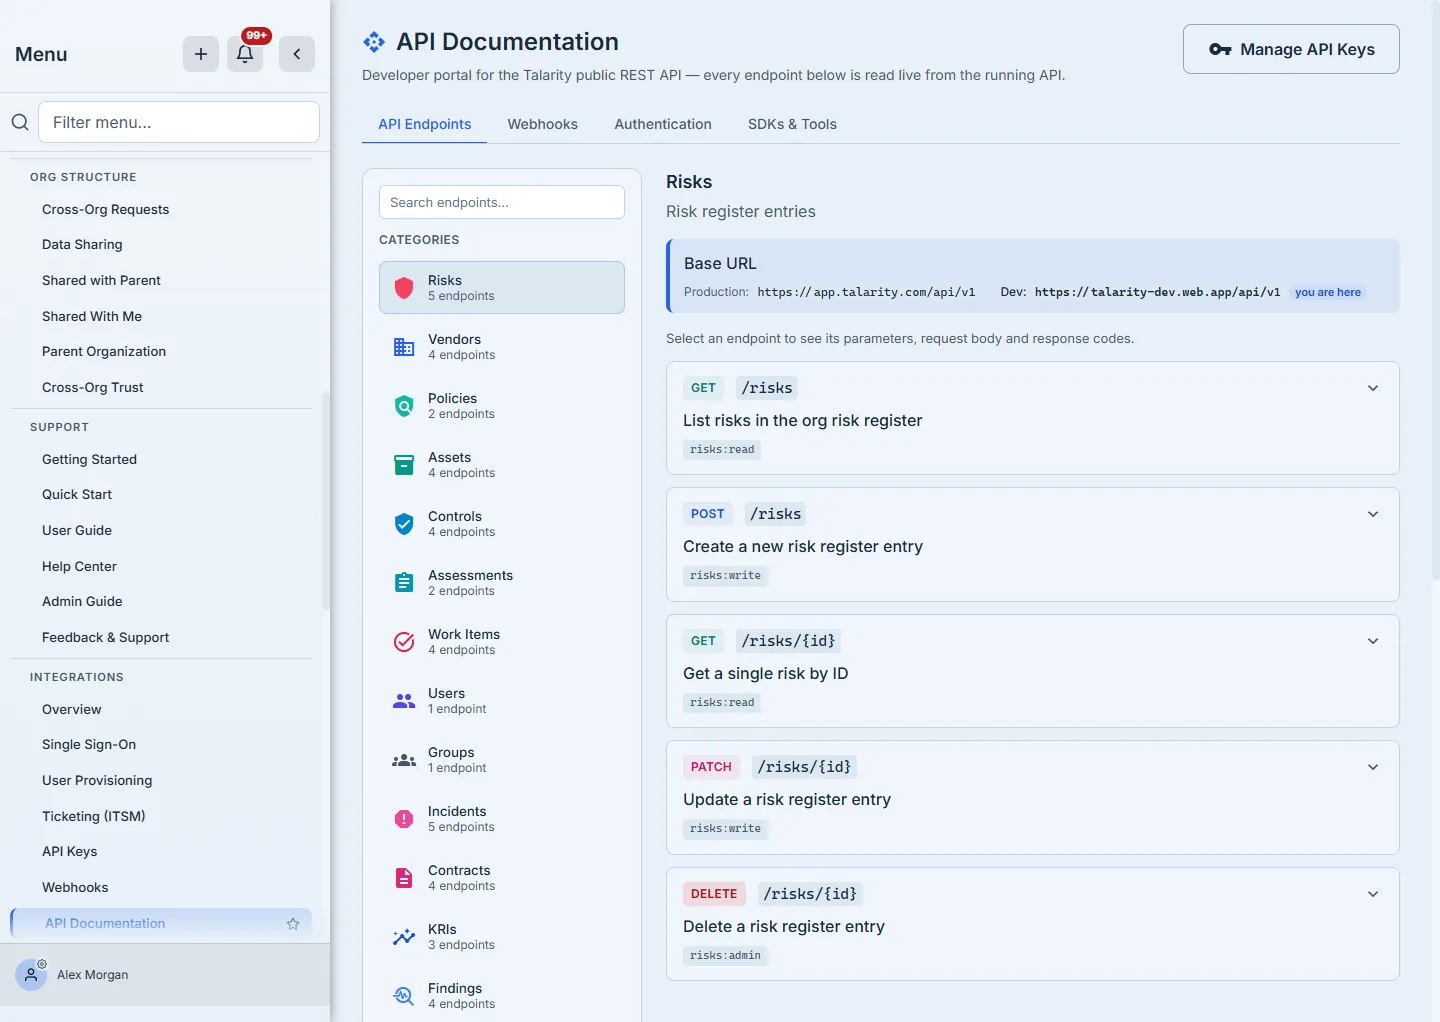
The counts are worth reading rather than skimming. They come from the endpoint registry the public router itself consults, so a resource appearing here with four endpoints means the server will route four endpoints — not that someone remembered to document four.
If you already know roughly what you’re after, the search above the rail is faster than the rail. It runs across every resource at once and matches on method, path, summary or scope — so delete, /risks/{id}, vendor and evidence:write all find their endpoints. That breadth is the point: you often don’t know which resource owns the thing you want. Contracts, for instance, are their own resource rather than living under Vendors, and searching finds them without you having to guess that first.
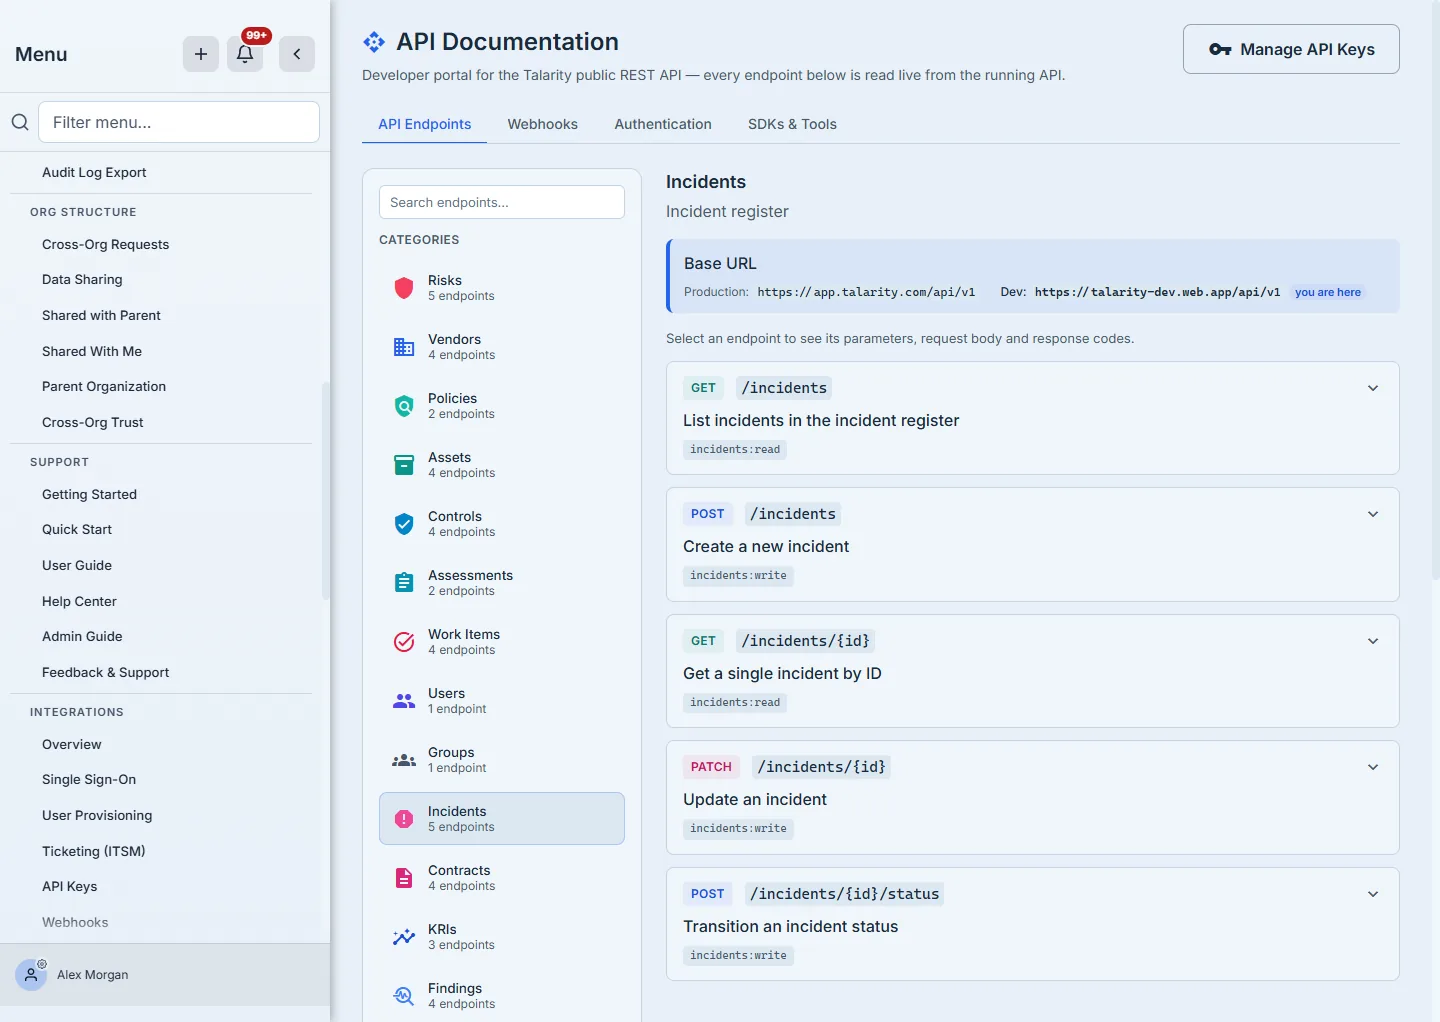
The Base URL callout above the endpoint list shows the host your calls should target, resolved for the environment you’re currently signed in to, with every environment the specification declares listed beneath it and the current one marked. That distinction matters more than it looks: copying a base URL from a colleague’s screenshot is how integrations end up pointed at the wrong host, and the page tells you which one you’re reading.
Step 3 — Open the endpoint and read its contract
Each row shows its method, path, a one-line description, and the scopes it requires. Selecting a row expands the full reference.

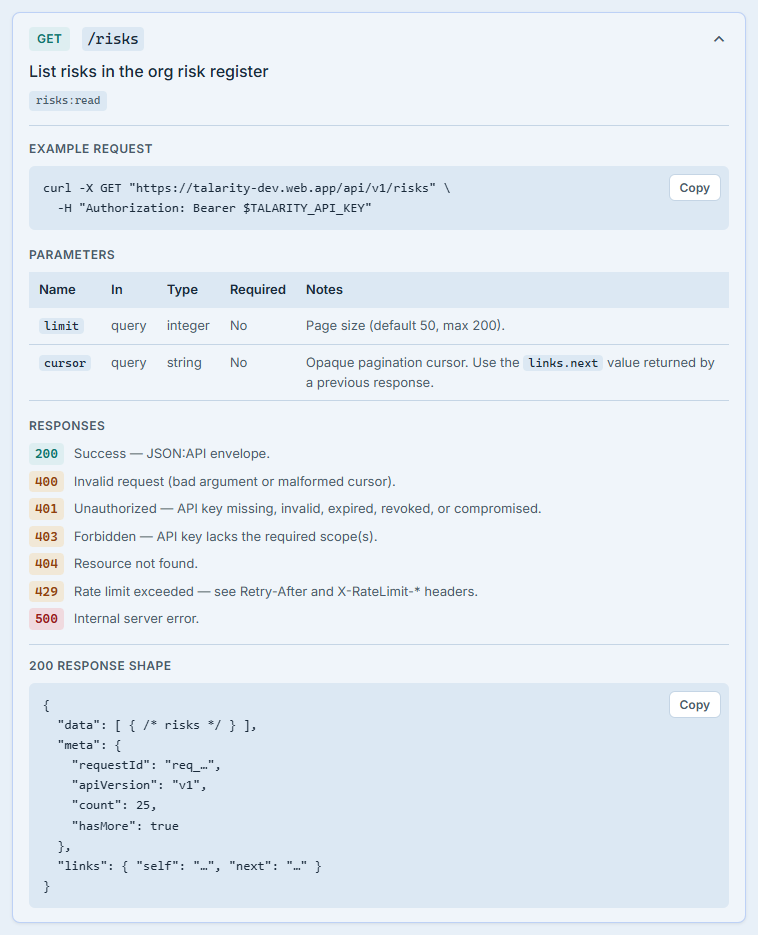
Expanded, a read endpoint gives you a copy-ready request — every code block on the page has a Copy button, so the curl line, the spec URL and the generator command all go straight to your clipboard — then every parameter it accepts with type, default, and limit:
For a write endpoint you get the request-body schema, which is the difference between documentation you can read and documentation you can build against:
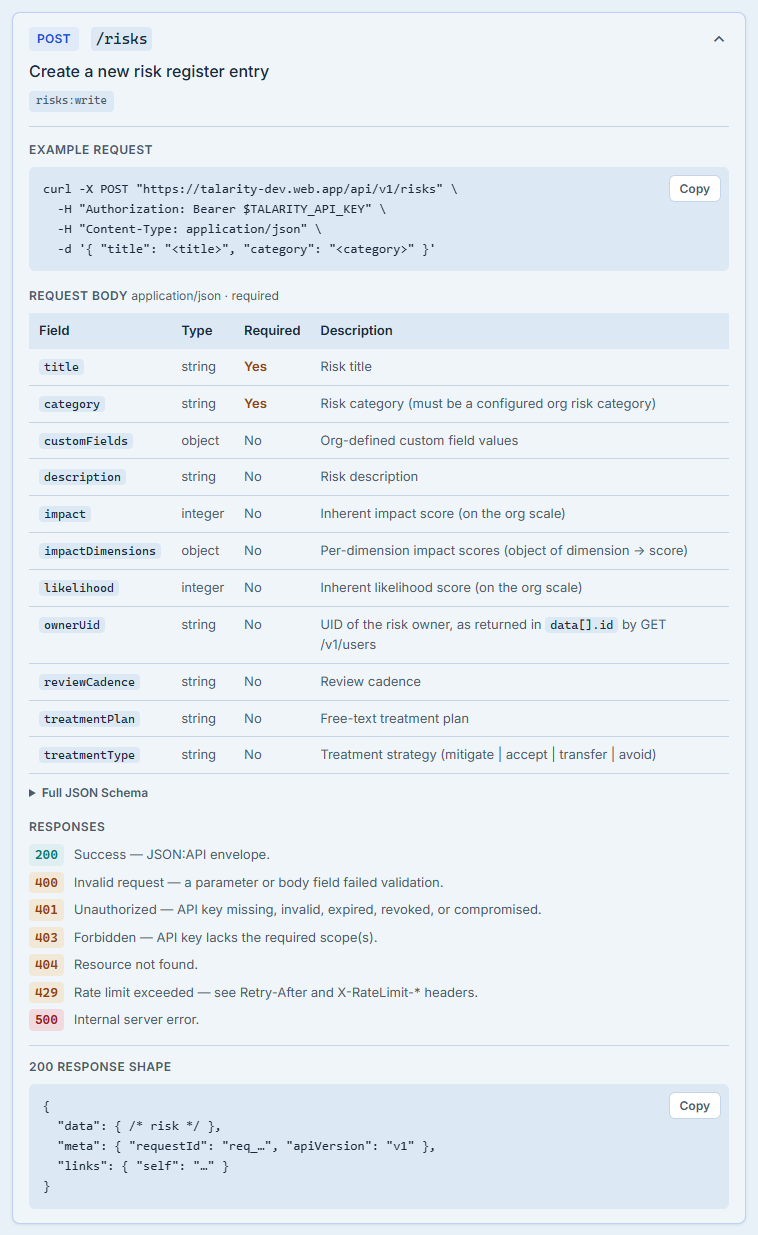
The table names its required fields explicitly, so you know before your first call which properties are mandatory and which are optional — and the full JSON Schema stays available beneath it for the nested shapes a table can’t express. Underneath, every response the endpoint can return is listed with what it means, client errors and server errors coloured apart so a 500 you can only retry doesn’t read like a 403 you can fix:
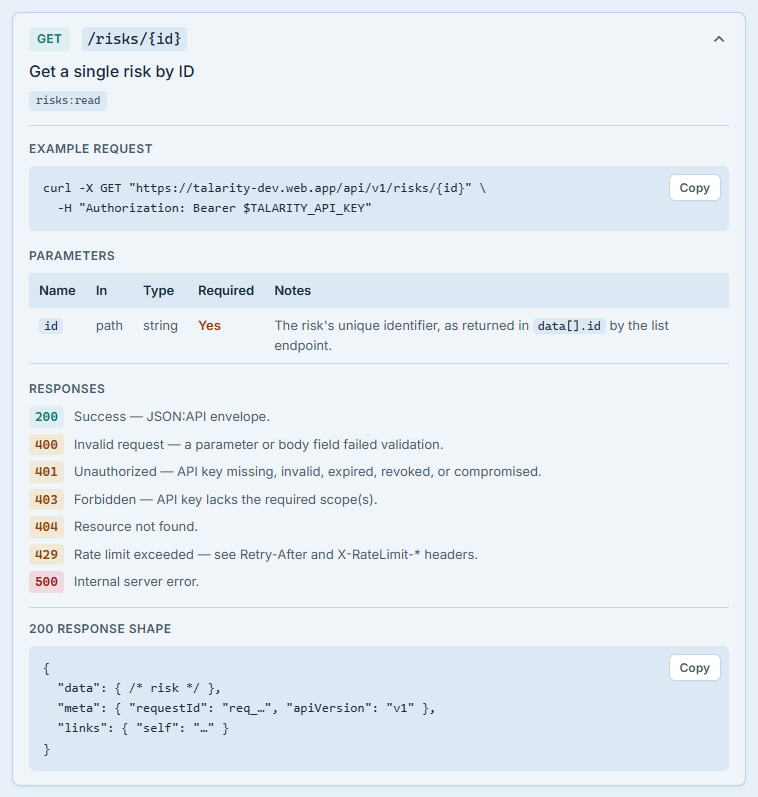
Beneath the status codes sits the shape of a successful response — where your rows arrive, what meta carries, and whether there’s a links.next to follow. Worth reading before you write the parsing code: records come back under data, not at the top level, and on a collection it’s meta.hasMore that tells you whether to ask for another page.
Compare the two shapes above and the difference is the one that catches people out. On the collection, data is an array and meta carries count and hasMore with a links.next to follow. On the single-resource endpoint, data is a single object — no count, no hasMore, no next, because there is nothing to page through. Write the branch once, off the endpoint you called, rather than probing the payload’s type at runtime.
All of it — parameters, schema, response codes, response shape, required scopes — is read out of the specification at render time. There is deliberately no cached copy of the catalog on this page: if the specification can’t be loaded, the page says so and offers a retry rather than showing you a stale list that might document scopes the server no longer accepts.
Step 4 — Scope the key to exactly those endpoints
Now that you know which endpoints you need, the Authentication tab’s scope table tells you what to request. It is derived from the same specification, so it lists every scope the live API recognises along with how many endpoints each one unlocks.
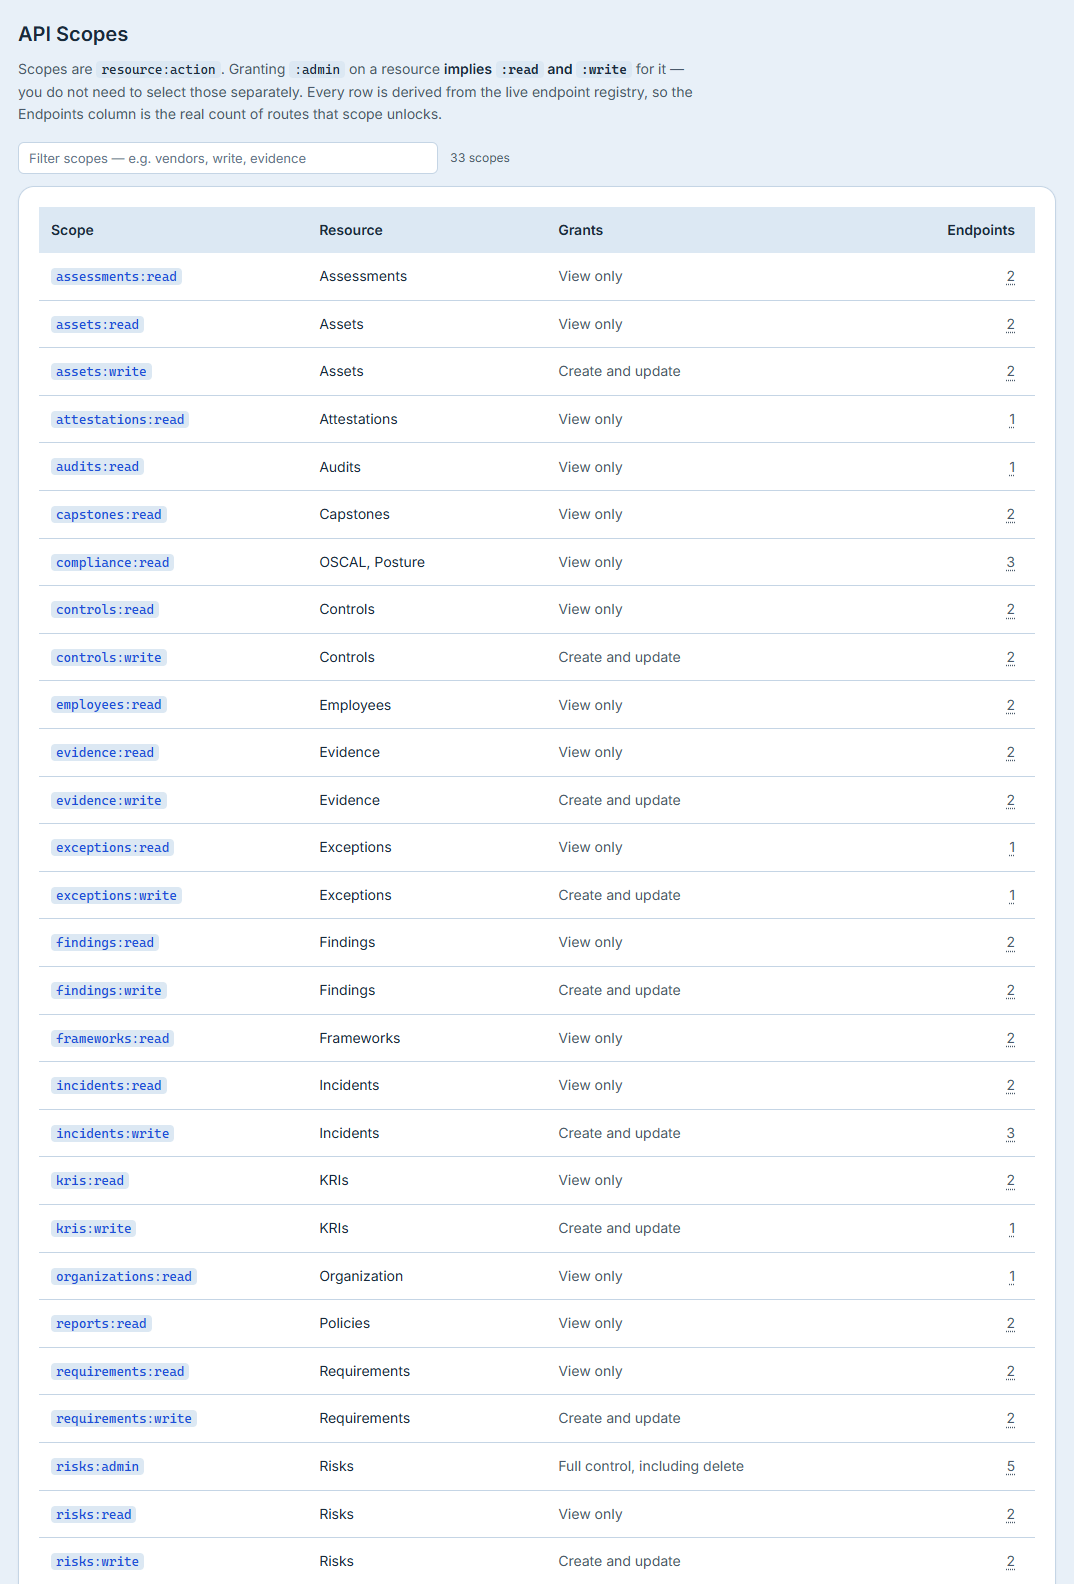
That endpoint count is a link, not a label. Click it and you land on exactly the endpoints that scope unlocks — not the whole resource, which would be a wider set. It’s a small thing that answers the question the table otherwise leaves open: vendors:read unlocks four endpoints, but which four? Filter the table by resource or by action if you’re hunting for a specific one.
:adminis not “the convenient one”. The hierarchy is real:<resource>:adminimplies both:readand:writeon that resource, including deletes. A key created withrisks:adminbecause it was one checkbox instead of two can destroy risk records. Grant:readunless the integration genuinely writes.
A handful of scopes reach further than their name suggests, and the picker says so where they do. vendors:read also unlocks contracts; users:read also unlocks groups. The one that catches people out is policies: there is no policies:read, and the two policy endpoints are gated by reports:read. Scanning the scope names for the resource you want would never find it — the Resource column would, on the first pass, because it’s built from the endpoints each scope actually gates rather than from the scope’s own name. Read the row, not the label, before you tick it.
Create the key in Settings › API Keys, ticking only the scopes your endpoints listed.
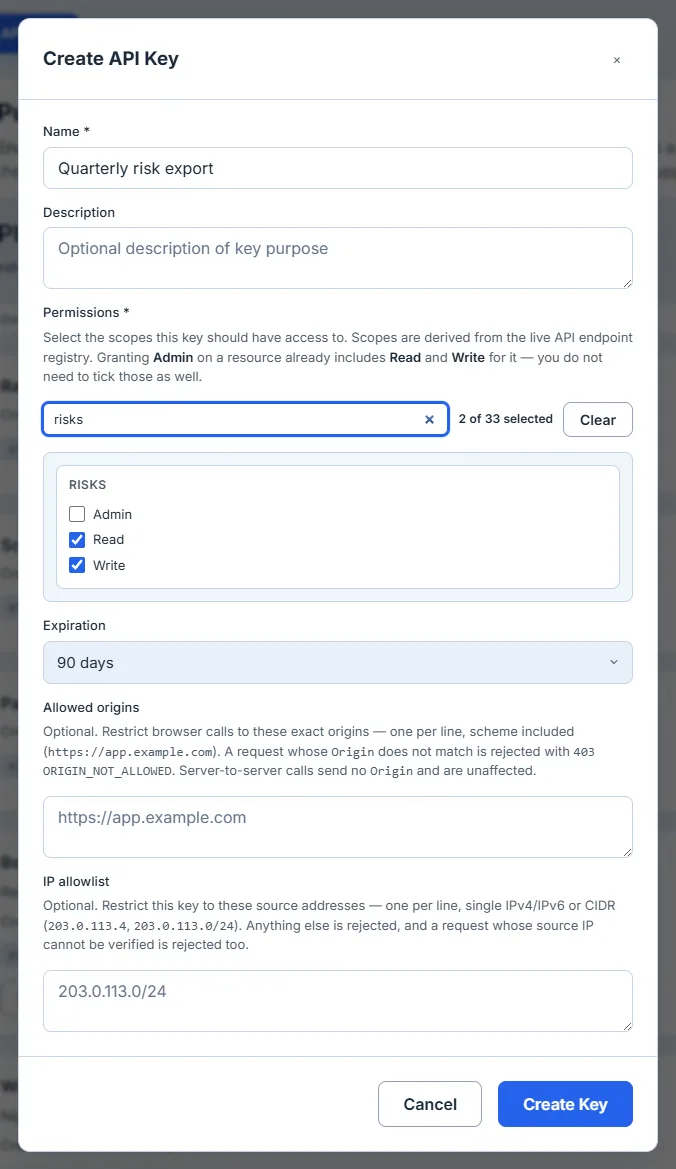
The scope grid is built from the endpoint registry rather than a fixed list, so it can only offer scopes that actually gate a live endpoint — you cannot request a permission that means nothing. With thirty-three scopes across twenty-one resources, use the filter rather than scrolling: it matches on resource and on action, so vendors and write both narrow it. The running count beside it is the only thing that tells you what you’ve actually ticked once the rest has scrolled out of view. Set an expiry while you’re here; a key that expires is one you can’t forget about. The secret is shown exactly once, at creation. Copy it then; there is no second reveal, by design.
Step 5 — Make the call
Send the key as a Bearer token. There is no separate token-exchange step.
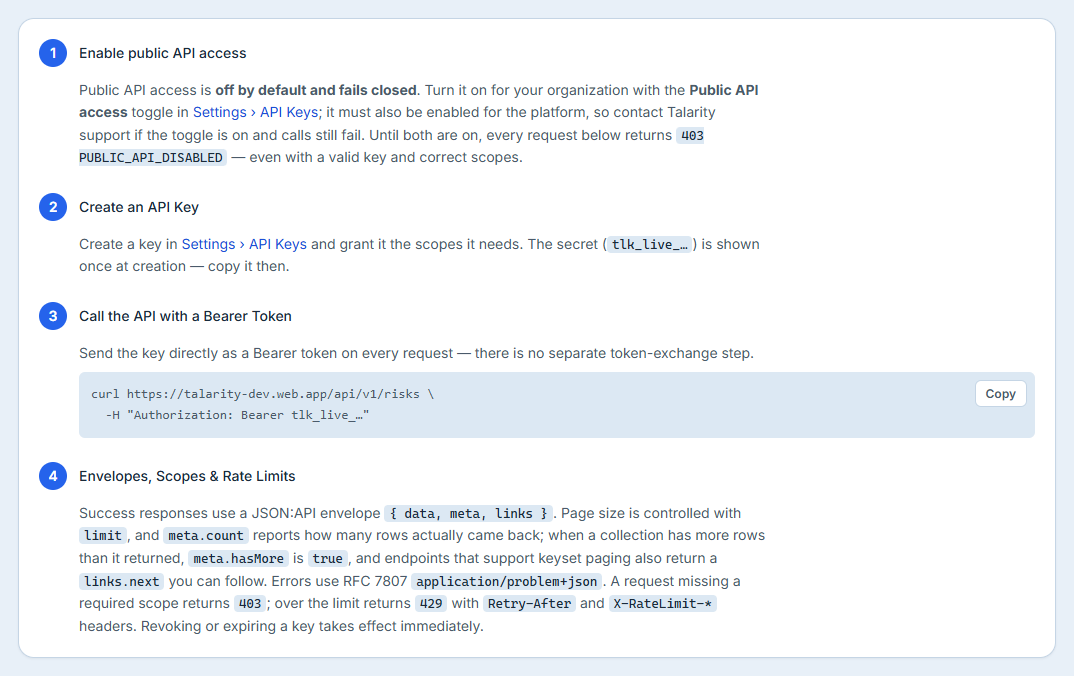
Successful responses use a JSON:API-shaped envelope: your records under data, request metadata under meta (including a requestId worth logging and the count returned), and a links object carrying self. Errors use RFC 7807 application/problem+json, so a failure is a structured document rather than a string: a type, a title, the status, a detail, and an instance carrying that same request id.
Control page size with limit — the parameters table on each collection endpoint gives you its default and maximum. Read meta.count to see how many rows actually came back rather than assuming you got everything you asked for.
The parameters table is worth trusting on this point, because it is not a generic template. An endpoint lists cursor only if it genuinely supports cursor pagination, and lists limit only if it returns a collection at all — so a single-object endpoint like /v1/me shows neither. When you do see cursor, the response’s links.next is the value to follow, and its absence means you have reached the end rather than that something went wrong.
Two failures are worth provoking on purpose before you write production code. Call an endpoint your key isn’t scoped for and you get a 403 whose detail names the scope you’re missing — you don’t have to guess which checkbox you skipped. And every response carries X-RateLimit-* headers showing your limit, what’s left in the current window, and when it resets, so you can pace a bulk job from the response rather than by trial and error.
Step 6 — Pin the caller, and know the version contract
A scoped key is good; a scoped key that only works from where you expect is better. Two optional, independent restrictions are available at creation: allowed origins for browser callers, and an IP allowlist for servers.
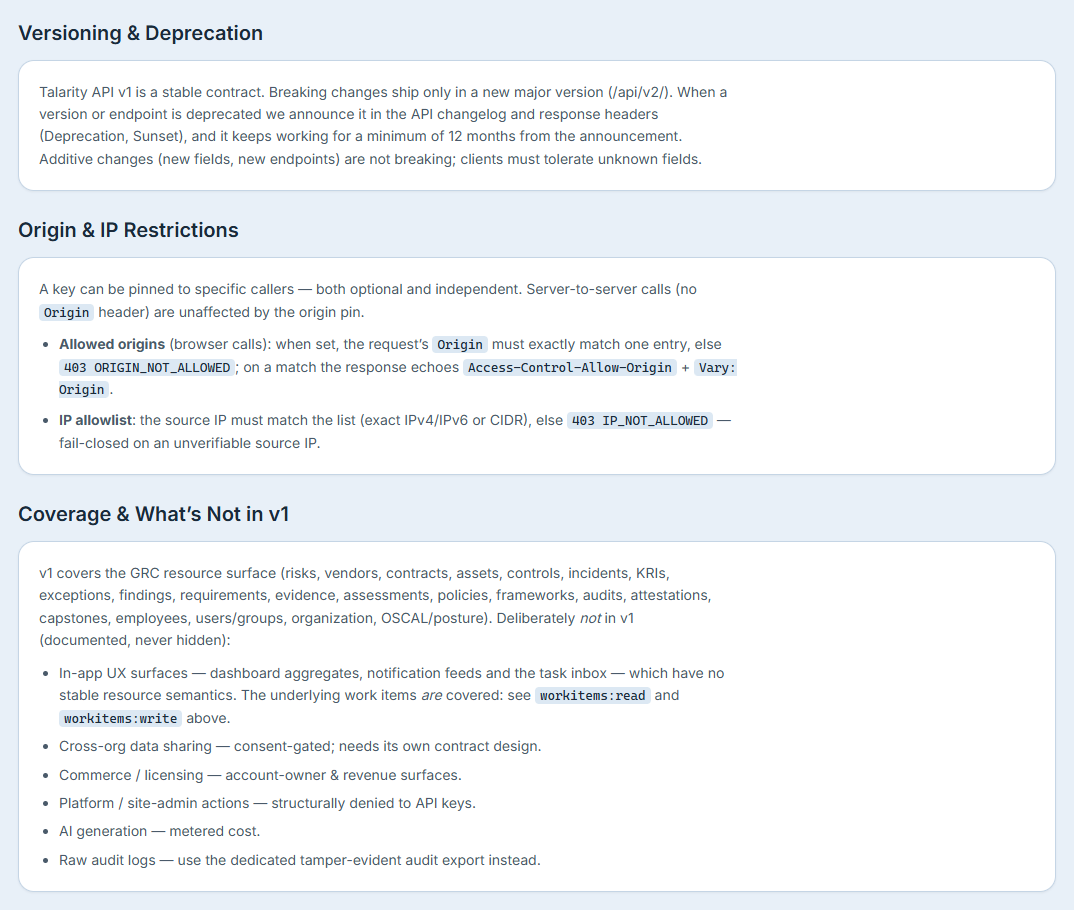
Origin pinning compares the request’s Origin exactly and rejects anything else, while leaving server-to-server calls — which send no Origin at all — unaffected. The IP allowlist accepts single addresses or CIDR ranges and fails closed: if the source address can’t be verified, the request is refused rather than allowed. Keys on the list show how many origins and addresses they’re pinned to, so a reviewer can tell a restricted key from an open one at a glance.
The versioning commitment is the other half of building against this safely. Breaking changes ship only in a new major version. When something is deprecated it’s announced in the changelog and in Deprecation and Sunset response headers, and it keeps working for at least twelve months from that announcement. Adding fields and endpoints is not breaking — so write clients that tolerate properties they don’t recognise, and you’ll survive minor releases untouched.
Step 7 — Generate a client instead of hand-writing one
The SDKs & Tools tab gives you the specification itself, at a public, unauthenticated URL.
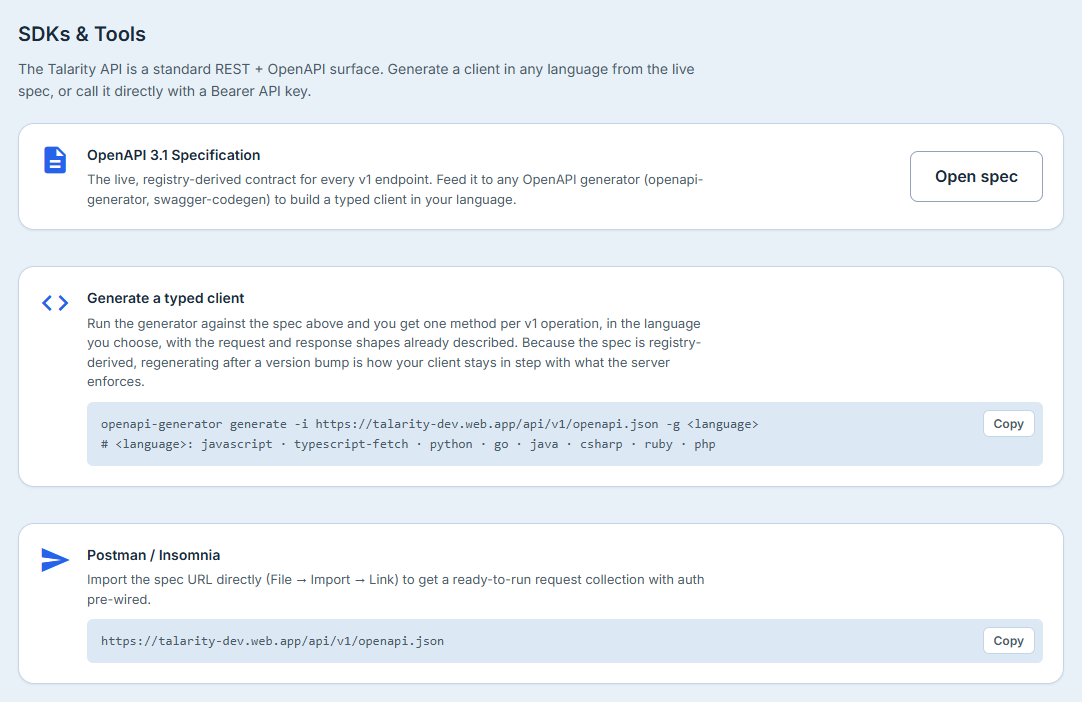
Point any OpenAPI generator at it for a typed client in your language, or import the URL into Postman or Insomnia for a ready-to-run collection with auth already wired. Regenerating after a version change is how you pick up new fields and endpoints for free — which is the practical argument against hand-written request models that drift.
What this page does not cover
The reference documents the API; it doesn’t manage it.
- Key lifecycle — rotation, revocation, marking a key compromised, and per-key usage live in Settings › API Keys, covered in connecting Talarity to your stack.
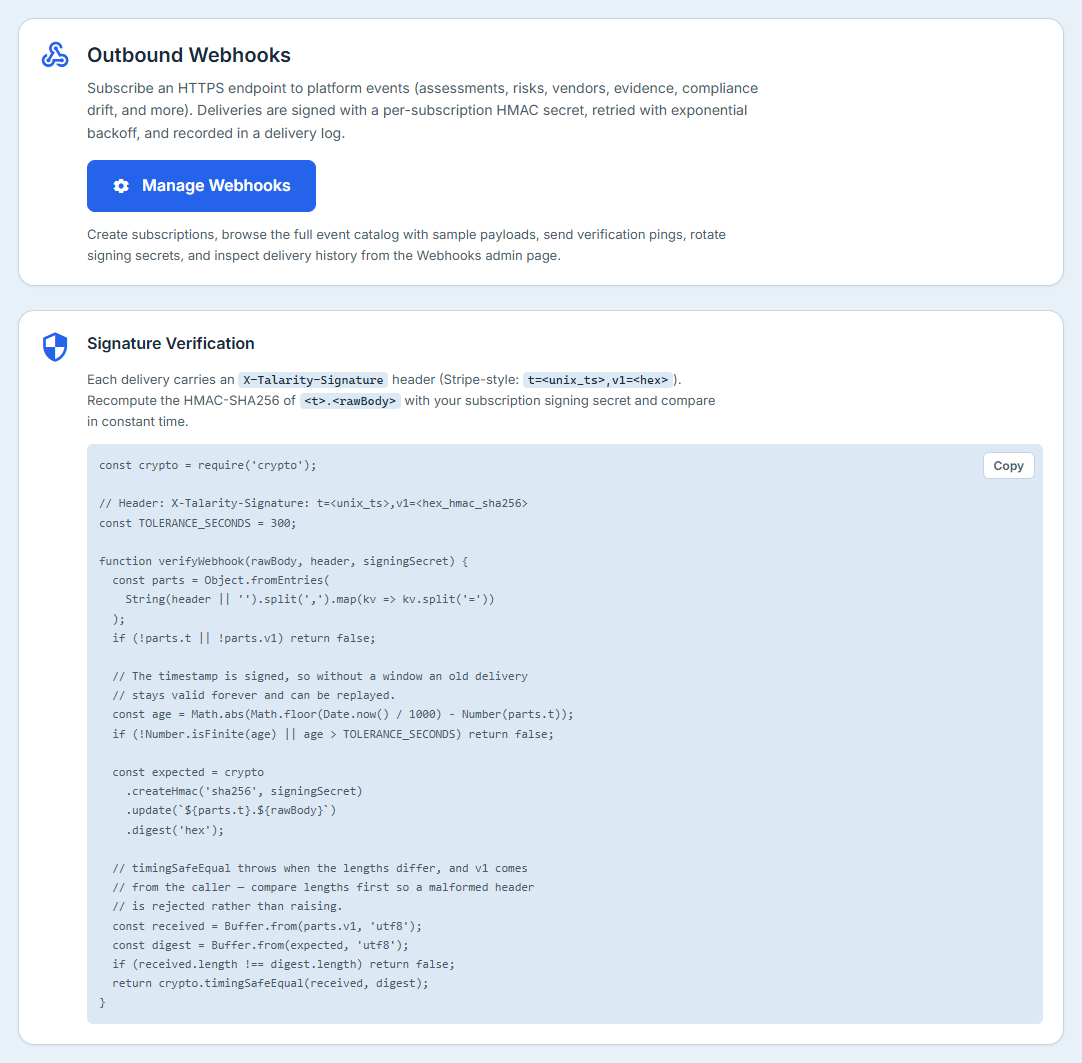
- Webhooks — this tab covers signature verification so you can authenticate an inbound event; subscriptions, the event catalog, delivery logs and retries are on the Webhooks page, walked through in that same guide.
- What’s deliberately outside v1 — in-app surfaces, cross-org data sharing, commerce, platform administration, AI generation, and raw audit logs. The Authentication tab lists these explicitly rather than leaving you to discover the gaps.
One more state worth recognising, because it’s the honest one:
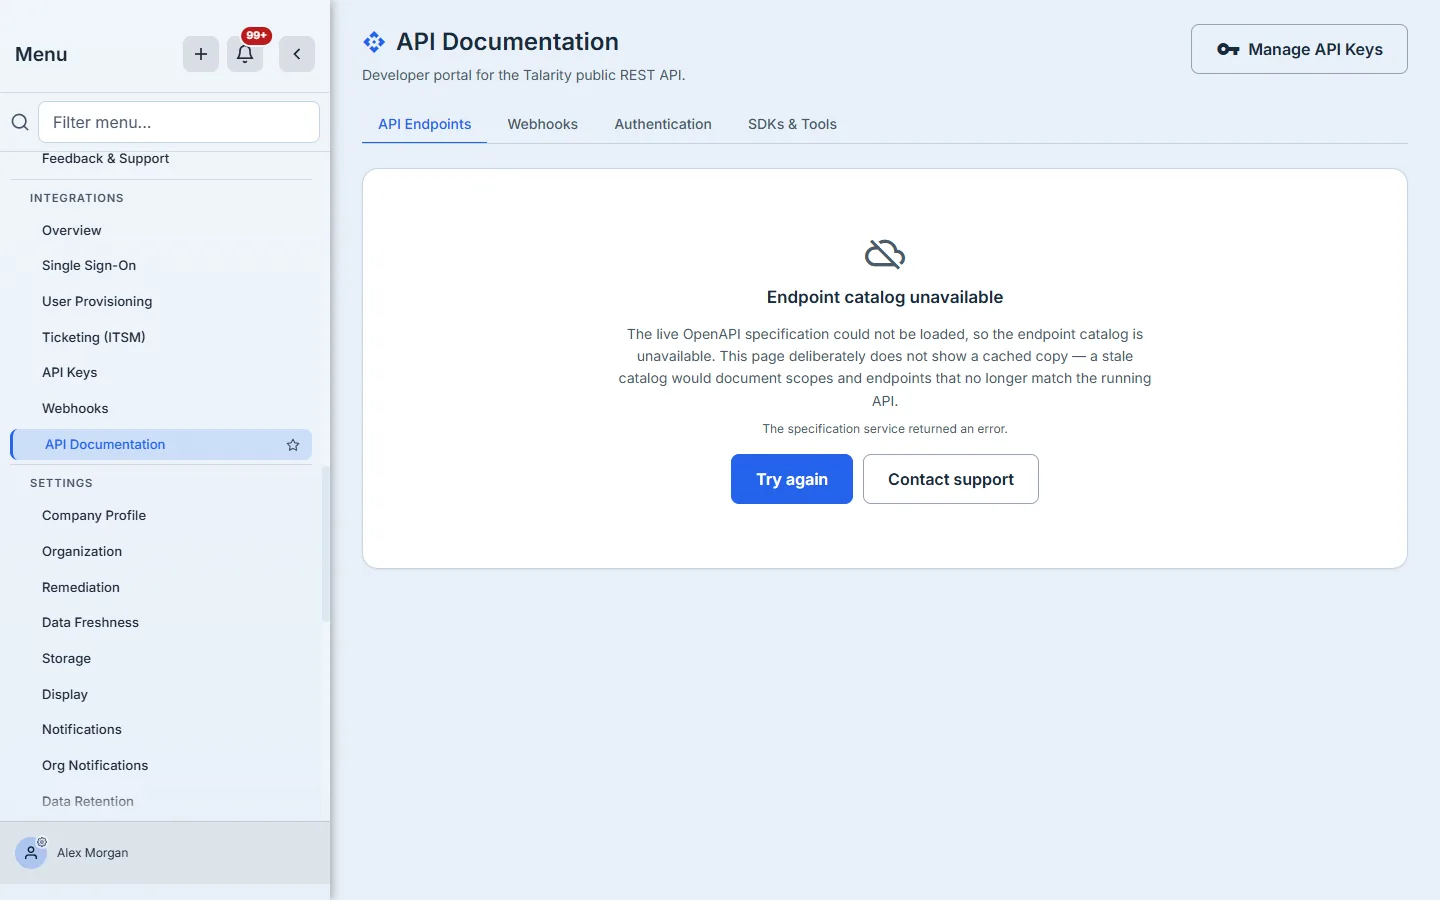
If the specification can’t be read — most often because the catalog needs organization-settings admin access — the page says so, prints the reason the call actually reported, and offers a retry. It will not fall back to a remembered list. A stale catalog is worse than no catalog, because it produces keys that fail.
What you walk away with
- A catalog you can trust, because it’s rendered from the specification the router enforces rather than a maintained copy of it.
- A minimum-scope key whose permissions you derived from the endpoints you actually call, with an expiry set.
- The secret handled once — copied at creation, never retrievable again.
- Callers pinned by origin, by source IP, or both, and visibly so on the key list.
- Failures you can read — RFC 7807 problem documents, a
403that names the missing scope, and rate-limit headers that tell you how to pace instead of guess. - A generated client you can regenerate after every version bump, against a contract that promises twelve months’ notice before anything breaks.
Start at Settings › API Keys and switch on Public API access, then open API Documentation and find the one endpoint your integration needs. Reading its parameters and required scopes takes about a minute, and it’s the minute that stops you creating a key with the wrong permissions and debugging a 403 instead.