You’ve stood the portal up and flipped on the request types you want to offer. That’s the catalog working out of the box. This is the article about making it yours — because the difference between a request queue and a governed intake program is in three decisions you make per request type:
- The form — exactly what a requester has to tell you before they can submit.
- The route — who has to approve it, in what order.
- The fulfillment — what Talarity does the moment it’s approved.
Get those three right and an approval stops being a message in a channel. It becomes a vendor in your TPRM funnel, a seat drawn from the right license pool, or a work item on the right team’s board — recorded, attributed, and auditable. SOC 2 CC6.2 and CC6.3 care about how access is requested and granted; ISO 27001:2022 A.5.16 and A.8.2 care that privileged and standard access alike follow a defined, approved path. A catalog you’ve shaped deliberately is that path.
The anatomy of a request type
Open Request Portal (/app/portal-requests) → Catalog & Routing. Every row — the seven built-ins and any you add — is the same shape: a label and description the requester reads, a fulfillment kind (the second column, “Fulfills: …”), an enable toggle, and a sort order that sets where it appears in the guest’s catalog. Click Edit on any of them and you’re looking at all three decisions in one place.
The built-in types ship pre-wired, but they’re not frozen — you can rename them, rewrite their descriptions, reorder them, and change how they route. Their request form and their fulfillment behaviour are the platform contract, so those two stay fixed (and a built-in can’t be deleted — disable it instead). A custom type you create is yours entirely: its form, its routing, its sort order, and its Delete button are all yours to edit.
Decision 1 — Build the form
Hit New custom type and you’re in the form builder. The top of the modal is identity: a Type key (a stable machine name like conference_travel — lowercase, underscores, set once), a Label the requester sees, and an optional Description.
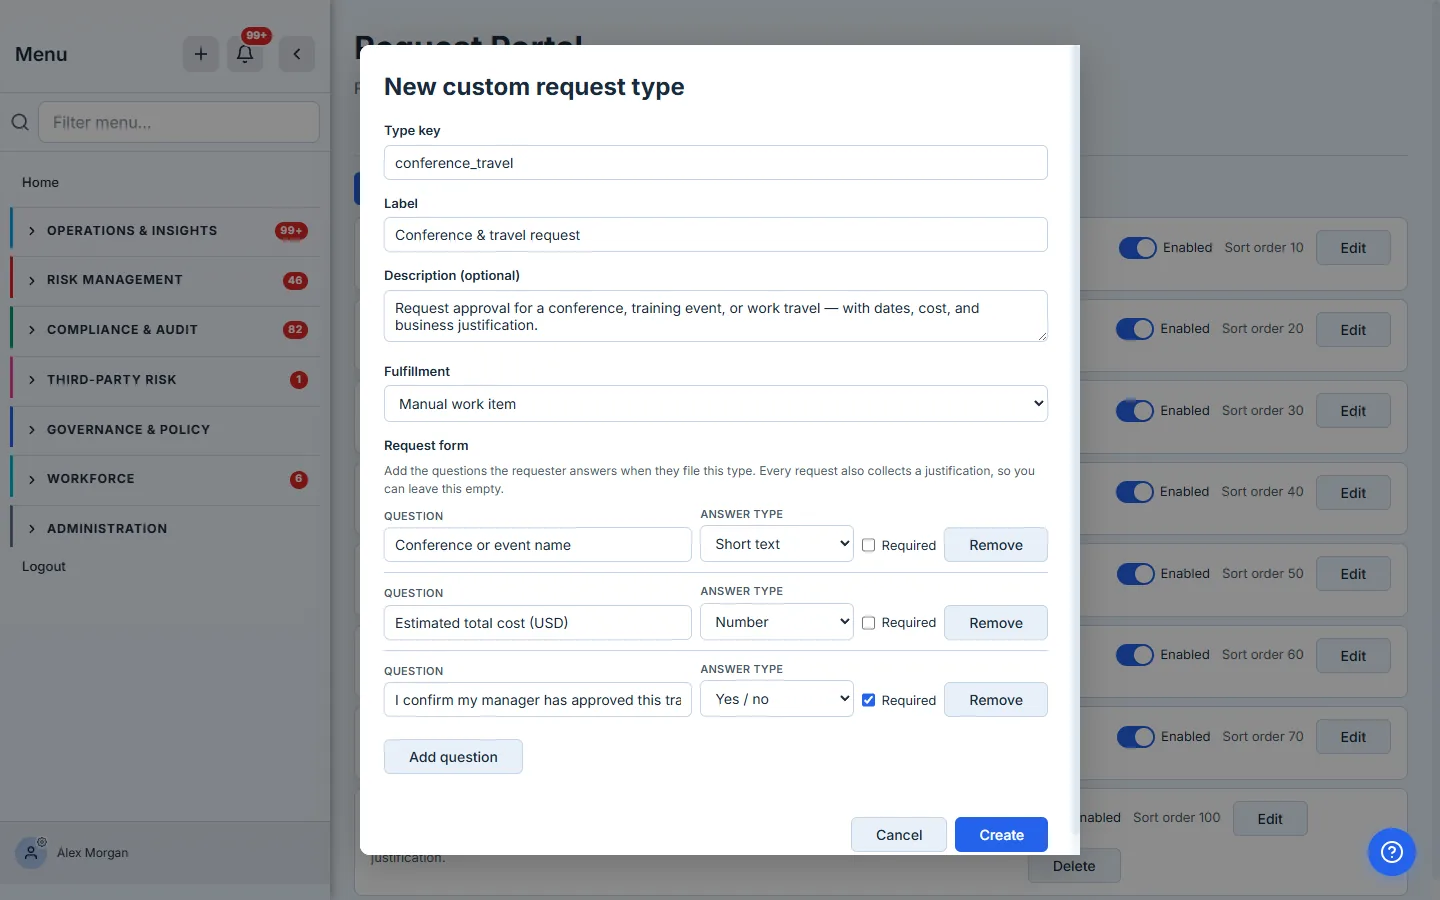
Below that is the Request form — the questions the requester answers when they file this type. Add a question, give it a prompt (“Conference or event name”), pick an answer type, and tick Required if it’s mandatory. The answer types are the field vocabulary you already know from custom fields elsewhere in Talarity — short text, long text, number, date, and yes/no — so a number field validates as a number and a yes/no renders as a checkbox the requester must tick. Every request also collects a free-text justification automatically, so you only add questions for the structured data you specifically need to act on.
The rule of thumb: ask for exactly what the approver and the fulfillment need, and nothing else. A license-seat request needs to know which tool; a travel request needs a cost and a manager-approval confirmation; a vendor request often needs nothing beyond the justification because the vendor record captures the rest. Over-asking is the fastest way to make a portal people avoid.
Decision 2 — Route it for approval
Scroll to Approval routing. This is where a request type stops being a suggestion box and becomes a control. Each step routes to an approver — Group members (anyone in a group you pick), Org admins, or specific users — and steps run top to bottom: step 2 doesn’t open until step 1 is decided.
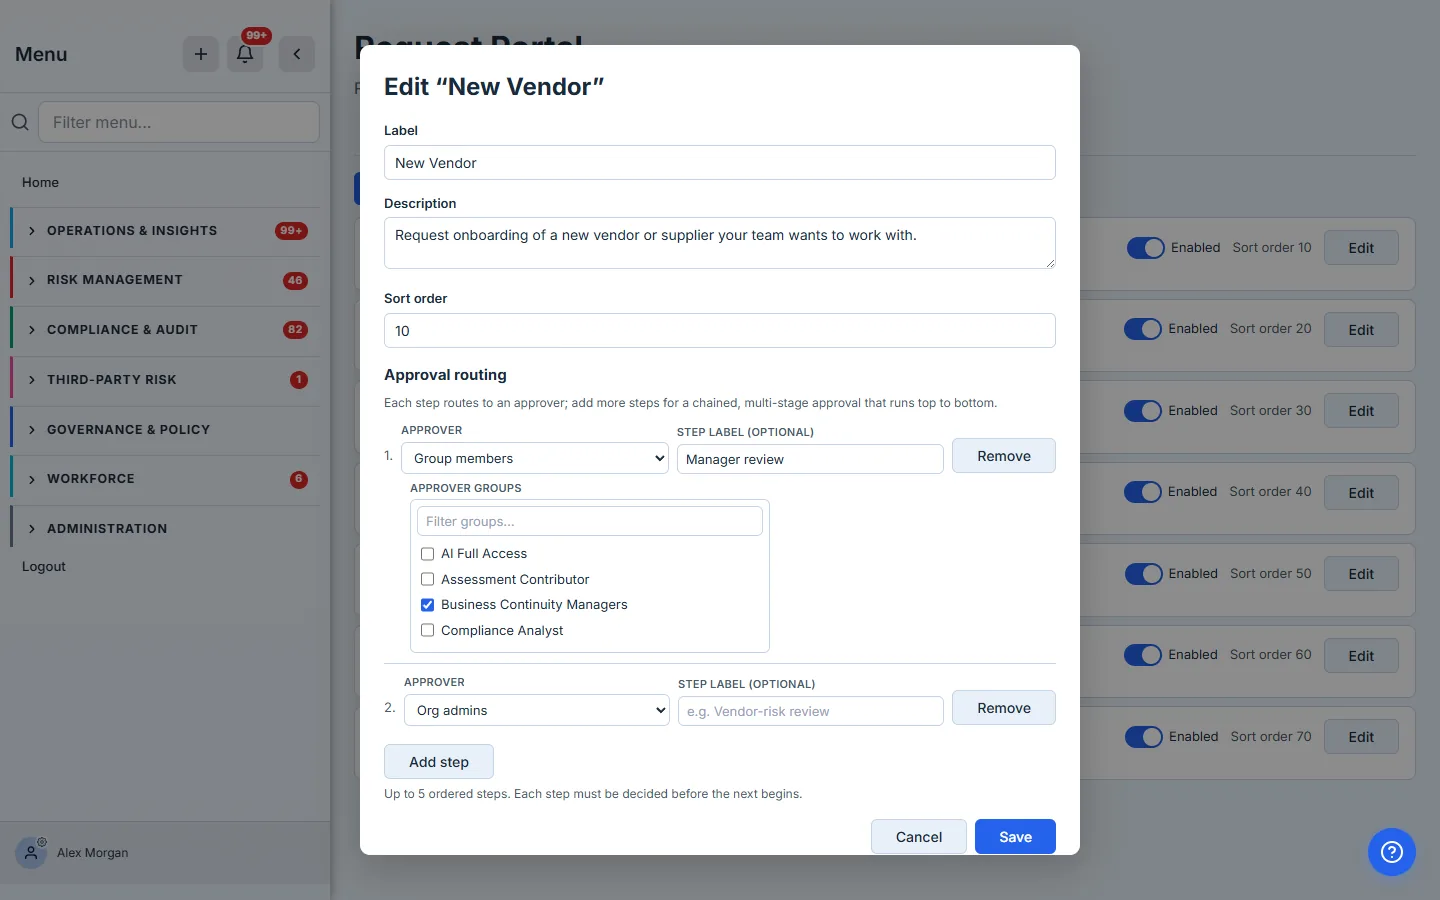
Two things make this genuinely usable at scale. First, each step takes an optional label (“Manager review”, “Vendor-risk review”) that shows up in the approver’s queue and the requester’s timeline — so a two-step chain reads like a process, not a mystery. Second, the group picker filters as you type, because an enterprise has dozens of groups and scrolling isn’t a plan. You can chain up to five ordered steps; within a step, the approval is satisfied by the first eligible person to act, so you’re routing to a pool, not creating a single point of failure.
Leave routing alone and a type falls back to a single org-admins step — safe, but blunt. The moment a request type carries real risk (a new vendor, a privileged seat), give it the chain it deserves.
Decision 3 — Choose what approval produces
The Fulfillment selector — right there in the builder, between the description and the form — is the decision that separates Talarity from a ticket queue. It’s the answer to “and then what?” — and it runs automatically the instant the last approval lands. There are five kinds, each wired to a real executor:
- Create vendor — spins up a vendor record in your TPRM funnel, deduplicated against vendors you already track, so an approved “New Vendor” request lands the supplier under management from day one.
- Adopt catalog subscription — brings a SaaS app or cloud service into your workforce catalog as a tracked entry (you pick the catalog category — software or cloud — right in the builder).
- Allocate license seat — draws a seat from a license pool and assigns it, when the requester maps to an employee; if they don’t, it falls back cleanly to a staff work item rather than failing silently.
- Assign asset — enters the equipment into your provisioning queue as a pending assignment.
- Manual work item — the honest catch-all: some requests need a human. This routes an approved request to a staff work item (optionally to a specific group) so nothing falls through, even when there’s no automation to run.
Fulfillment is where a request type earns its place. If a new type doesn’t map to one of these outcomes, it’s probably a “Manual work item” — and that’s fine. What matters is that the requester, the approver, and the auditor all see the same thing happen. The mechanics of that hand-off — what happens when fulfillment succeeds, and what happens when it can’t — are their own walkthrough: From request to reality.
Put it on the shelf
Save, and your new type joins the catalog alongside the built-ins — each with its Platform or Custom badge, its “Fulfills: …” kind, its enable toggle, and its sort order. Custom types carry a Delete; built-ins don’t (disable is the reversible equivalent).
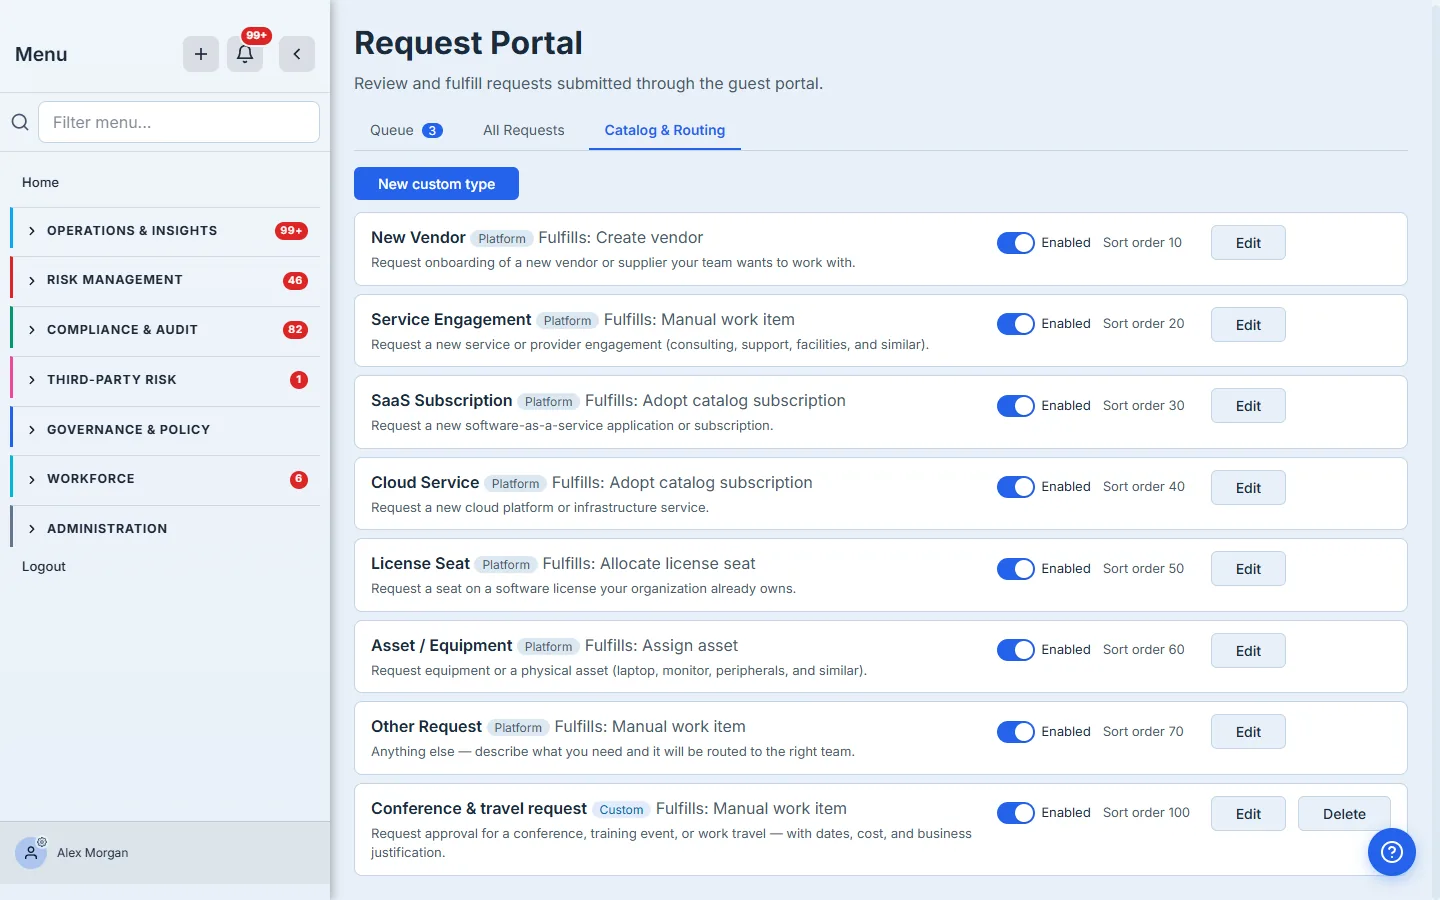
Sort order is worth a deliberate pass: the requests your guests file most should sit at the top of their catalog. It’s a small thing that makes the portal feel designed rather than dumped.
What the requester sees
Everything you just built renders, on the guest’s side, as a clean form — no builder chrome, no routing internals, just the questions you chose in the order you set them, with your required fields enforced.
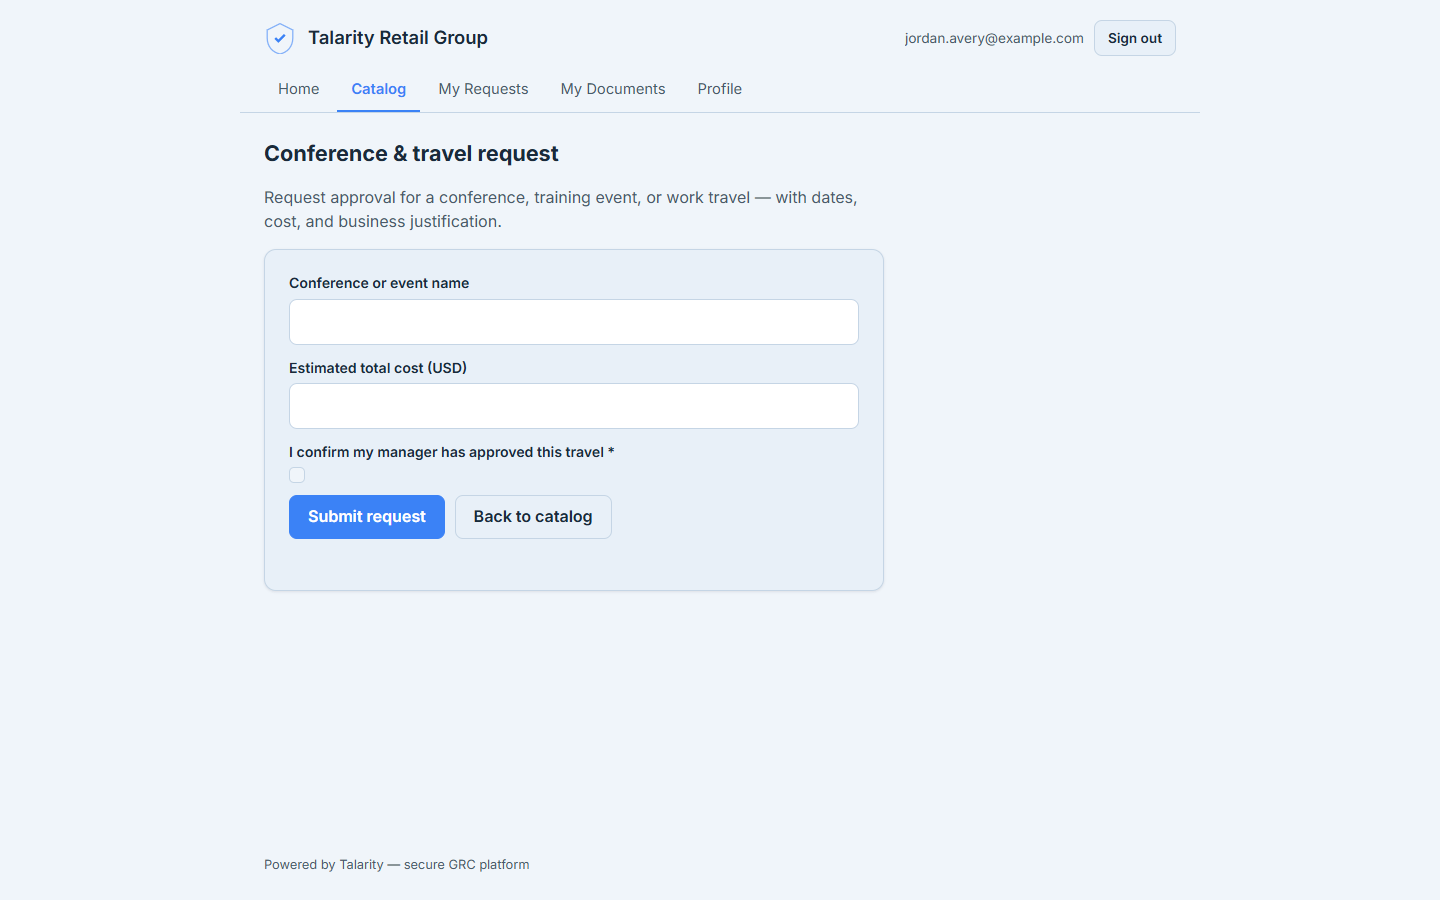
This is the payoff of the three decisions: the requester answers exactly what you need, hits submit, and the request enters the chain you routed — on its way to the fulfillment you chose. The requester’s full experience — sign-in, catalog, tracking a request through to delivery — is its own walkthrough.
What you walk away with
- A per-type form that collects exactly the structured data your approvers and fulfillment need — nothing more.
- Approval routing with up to five ordered, labeled steps, each routed to a pool so there’s no single point of failure.
- A fulfillment kind on every type, so approval produces the vendor, subscription, seat, asset, or work item automatically — on the right register, with the trail attached.
- A catalog you’ve shaped and ordered deliberately, built-ins and custom types side by side.
Start with one type. Open Catalog & Routing, click Edit on the request your team files most, and give it a real form and a real route. Then build the one thing your built-ins don’t cover. The catalog is the difference between collecting requests and governing them — and it’s yours to design. When you’re ready to see what happens after approval, From request to reality picks up the story; to manage the guests filing these requests, see Guests, without the sprawl.