An intake process is only worth having if the approval means something and the approved thing actually happens. SOC 2 CC6.1–CC6.3 and CC9.2 don’t just ask “who approved this” — they ask that provisioning follow approval and that the record exist afterward; ISO 27001:2022 A.5.18 (access rights) and A.5.19 (supplier relationships) say the same for seats and vendors. The gap most teams live with is the hand-off: an approved “yes, onboard that vendor” in a ticket, and then someone re-keys it into the vendor system a week later — or doesn’t.
Talarity closes that gap. Every request your team files through the guest request portal routes to an approver, and on approval it fulfills itself — the New Vendor becomes a real vendor record, the License Seat is allocated from the pool, the equipment request enters the provisioning queue. This is the org side of the portal: the queue where you decide, the record each decision produces, and the catalog where you shape what can be requested and who approves it.
Who’s involved
- Approver — the admin or group a request type routes to. Reviews the request in one queue and approves or declines with a note.
- Requester — sees the outcome on their portal timeline: a decline with a reason, or an approval that turns into a real thing.
- The fulfillment engine — on final approval, runs the action the request type carries: create the vendor, allocate the seat, queue the asset, or open a staff work item.
- Auditor — pulls the whole chain: the request, the approval and its note, and the record it produced — one linked trail per request.
What’s on the page
Everything lives at /app/portal-requests, in three tabs:
- Queue — the requests awaiting your approval right now.
- All Requests — every request in the org, filterable by status, with a detail view showing the fulfillment result.
- Catalog & Routing — the request types themselves: enable, hide, relabel, add custom ones, and set who approves each.
Step 1 — Work your approval queue
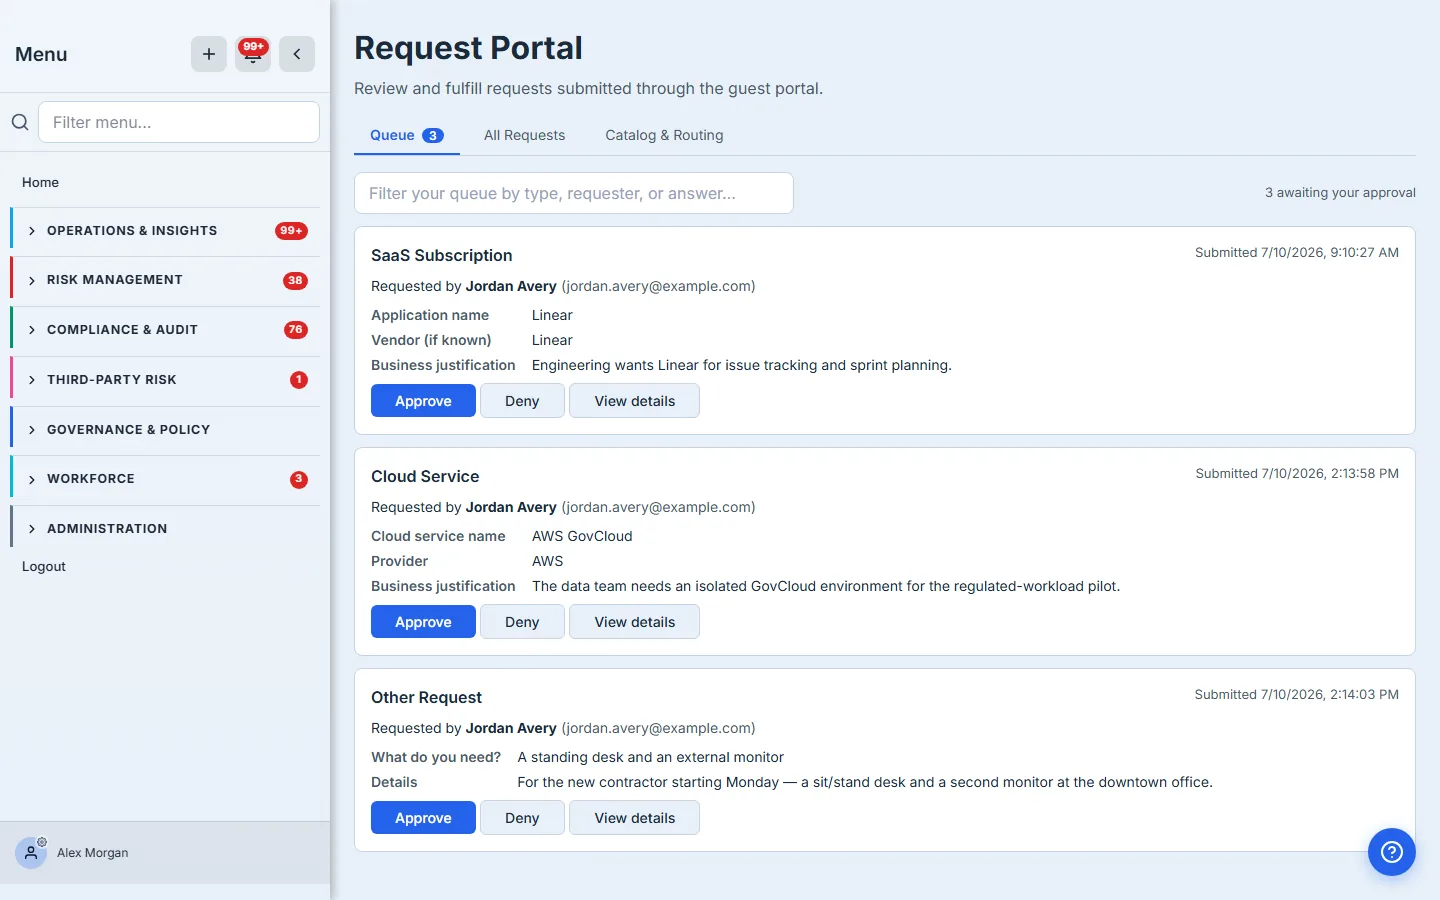
The Queue tab shows the requests whose current approval step is yours. Each card carries the request type, who asked, when, their justification, and the answers they gave — enough to decide without opening anything. A search box and a live “awaiting your approval” count keep the queue usable when the backlog grows, and your My Work approvals badge counts these too, so they don’t get lost.
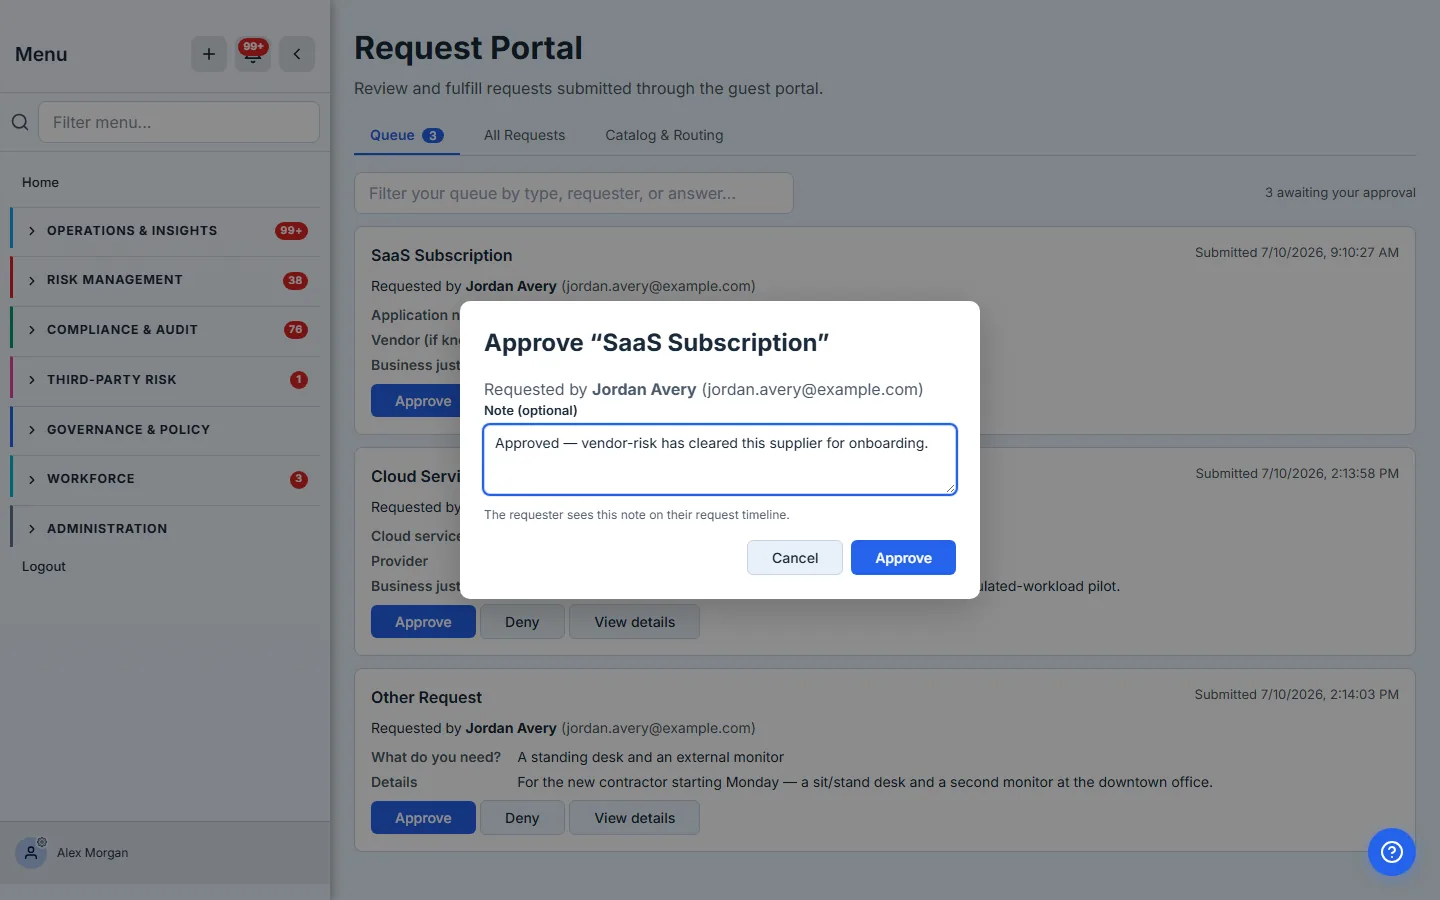
Approve or decline with an optional note. The note isn’t decoration — the helper line under the field says exactly where it goes: the requester sees it on their request timeline, so a decline explains itself and an approval can carry a condition.
Approvals are per-type, not one-size-fits-all. A New Vendor request can route to your vendor-risk lead while a License Seat routes to IT and an equipment request routes to facilities — each request type carries its own approval routing (Step 4). The queue only ever shows you the requests you’re actually the approver for.
Step 2 — Watch it fulfill itself
This is the part that makes an approval more than a status change. When you approve the final step, Talarity runs the request type’s fulfillment action:
- New Vendor → creates a real vendor record — status prospect, ready for tiering — or links an existing vendor if one already matches by name or domain, so you never double-create.
- SaaS Subscription / Cloud Service → adds the application to your workforce catalog as a tracked, owned asset.
- License Seat → allocates a seat from the chosen pool to the requester, honoring the pool’s capacity.
- Asset / Equipment → creates a pending provisioning assignment that drops straight into the equipment custodian’s queue.
- Service Engagement / Other → opens a staff work item carrying the full request detail.
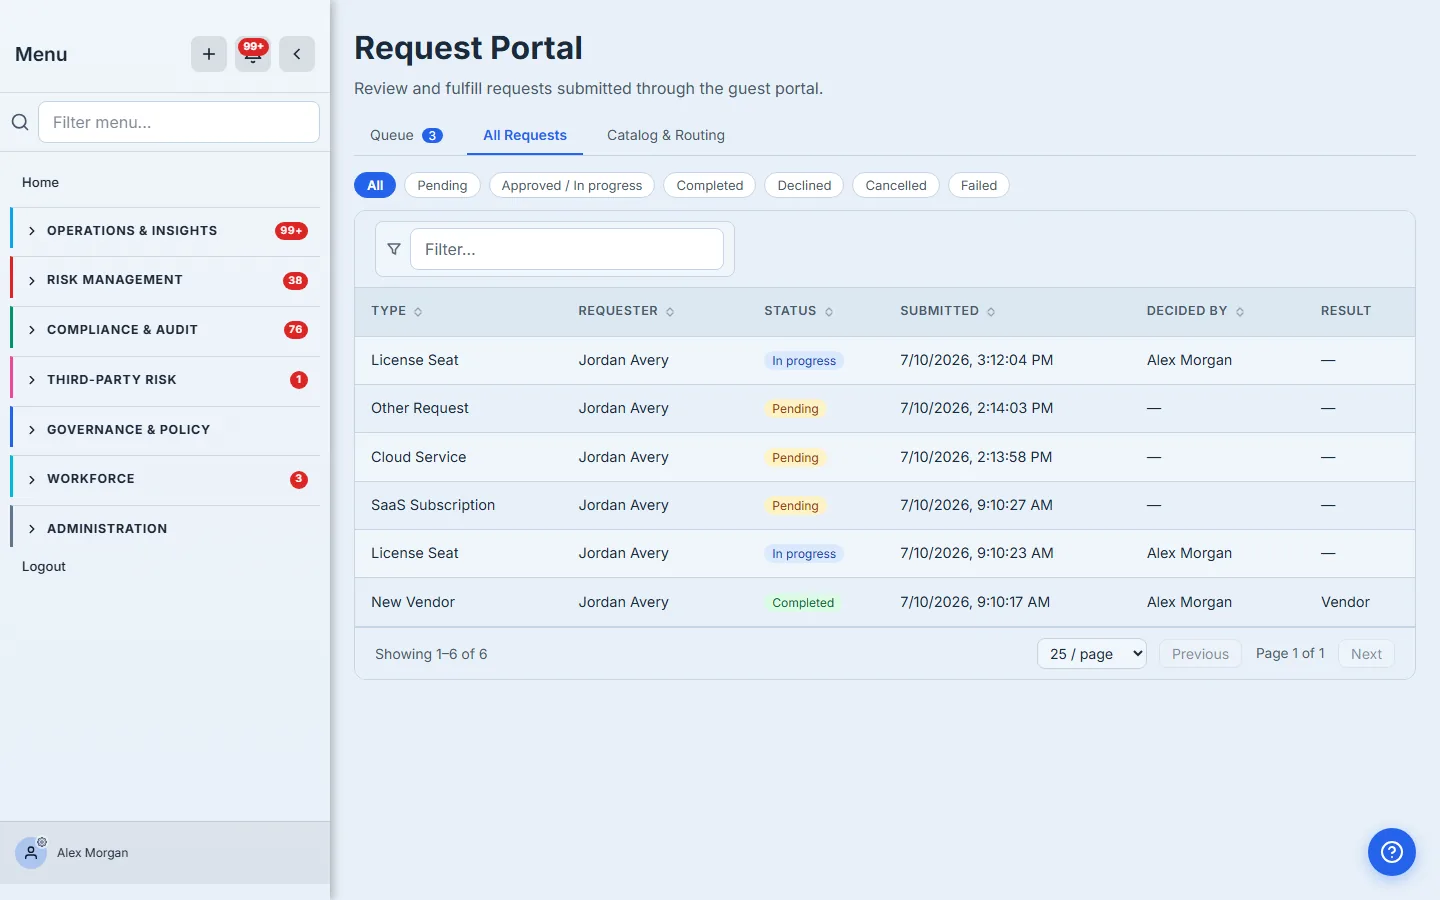
The All Requests tab is the org-wide view. Every request shows its status — Pending, Approved, In progress, Completed, Fulfillment failed, Declined, Cancelled — who decided it, and what it produced; the status chips across the top narrow the list to answer the questions that come up: what’s waiting on approvers, what’s mid-fulfillment, what errored and needs a hand, what’s done.
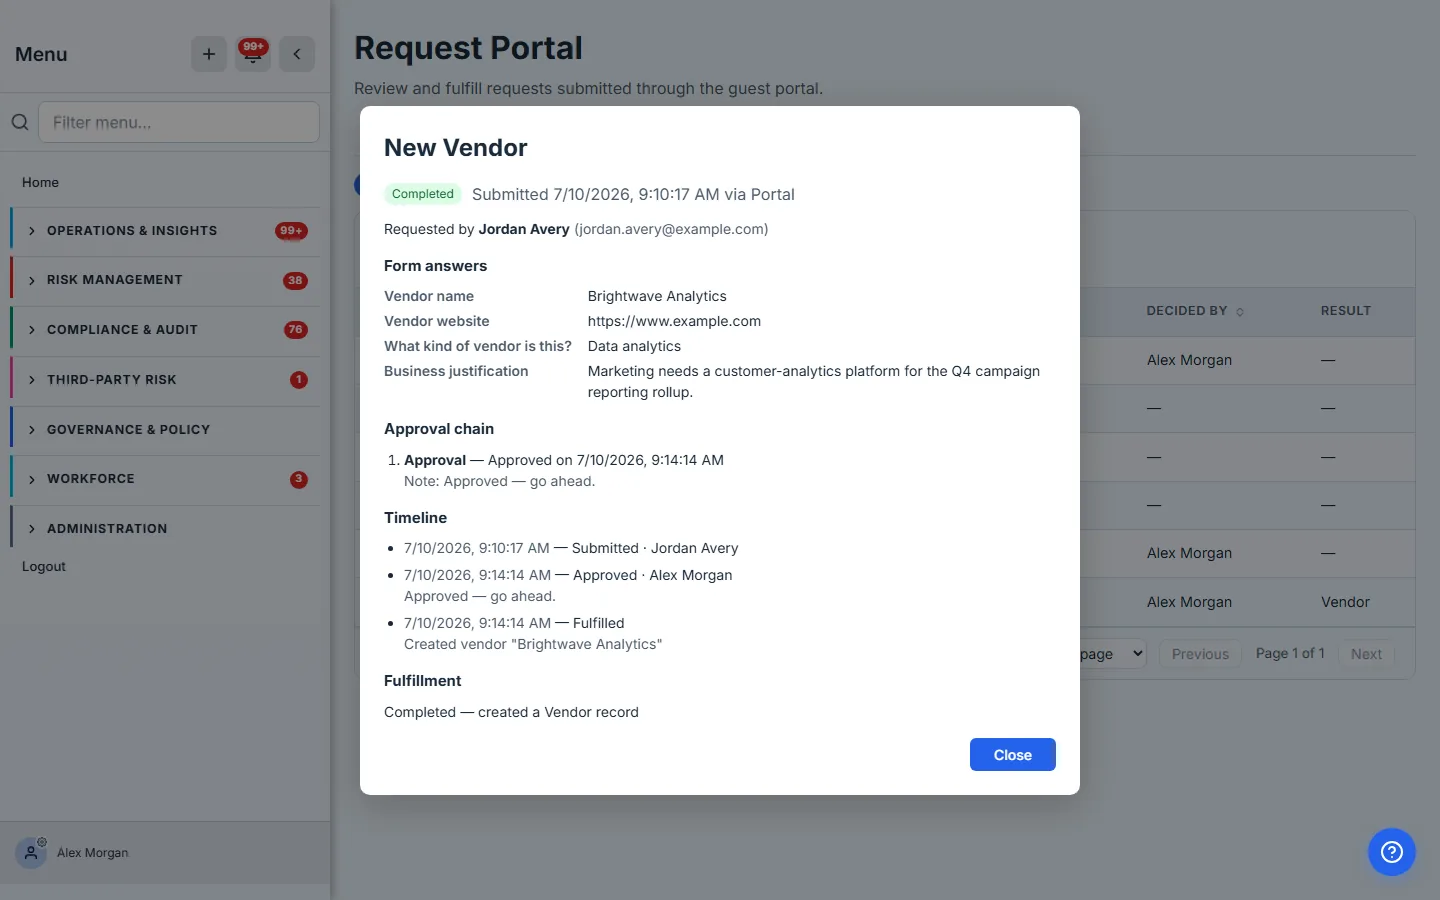
Open any request for the full picture: the submitted answers, the approval chain with its note, the timeline, and what fulfillment produced — the completed New Vendor names the vendor record it created right in the timeline.
The request is the front of a real workflow. An approved New Vendor lands in the funnel from Onboarding a vendor; a License Seat writes into the ledger from Software licenses, tracked like seats; an equipment request joins the equipment custodian’s provisioning queue. The portal is where the request enters; those workflows are where it lives.
Step 3 — When automation can’t finish, nothing is dropped
Not every request can complete itself, and Talarity is honest about it. A License Seat request whose requester has no workforce record to allocate against — or an equipment request that needs a person to fulfil it — doesn’t silently fail. It’s routed to staff as a work item carrying the full request detail, the request shows as In progress with a link straight to that work item, and the requester simply sees it’s being completed by staff.
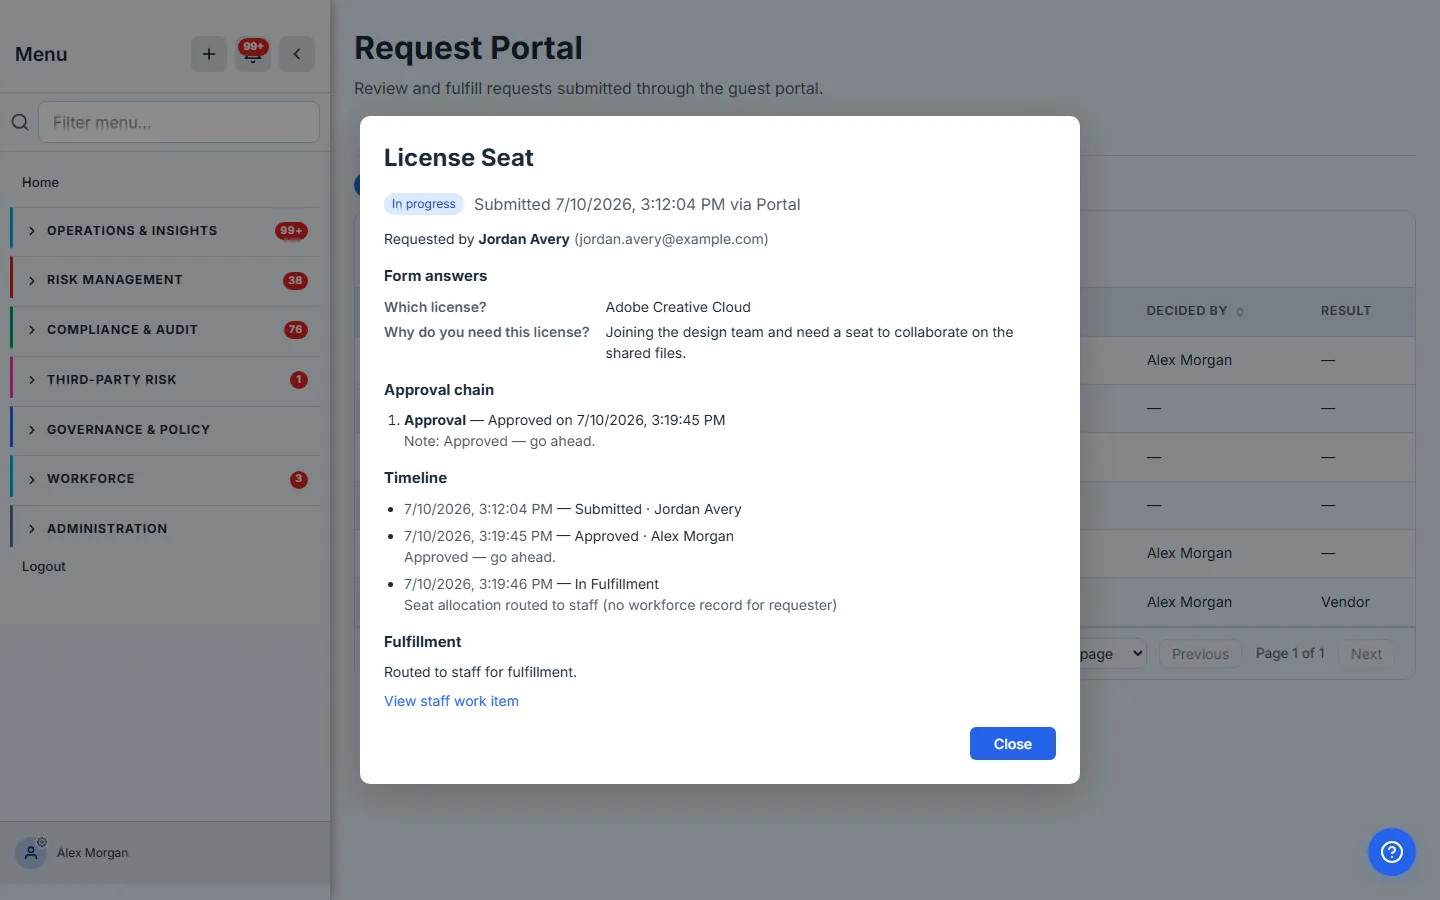
And if an automated step genuinely errors — a license pool at capacity, say — the request is marked Fulfillment failed, a staff work item is created with the full detail, and the org’s admins are notified. Fix the blocker — add seats to the pool, create the workforce record — and Retry the fulfillment from the request’s detail; a retry that succeeds moves the request to Completed and cancels the now-redundant staff work item automatically, so you never end up chasing a task for something that’s already done.
Step 4 — Shape the catalog and the routing
The Catalog & Routing tab is where you decide what your team can request and who approves each type. Every organization starts with the seven built-in types; from here you enable or disable any of them with a toggle, reorder them, and add fully custom types of your own.
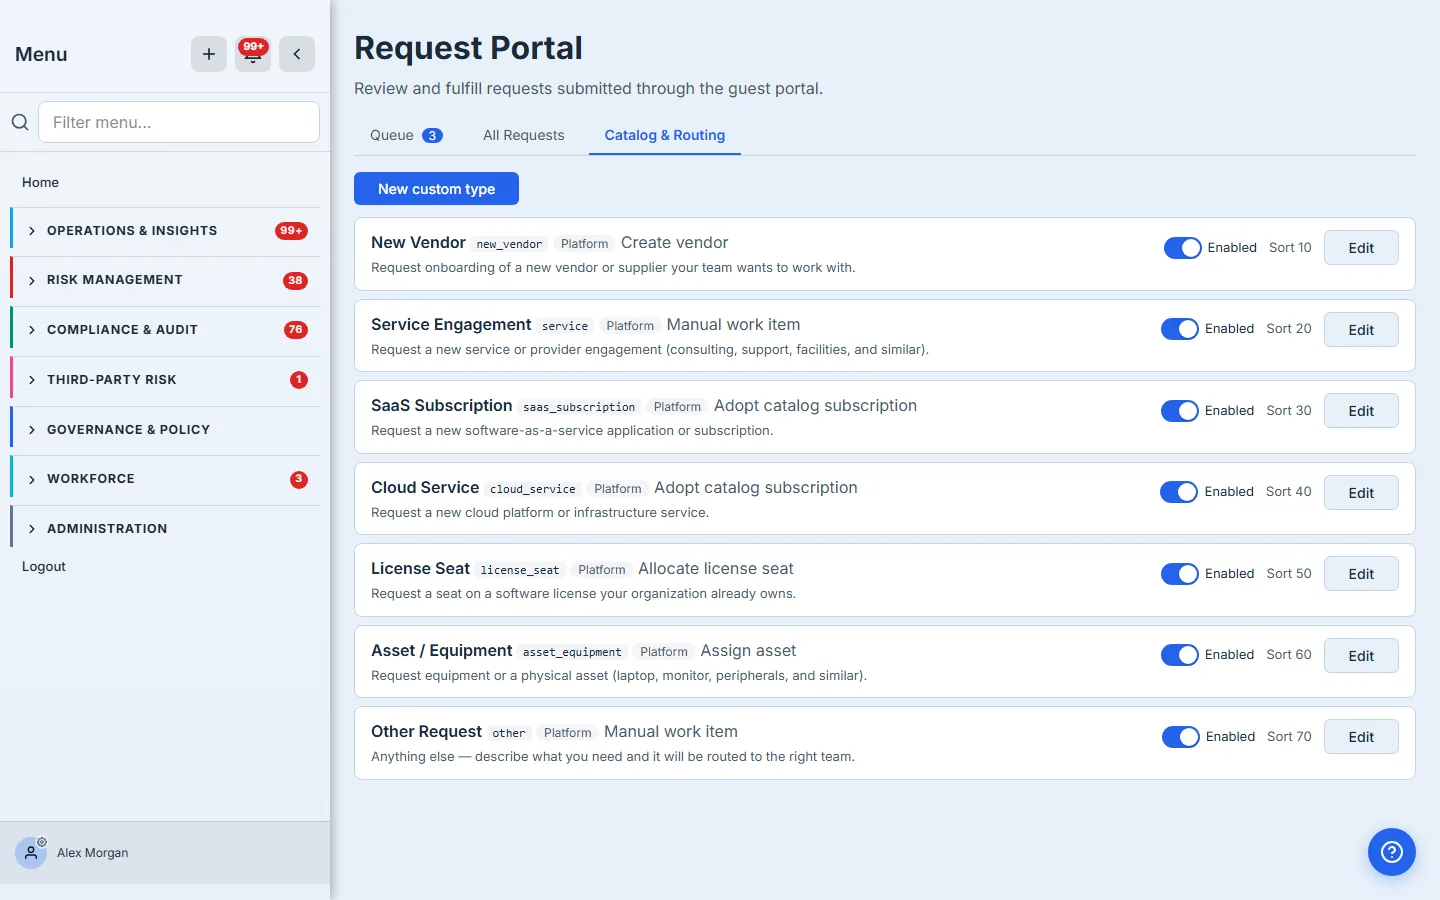
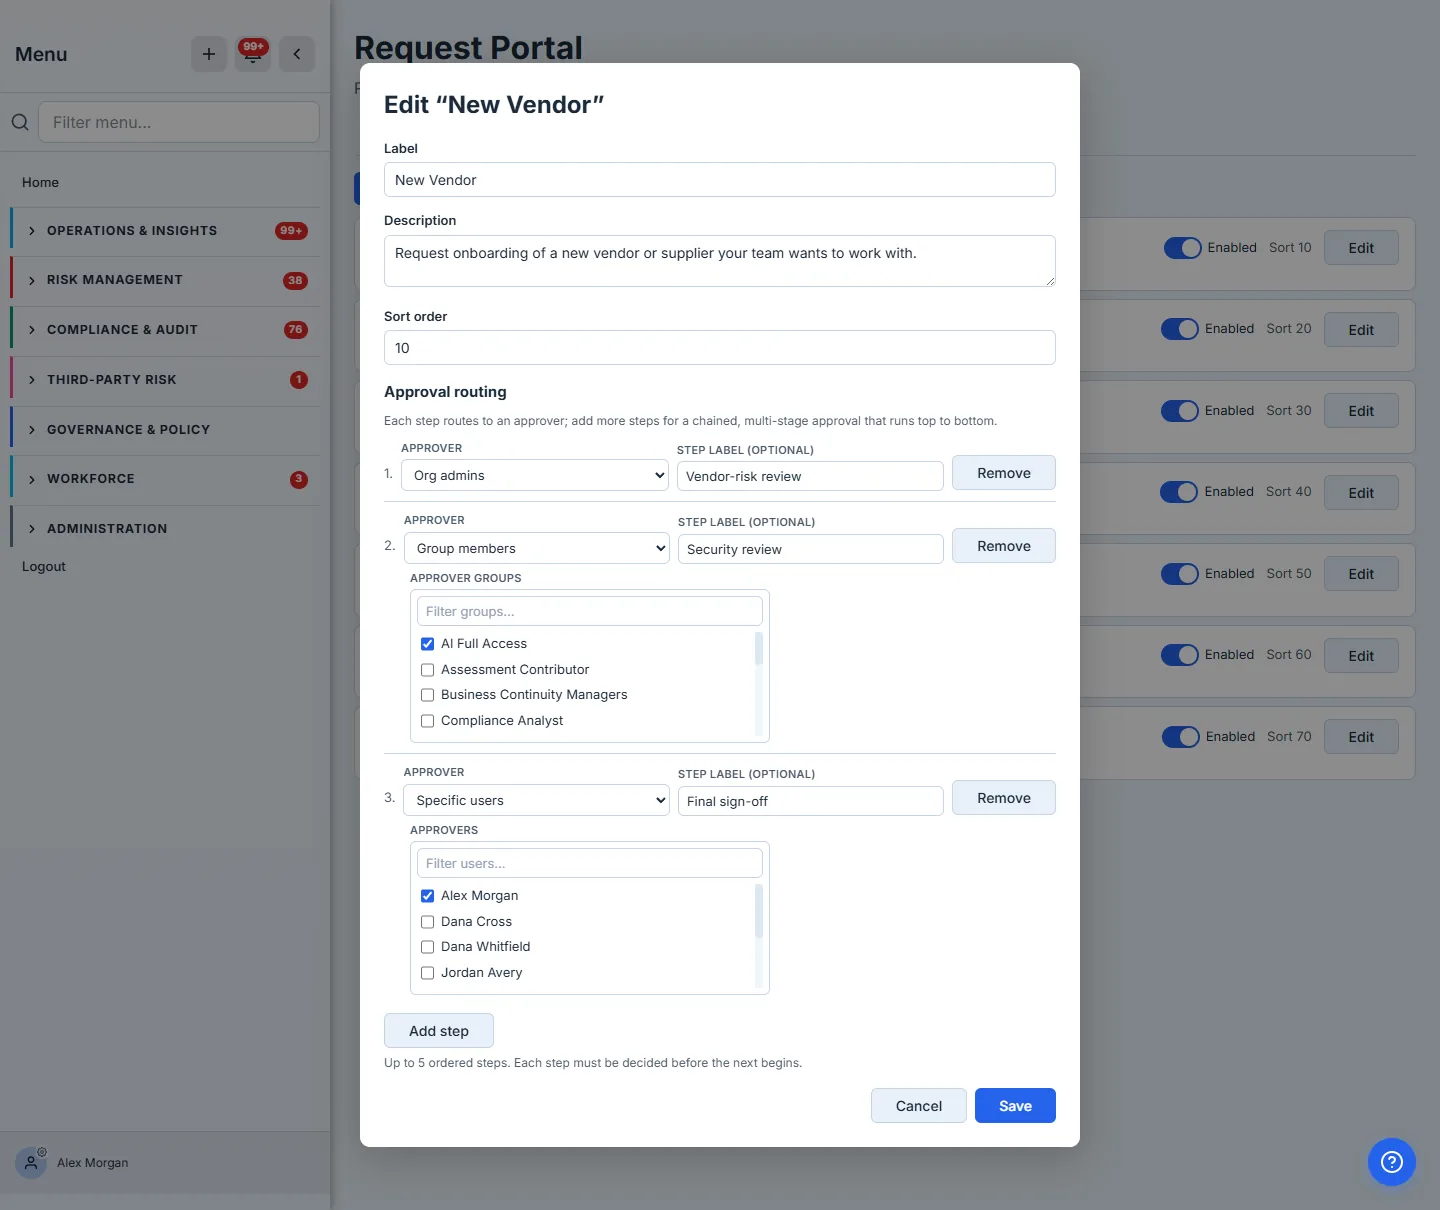
Each type’s approval routing is a small ordered pipeline. A step can route to your org admins, to the members of a named group, or to specific people — chosen by name, not by ID — and you can chain steps for a multi-stage approval that runs top to bottom. The requester’s request is snapshotted against this routing when they file it, so a routing change never disturbs a request already in flight.
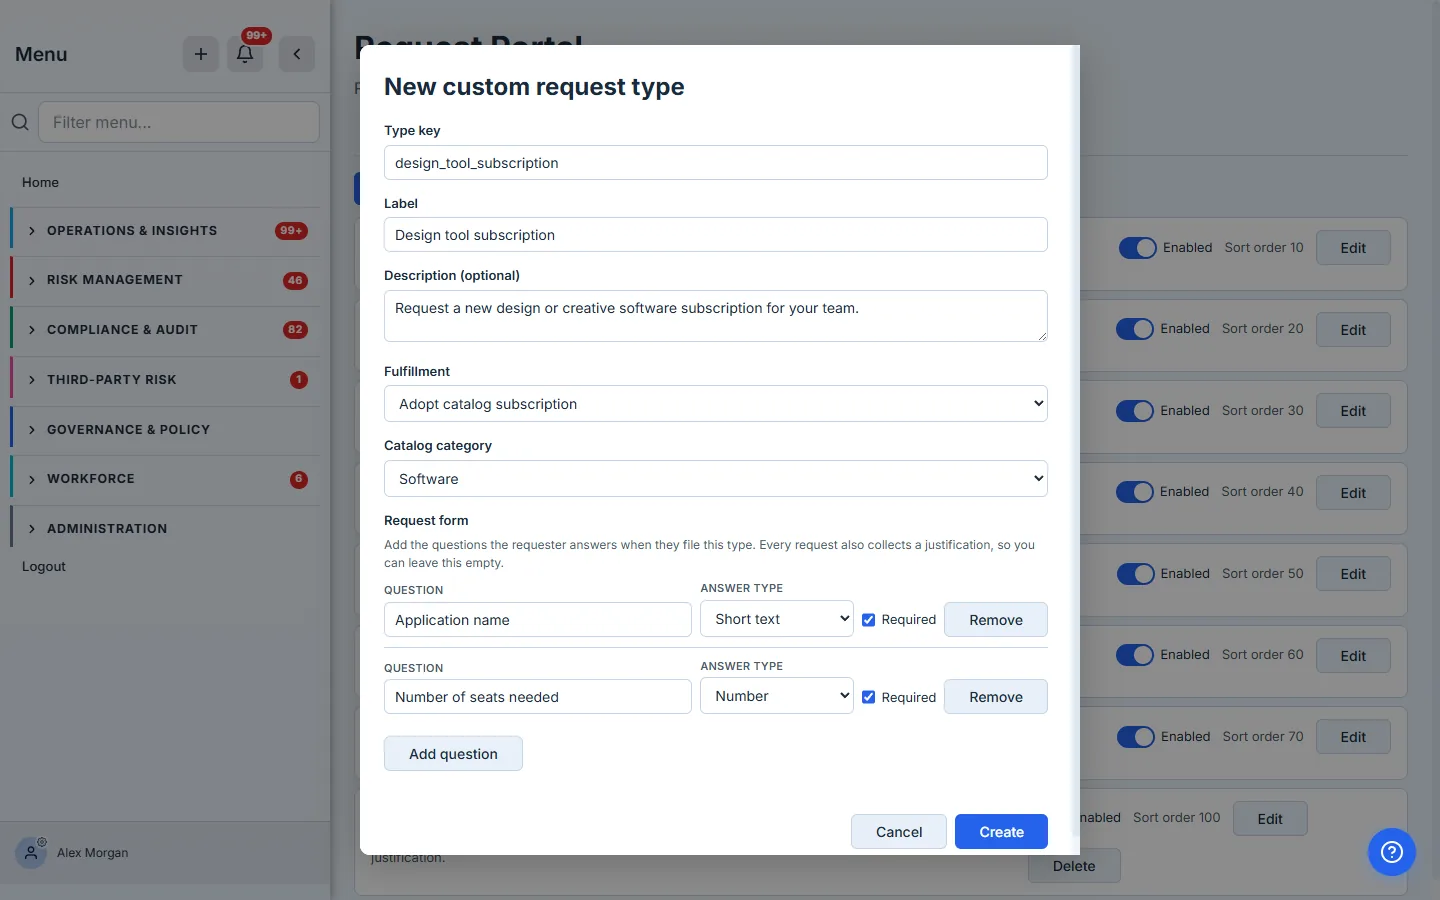
Adding a custom type is the same shape: name it, give it a fulfillment behaviour (from a new vendor to a staff work item), and build its request form with a visual field editor — add each question, choose its answer type, mark it required — no code, no JSON. New requesters see it in the catalog immediately. Designing the form, the routing chain, and the fulfillment behaviour deliberately — the three decisions behind every request type — is its own deep-dive: Design your request catalog.
What you walk away with
- One approval queue for every request your team files — searchable, with the answers inline, so you decide without digging.
- Fulfillment that follows approval — an approved request becomes a vendor record, a license-seat allocation, or a provisioning task, linked back to the request.
- A never-dropped fallback — anything automation can’t finish becomes a staff work item, with a retry once the blocker clears.
- Per-type approval routing — org admins, a named group, or specific people, in ordered steps, snapshotted per request.
- A configurable catalog — enable, hide, reorder, or add request types, each with its own form, fulfillment, and routing.
Set yours up this afternoon. Open /app/portal-requests, review the Catalog & Routing tab to point each type at the right approver, and the next request your team files arrives in your queue already linked to the record it will become.
See also: Stand up your request portal (turn it on), Design your request catalog (shape what can be requested), the guest request portal (the requester’s side), and guest management (who gets to request).