Every framework that asks for controls also asks for proof that they operated. SOC 2 puts it in CC4.1 (the entity evaluates its controls) and CC7.2 (it monitors them); ISO 27001:2022 asks for documented information under A.5.36 and for monitoring and measurement in Clause 9.1; NIST CSF 2.0 carries it in GV.OV — the outcomes of the programme are reviewed, not assumed. None of them accept a shared drive as an answer, because a shared drive cannot tell you what is missing.
Most programmes discover their gaps the way an auditor does: one control at a time, in the week before fieldwork. Talarity treats evidence as a loop with four moving parts — a detector that names what is absent, an intake queue that triages what arrives, a signed endpoint that lets outside systems push, and a freshness policy that decides when a passing control quietly stopped passing. This walkthrough follows one piece of evidence all the way round that loop, and — the part most walkthroughs skip — is precise about which store each check reads, because the four surfaces do not all read the same one.
Who’s involved
- Compliance lead — runs the analysis, sets the freshness thresholds, and decides which gaps get fixed, which get formally accepted, and which were never gaps at all.
- Control owner — receives the work item behind a gap and does the actual thing: attaches evidence, or links the control to the risks it mitigates.
- Evidence reviewer — works the intake queue. Confirms or corrects the classifier’s proposed category and control mappings, then approves or rejects.
- A system you own — a build pipeline, an access-review script, an internal tool. It has no seat and no opinion; it POSTs a signed payload and moves on.
- Auditor — pulls the control, sees the artefact, and sees the dates. Everything below exists so that third thing is true.
What’s on the page
Four routes, each doing one job in the loop:
- Evidence Gap Detection (
/app/grc/evidence-gaps) — the detector. Names what is missing, stale, expiring, insufficient, or unlinked to any risk. - Evidence Freshness Settings (
/app/grc/evidence-gaps/settings) — the thresholds the detector measures against. - Smart Evidence Intake (
/app/smart-evidence-intake) — the triage queue for evidence a person uploads. - Evidence Collection (
/app/grc/evidence-collection) — where evidence that arrives from a system lands, whether pulled by a connector or pushed to the inbound endpoint.
Step 1 — Ask the question: run the analysis
Gap detection does not run on a hunch. Open /app/grc/evidence-gaps on an organisation that has
never analysed and you get a Ready to Analyze panel, rather than an empty table you have to
interpret. It lists six entries, and only five of them are things the pass detects: Missing
Evidence, Stale Documentation, Insufficient Coverage, Expiring Evidence and Controls Not Linked to
Risks. The sixth, Dual-Approval Acceptance, is not a detector — it is the route a finding takes
out of the list once you accept it, and Step 4 is where you meet it. Once a pass has run, the
same button reads Re-run Analysis and the panel is replaced by the result — which is the state
every screenshot below is taken in.
Two of those chips are worth reading closely, because they are the ones that surprise people. Controls Not Linked to Risks is usually the largest single population in a first run — the detector raises it for every control that mitigates nothing in your register, and that is a finding about your risk model rather than about your evidence. Insufficient Coverage carries the qualifier once a minimum is set, and it means it: the platform default for the minimum evidence count is unset, so out of the box that check is skipped entirely rather than firing on everything.
Press Run Analysis. The pass runs server-side inside one transaction: it loads the organisation’s freshness configuration, joins controls to risks and to evidence, evaluates any declared evidence recipes, and writes one finding row per gap. The whole pass is one transaction, so re-running it is the normal thing to do rather than an event: a second run replaces the picture instead of accumulating a second copy of it, and what differs between two runs is what actually changed — a threshold you moved, a risk link somebody added.
Step 2 — Read the result without being misled by it
The result is a set of tiles, a severity band, a composition breakdown, and a list. The tiles and the list answer different questions, and the page says so on screen rather than leaving you to discover it.
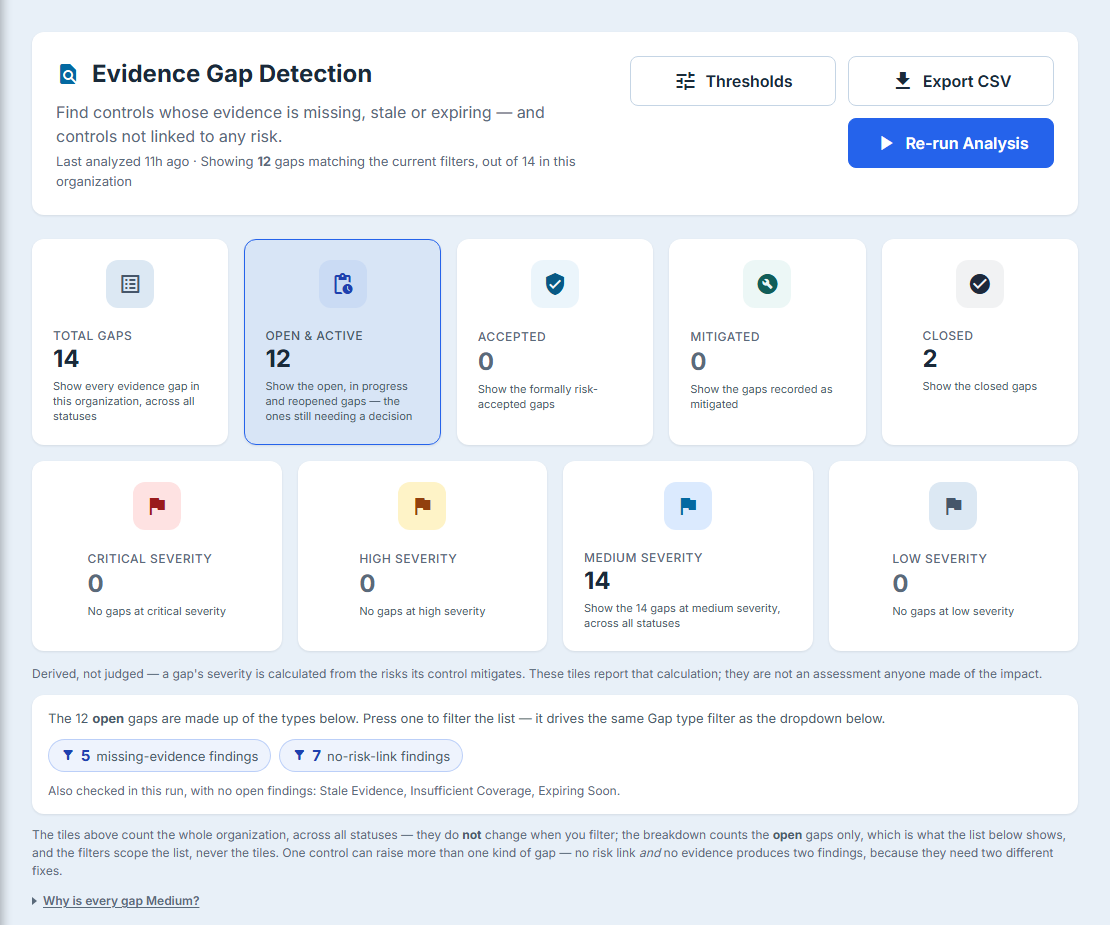
The tiles do not move when you filter, and that is deliberate. The list handler returns two populations in one response: the rows, which honour every filter you set, and a set of roll-ups scoped to your organisation and the gap source rather than to your filters. So the tiles are always the organisation’s true gap population, and the list is your current question about it. A page where both numbers moved together could never tell you whether a filter hid something or nothing was there.
Severity is derived, not judged. A gap inherits its ranking from the residual scores of the risks its control mitigates — the caption under the severity tiles says exactly that — so a control with no linked risks has nothing to inherit from, and its unlinked-control finding is set to Medium by rule. (A control can carry a severity cap of its own, which lowers that Medium but never raises it.) That is the second reason to fix the risk links first: they are what gives every other finding on that control a real ranking.
The composition line under the tiles counts open gaps by type, which is what the list shows. One control can appear in more than one chip: no risk link and no evidence is two findings, because they need two different fixes.
Filtering, and the honest empty state
Six filters sit above the list — Status, Severity, Gap type, Framework, an identified-date range, and a text search over the control and the description.
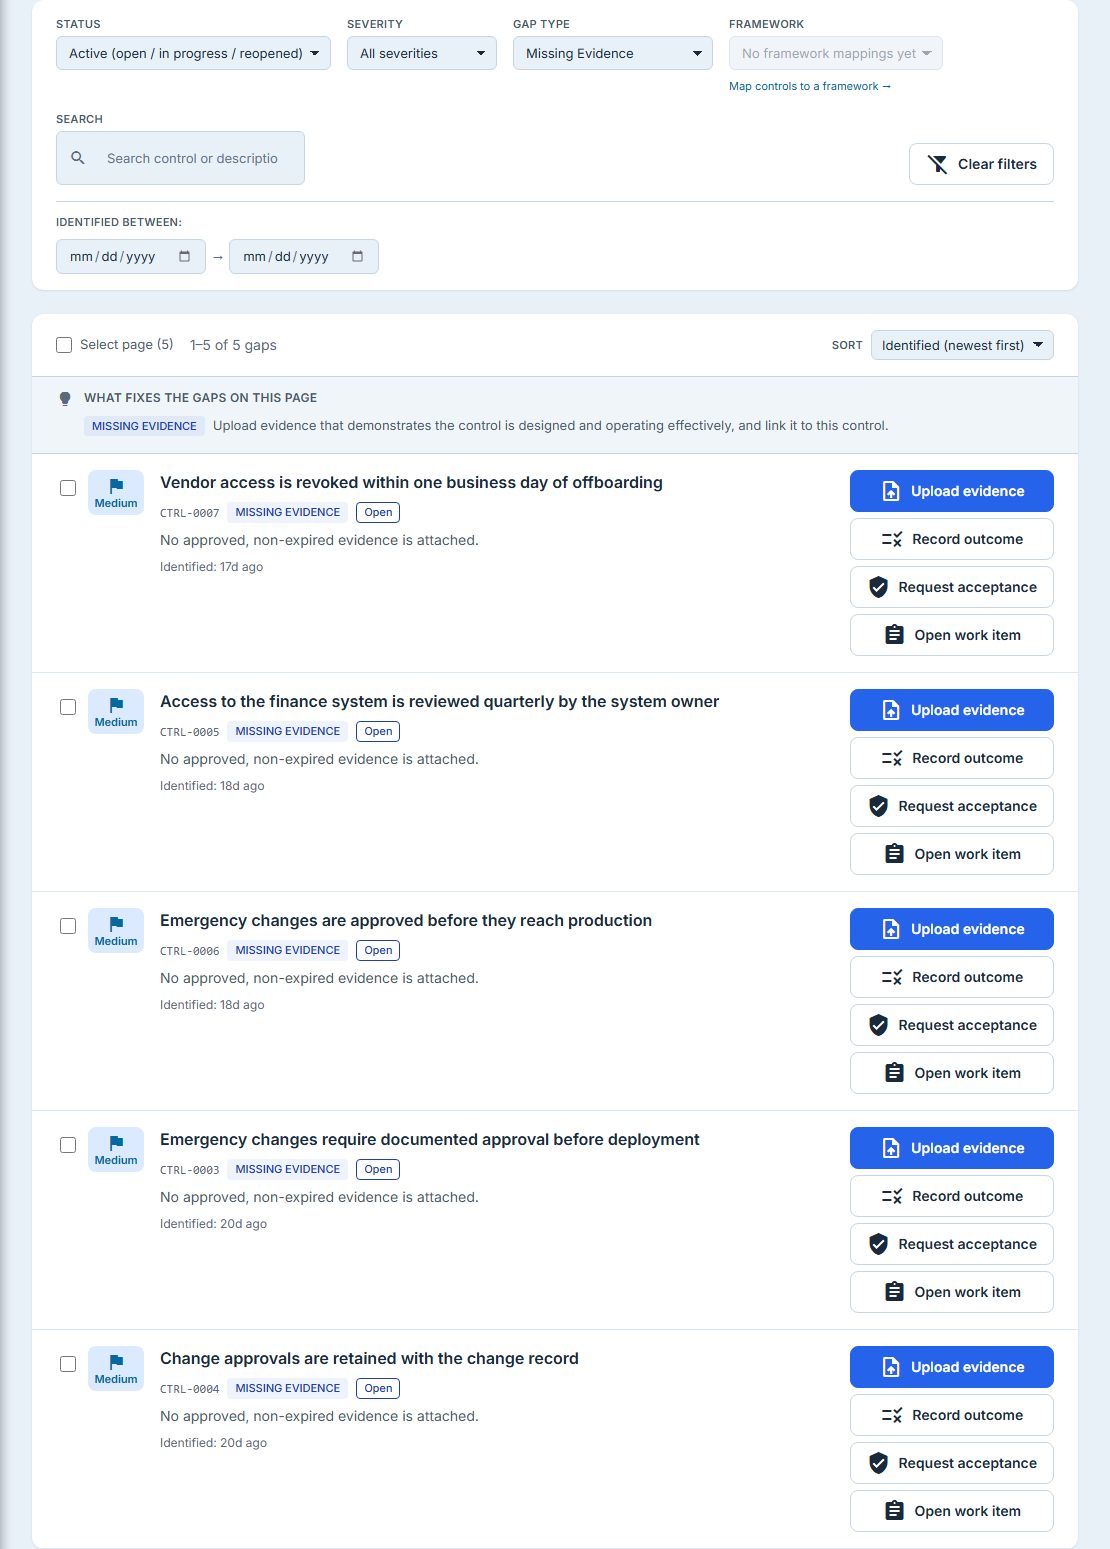
All seven filter fields are sent to the server, search and the date range included, and the page applies no predicate of its own — it sorts what comes back and renders it. That is worth stating because it used not to be true, and the earlier arrangement produced a lie. When the text search narrowed the 500-row window after it arrived, the list on screen and the file the Export button produced were answering two different questions from the same toolbar. Both now run one predicate on the server, so they cannot disagree.
A second lie came from the same page and outlived the first. Filter to a severity that no finding carries and the server returns an empty array — and a page that decides “is this list filtered?” by asking whether the array is empty concludes not filtered and tells you every control passes. On an organisation whose Total Gaps tile is reading fourteen.
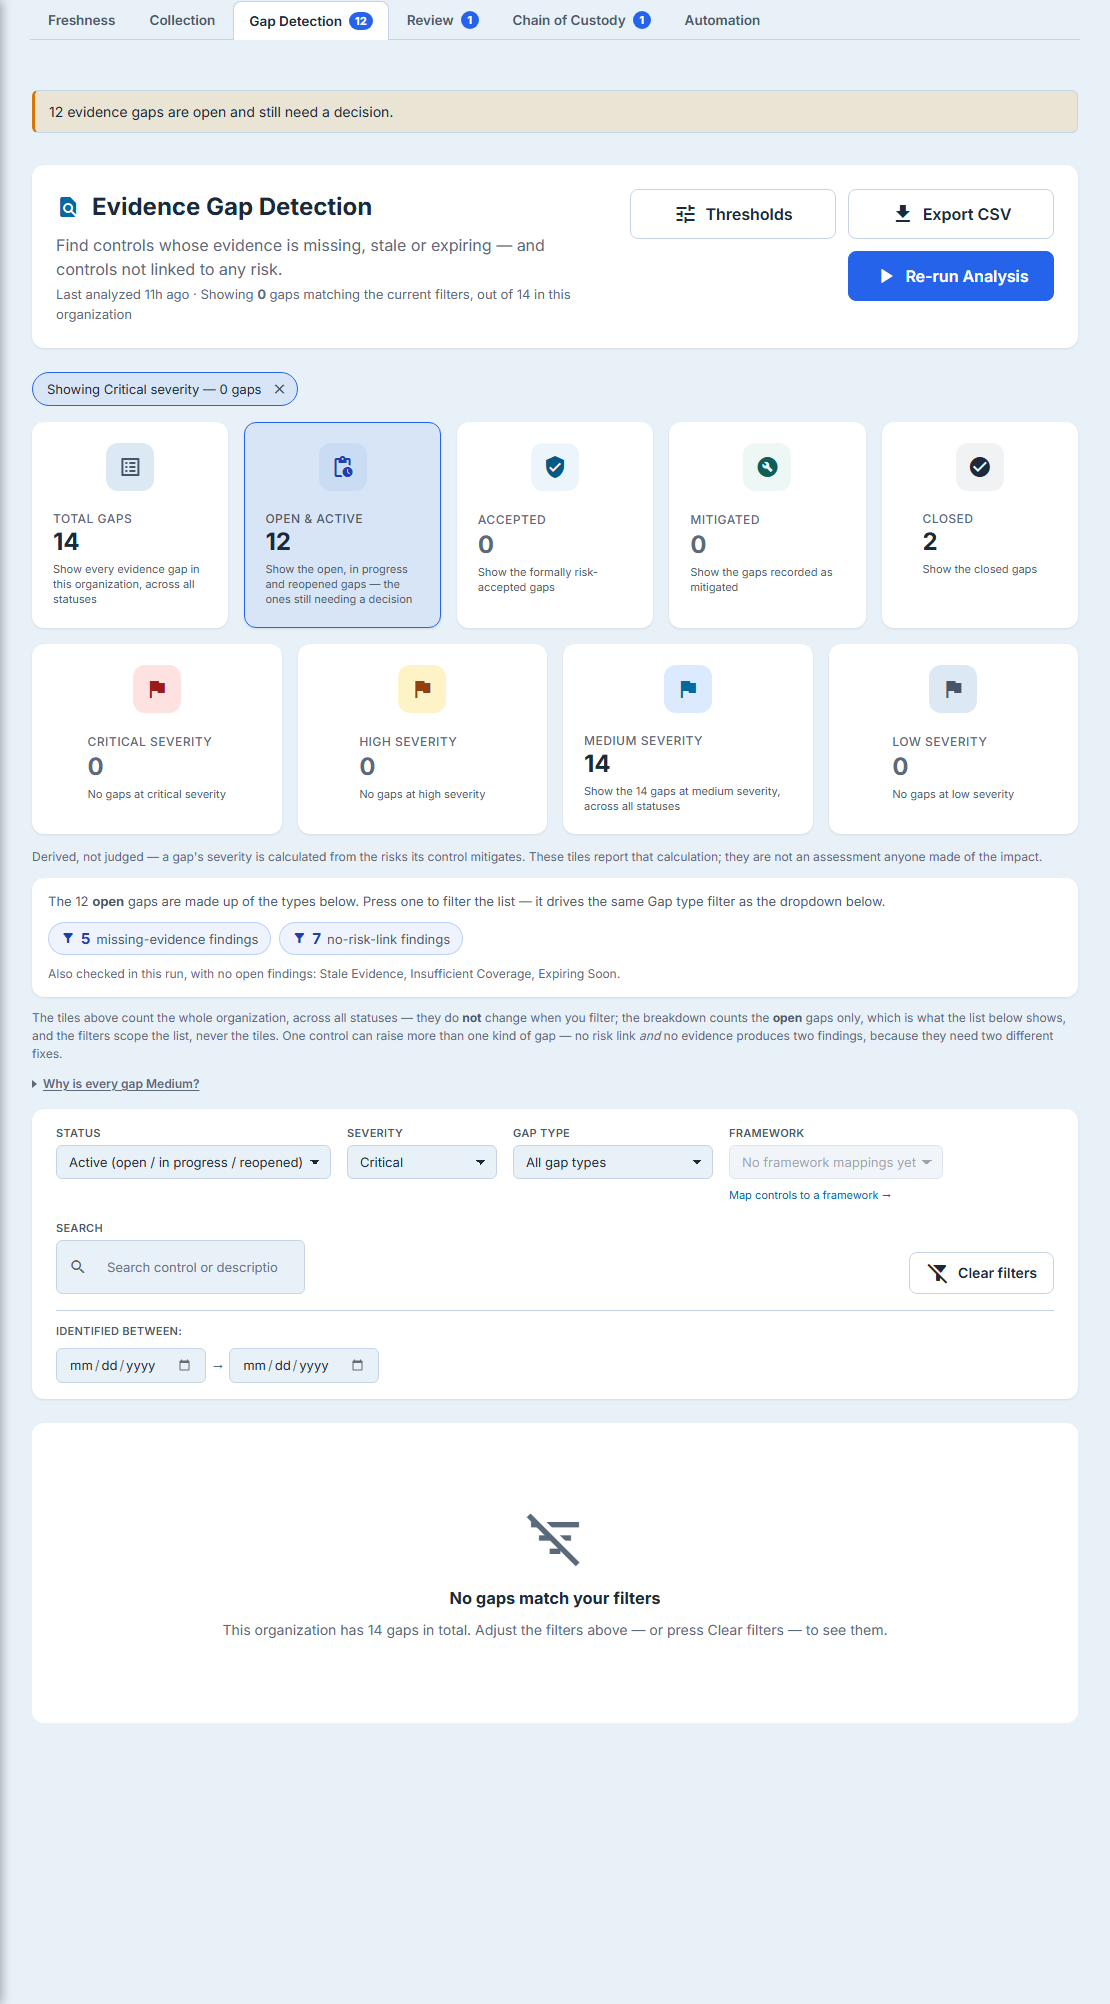
The page now decides that question two ways at once, and needs both. It diffs all seven filter fields against their defaults — the same check that drives the Clear filters button — and it reads the filter-independent roll-up. Both are required: the page lands on Status = Active, which is itself a filter, so the field diff alone would mean a genuinely clean organisation could never again be told it was clean. And the filtered panel states the organisation-wide total, so it now agrees with the tile it used to contradict.
There is a third state most detectors never distinguish: an organisation with no controls at all. “All controls currently pass the evidence checks” is false there — nothing was checked, because there was nothing to check — so that case gets its own panel and a link to the Control Library.
Taking the register off the page
The list loads 500 rows at a time and says so on screen — “500 of 812 loaded”, with a Load more button beside it that fetches the next 500 rather than telling you to narrow your filters until the rest appear. Export CSV — in the page header beside Thresholds, with the analysis button on the line below them — is how the register leaves the page, and what it exports is the question you just asked rather than the whole table: the same filters, the same ordering and the same organisation scoping as the list you launched it from, up to ten thousand rows.
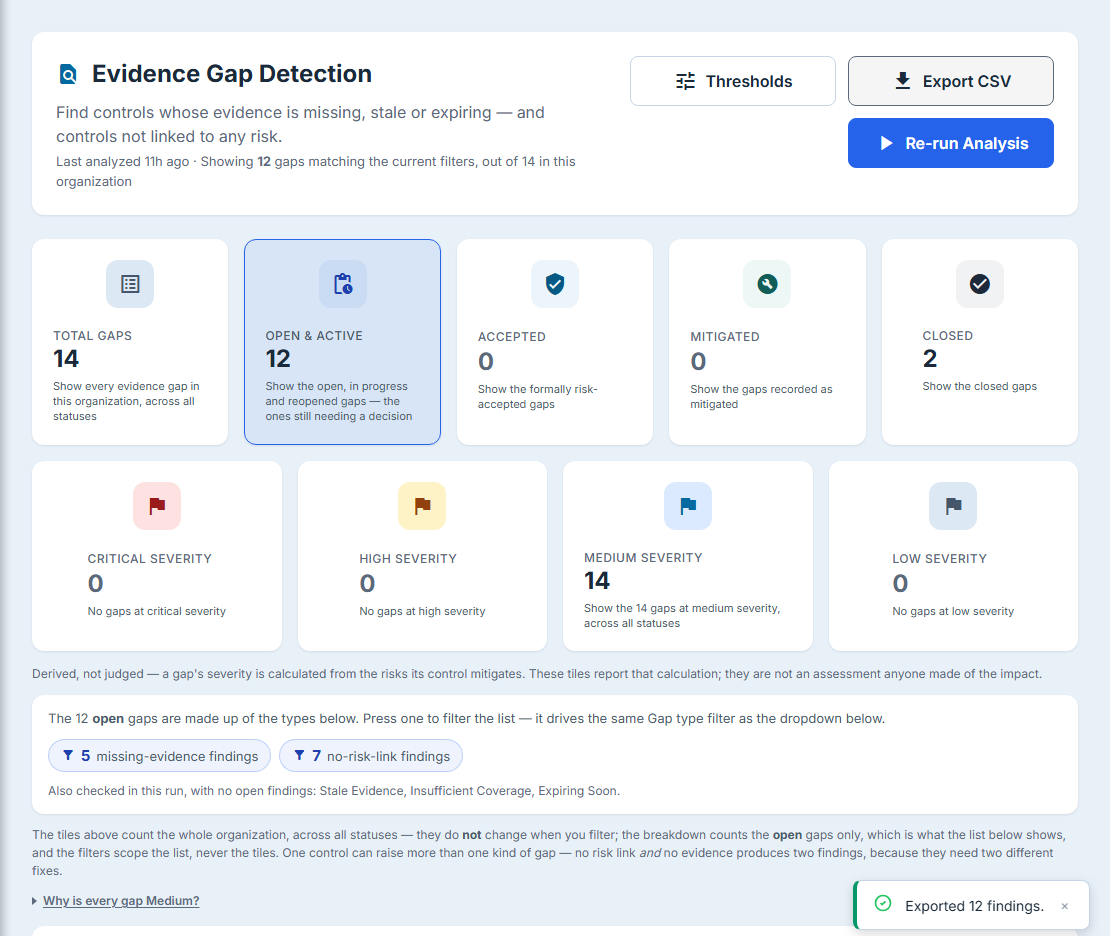
Four of its columns describe the work item behind a finding — its number, its owner, its due date and its status — and the page shows none of them; the row offers only a button that opens it. Where a gap has no work item, each of those four cells reads Not tracked rather than sitting empty. “Nobody is assigned yet” and “there is no work item here, so this finding cannot be late and cannot escalate” are different facts, and a blank cell tells you neither.
There is no screen-versus-file caveat to state, and that is the point: the list and the export push the same search predicate from the same module, so the two sets are equal by construction rather than by coincidence. The toast confirms what left the page by counting it — “Exported 12 findings.” — and it carries one genuine disclosure: if you reach the ten-thousand-row cap, it says so rather than handing you a truncated file that looks complete.
Three numbers, not one
A real organisation meets three different limits on this page, and they are easy to confuse because all three look like “how many gaps are there”:
- The list pages at twenty-five rows, with
Previous/Nextand aPage N of Mindicator underneath it. That is presentation only — it divides what has already arrived. - The fetch is five hundred rows, and the page says so on screen rather than leaving you to infer it, with Load more to fetch the next five hundred.
- The export reaches ten thousand, and discloses truncation if you pass it.
So “Page 1 of 20” is not a statement about your organisation; the header line above the tiles is.
If the page looks smaller than this article
Everything above assumes write access. A reader with view-only permission on evidence gaps sees the register, the tiles, the composition breakdown and every filter — and none of the actions. Run Analysis, Export CSV, Record outcome and Request acceptance are all absent rather than present and failing, and the page says which four in a single line at the top rather than leaving you to hunt for a button that was never rendered. If this article describes controls you cannot find, that sentence is the first thing to check.
Step 3 — Act on a finding
Each row carries its severity as a word, not just a colour band; the control’s name and number; a gap-type badge; a status badge; and the frameworks the control maps to. Above the list, a single guidance block states what fixes the gaps on this page, rather than repeating the same recommended-action sentence twenty-five times down the column.
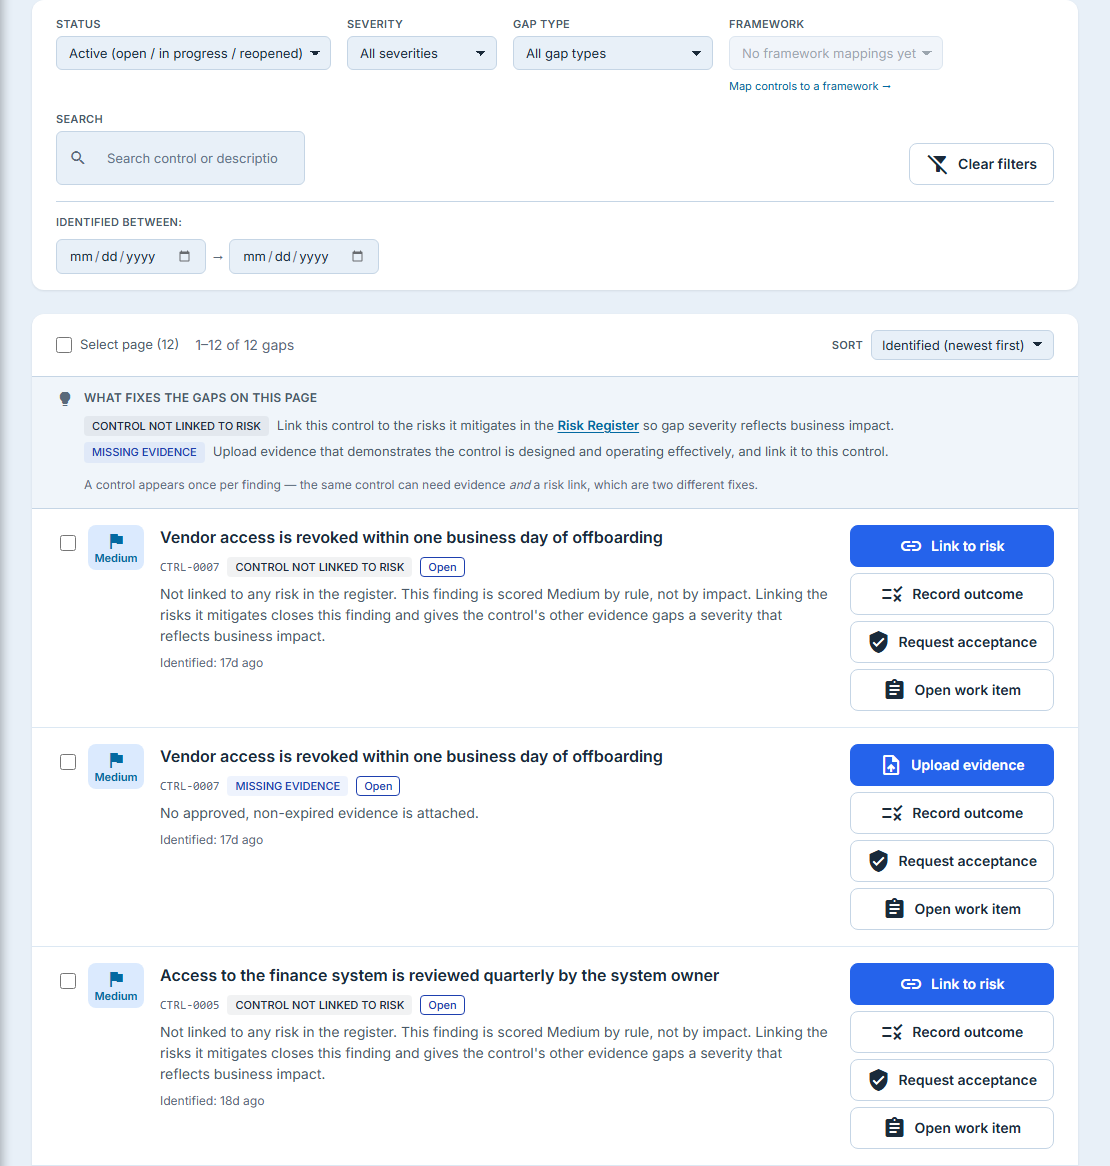
The primary button on a row is not generic. Each gap type prescribes the fix that closes it, and the link opens the control on the tab where that fix happens:
- Control Not Linked to Risk → Link to risk, opening the control’s Implementation tab, which is where its risk links live. (There is no separate “linked risks” tab to look for.)
- Missing Evidence → Upload evidence, opening the control’s evidence tab.
- Stale Evidence → Refresh evidence — same tab, different job: replace what has aged out.
- Insufficient Coverage → Add evidence, to fill the slots the control’s recipe still lacks.
- Expiring Evidence → Renew evidence, before the expiry date arrives rather than after.
That is all five detections and all five prescribed fixes — the mapping is exhaustive, so a finding on this page always arrives with the one action that closes it.
Where a gap already has a work item behind it, the row offers Open work item as well, so the finding and the tracked piece of work are one click apart in both directions.
The two things that are not fixes
Some findings are not going to be closed by an artefact, and the page has two honest outcomes for them. Select rows with the checkboxes and a bulk bar appears.
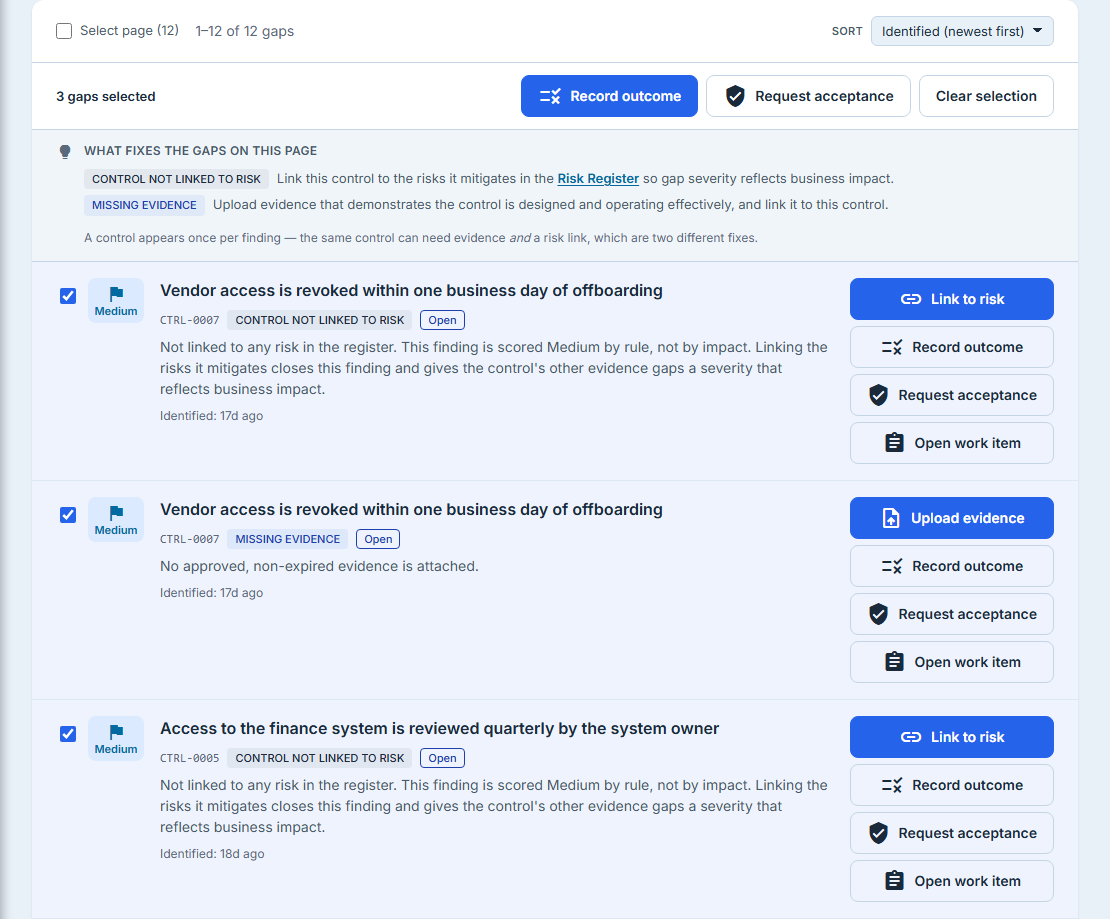
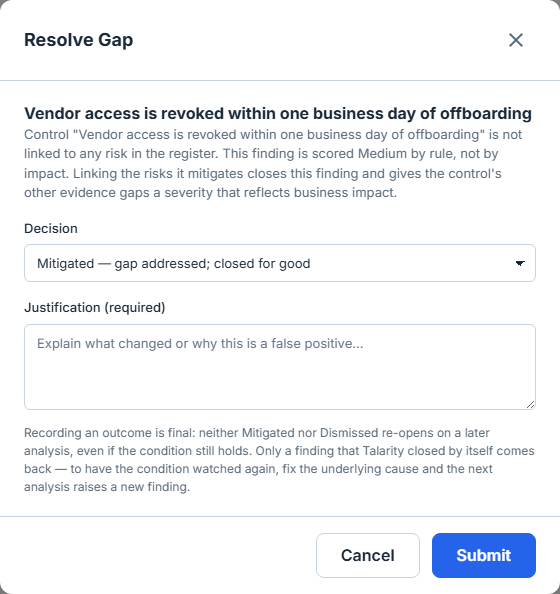
Record outcome writes a manual decision — Mitigated (addressed; closed for good) or Dismissed (false positive, data issue, or out of scope) — with a required justification. It closes the finding and its work item. It does not upload evidence and it does not link a risk. What the dialog states in as many words is that the decision is final: neither outcome re-opens on a later analysis, even if the condition still holds.
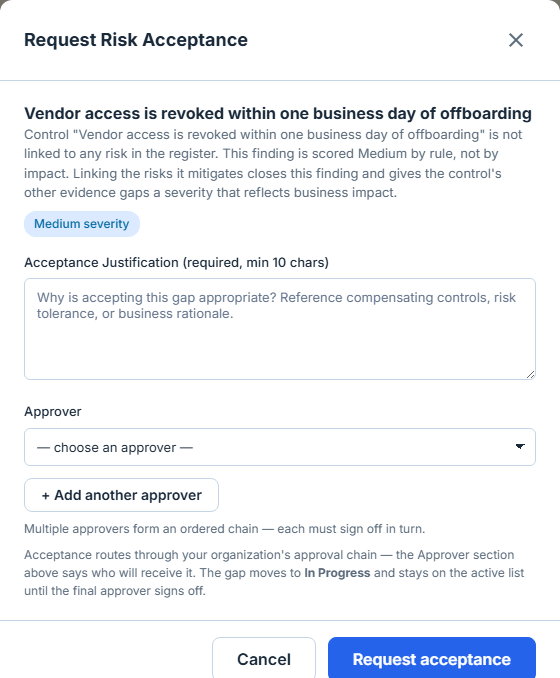
Request acceptance is the other one, and it is the control most often misread. It sends the gap into your organisation’s task-approval chain as a proposed risk acceptance. The gap moves to In Progress and stays on the active list until the final approver signs off — the badge changes, the obligation does not, and it is not a way to clear the list. And where your organisation has no second eligible approver, what happens next is your own policy’s decision — which is exactly the fact a reader would otherwise get wrong. By default the request returns to the requester and is recorded as self-approved, with the reason stored on the record. An organisation that has deliberately turned that fallback off — the segregation-of-duties posture a compliance team is most likely to have chosen — gets a refusal instead, and the acceptance cannot be requested until somebody eligible exists.
Pick by what you can defend later. Dismissed says the finding was wrong. Mitigated says the control is fine now and you are asserting it without an artefact. Request acceptance says the gap is real, you are living with it, and someone senior has put their name to that. An auditor reads the three very differently, and only the third produces an approval record.
Step 4 — Triage what arrives
A gap closes when evidence reaches the control. Smart Evidence Intake is the queue for evidence a person brings, and its job is to get from “a folder of documents” to “a mapped artefact” without a human reading every page.
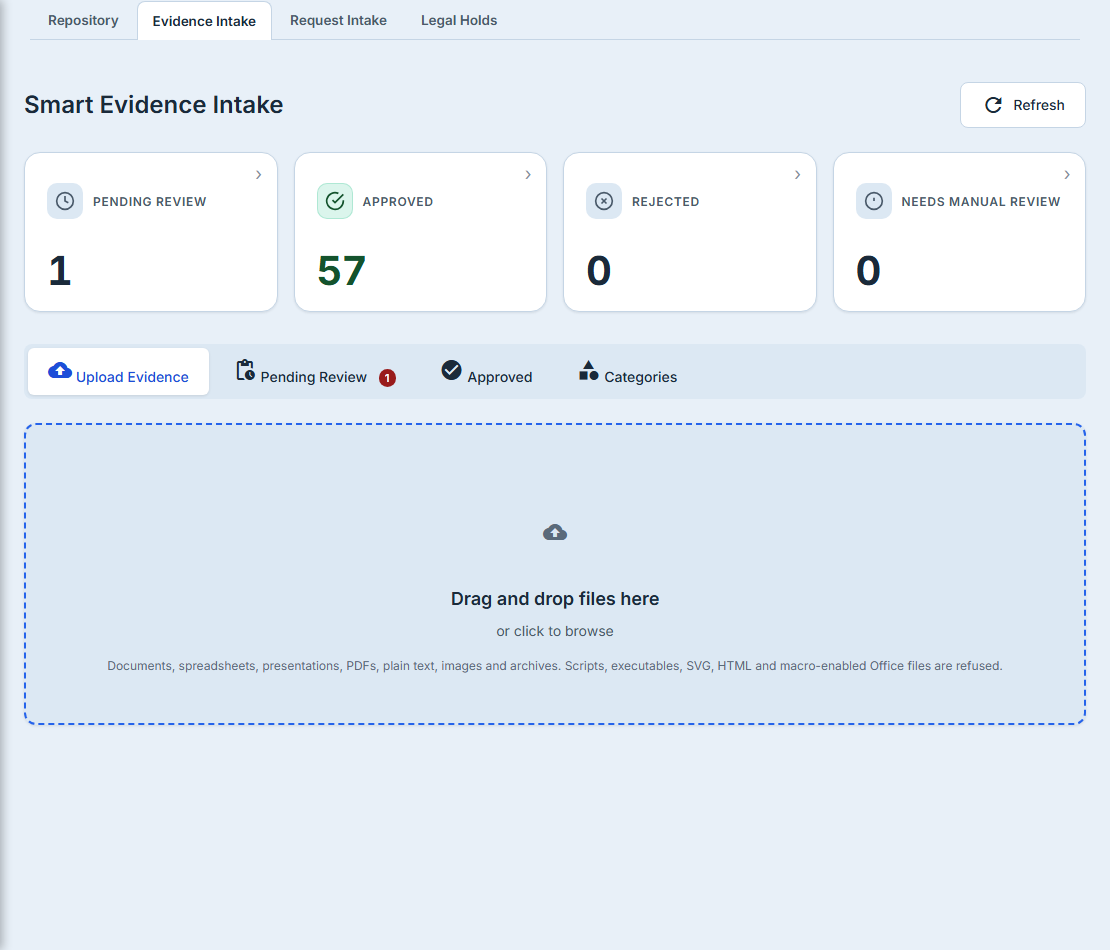
Each tile opens the rows it counts. Two of them are not synonyms for a tab: Rejected switches the queue’s status filter as well as the tab, and Needs Manual Review is a distinct population — items that are pending and that the classifier flagged as low confidence — rather than the pending queue under another name.
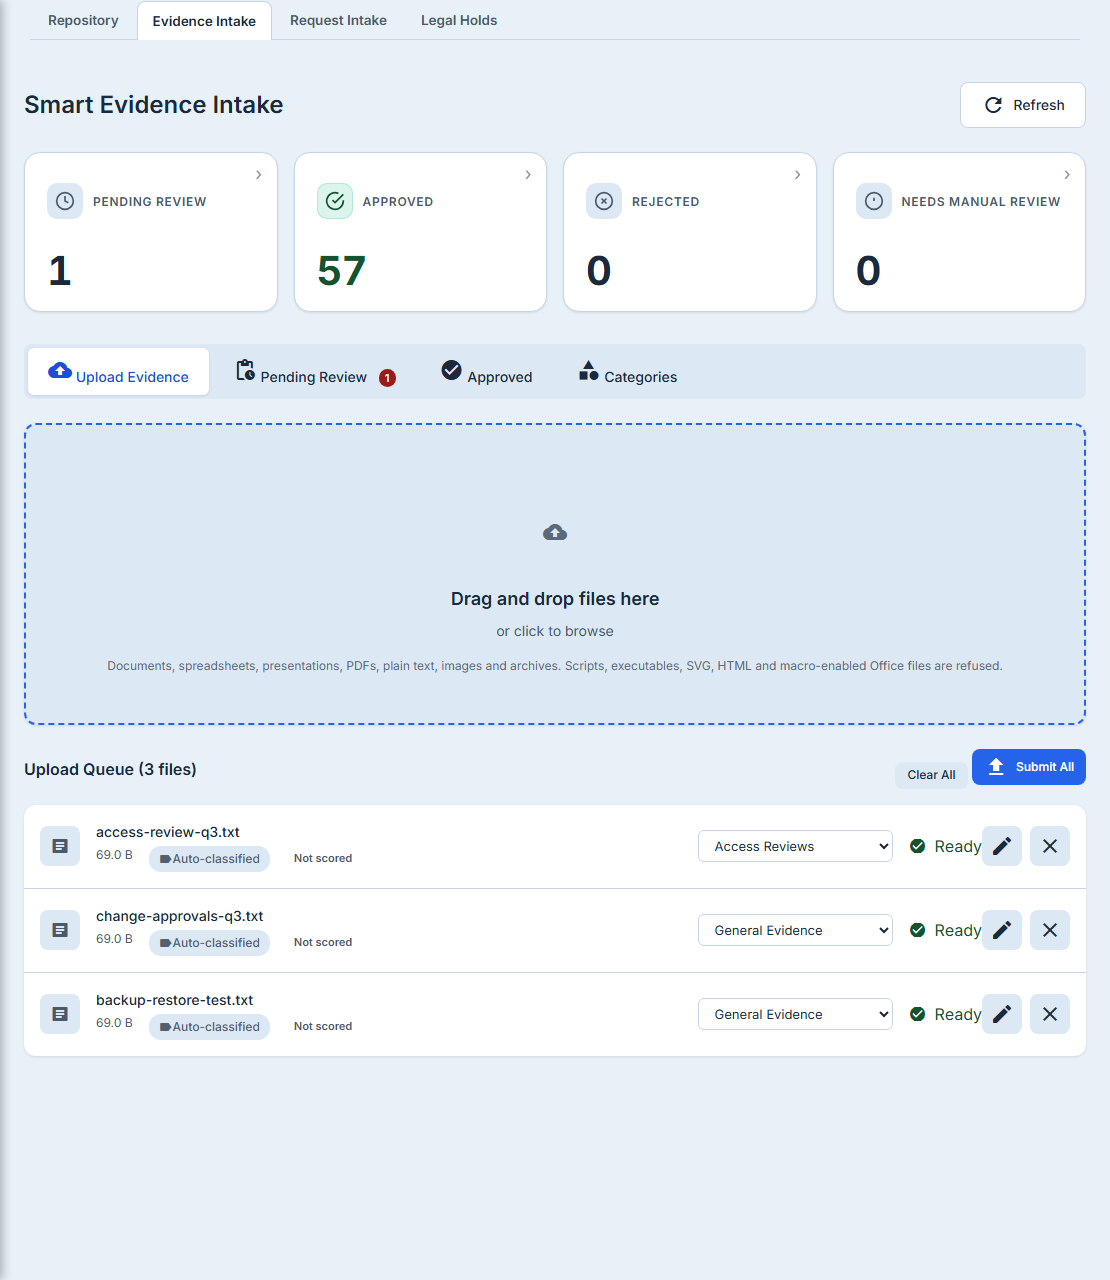
Upload is a drop zone with a per-file queue; each file gets a category before it is submitted.
The review decision
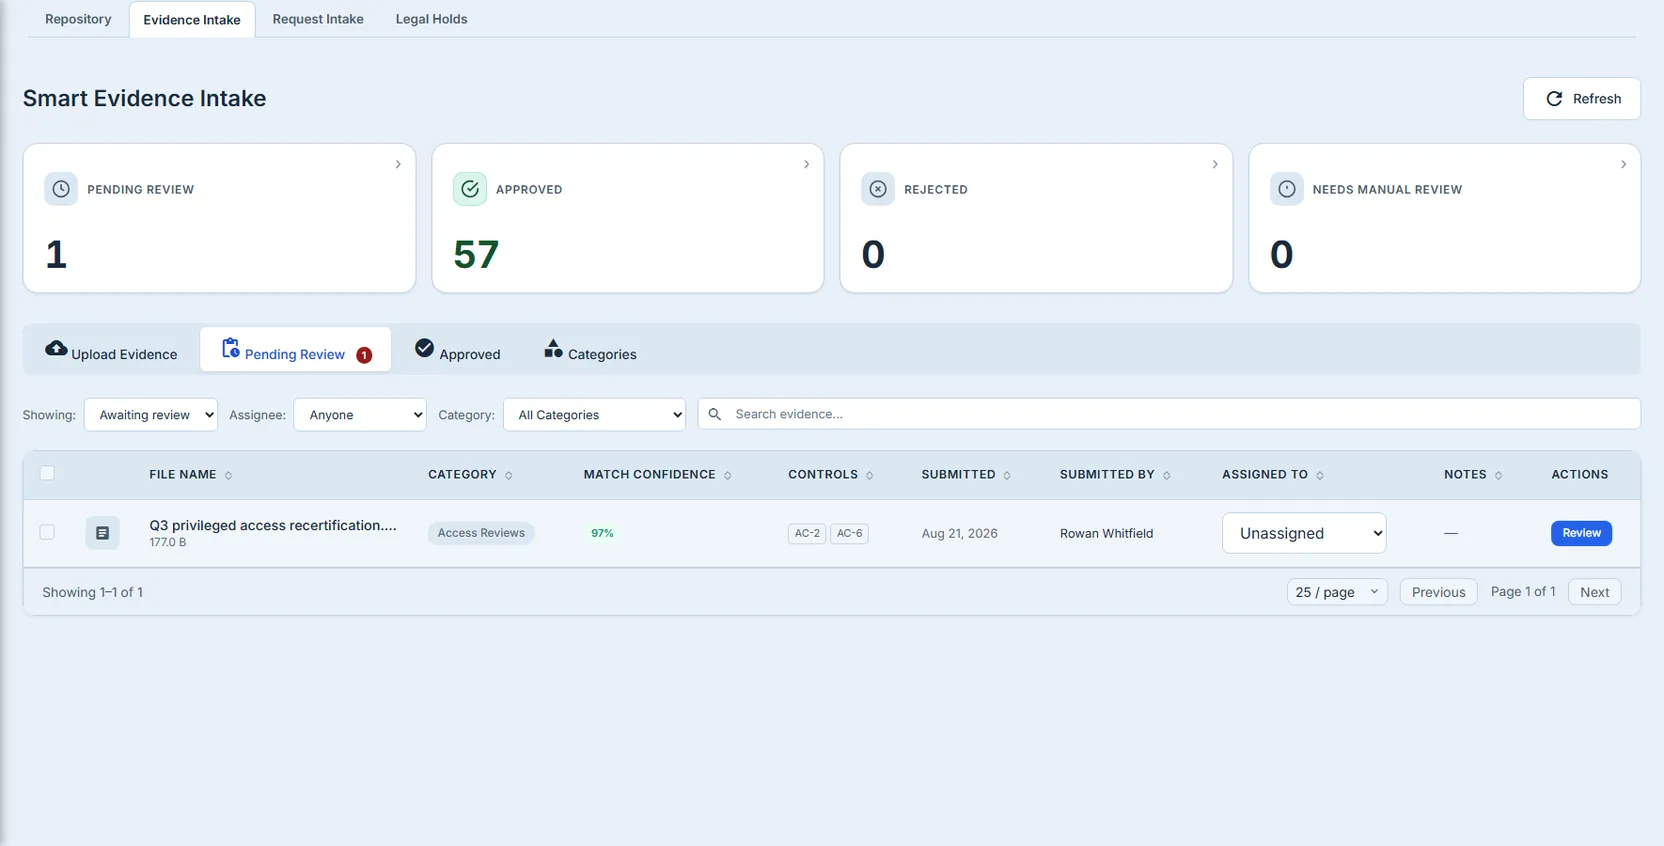
The Pending Review tab is where the queue is actually worked. It filters by status, by assignee — Anyone, Assigned to me, Unassigned — by category, and by a search over file names and descriptions that runs across the whole queue rather than only the page in front of you.
Open an item and the review panel shows what the classifier proposed, with its confidence, and — kept deliberately separate — the mappings you are actually about to record. The frame below carries both halves: five suggestions under a 97% confidence badge, and beneath them a Mappings to record list holding two. The gap between five and two is the point — nothing is recorded because a classifier proposed it.
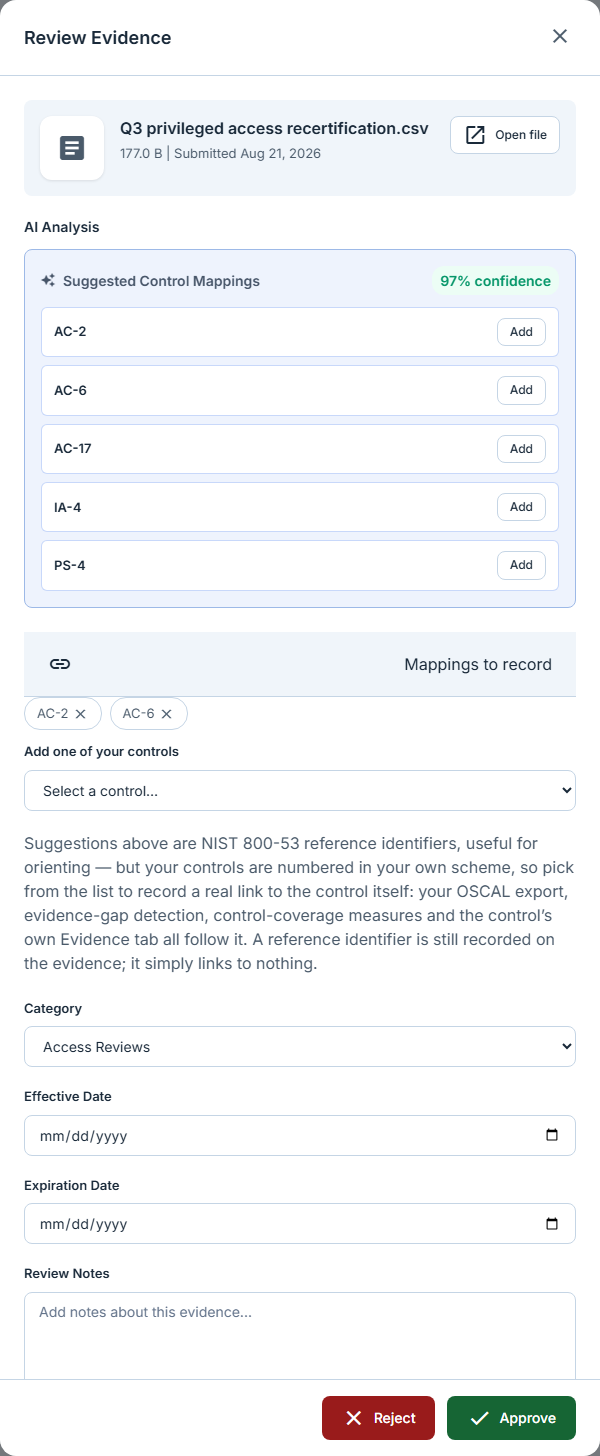
The separation is load-bearing. The suggestion list is static reference — pressing Add does not change it — while Mappings to record is the staged set, and every pill there is removable. It also tells you which kind of thing each one is: a pill styled as linked matches a control in your own inventory, and a pill styled as a reference identifier does not. Approving resolves each staged entry against your controls and writes a real cross-entity link, which is why a wrong mapping has to be removable before the decision rather than after it.
Two fields on that panel decide the artefact’s future rather than its present: Effective Date and Expiration Date — and they feed two different graders, which is worth getting right. Expiration Date is stored as the artefact’s expiry and is what raises the Expiring Soon finding on Gap Analysis. Effective Date is the one people assume is decorative, and it is not: besides grading the intake page’s freshness distribution and the per-row freshness column beside it, it is the first term in the age calculation the Insufficient Coverage check runs. That check asks whether a requirement’s evidence slots are filled by artefacts inside a maximum age, and the age it measures counts from the effective date where one is set — falling back to the issue date, then the upload date. So an artefact given a genuinely old effective date can age out of a slot it would otherwise have filled, and the finding is raised: the field decides whether a gap exists, not merely how a chart looks.
Neither field is what makes a control go stale, though — that check measures the age of the most recent upload, so that gap arrives on time whether or not anyone filled these in. What is lost by skipping them is the intake grade: evidence approved with neither counts as No dates recorded on the distribution, and no expiry means no early warning before one arrives.
More than one at a time
A queue that can only be worked one modal at a time is a queue that stops getting worked. Every row carries a checkbox in the leftmost column, and a selection raises the same bulk bar the gap page uses: Approve selected, Reject selected, and the count of what you have chosen.
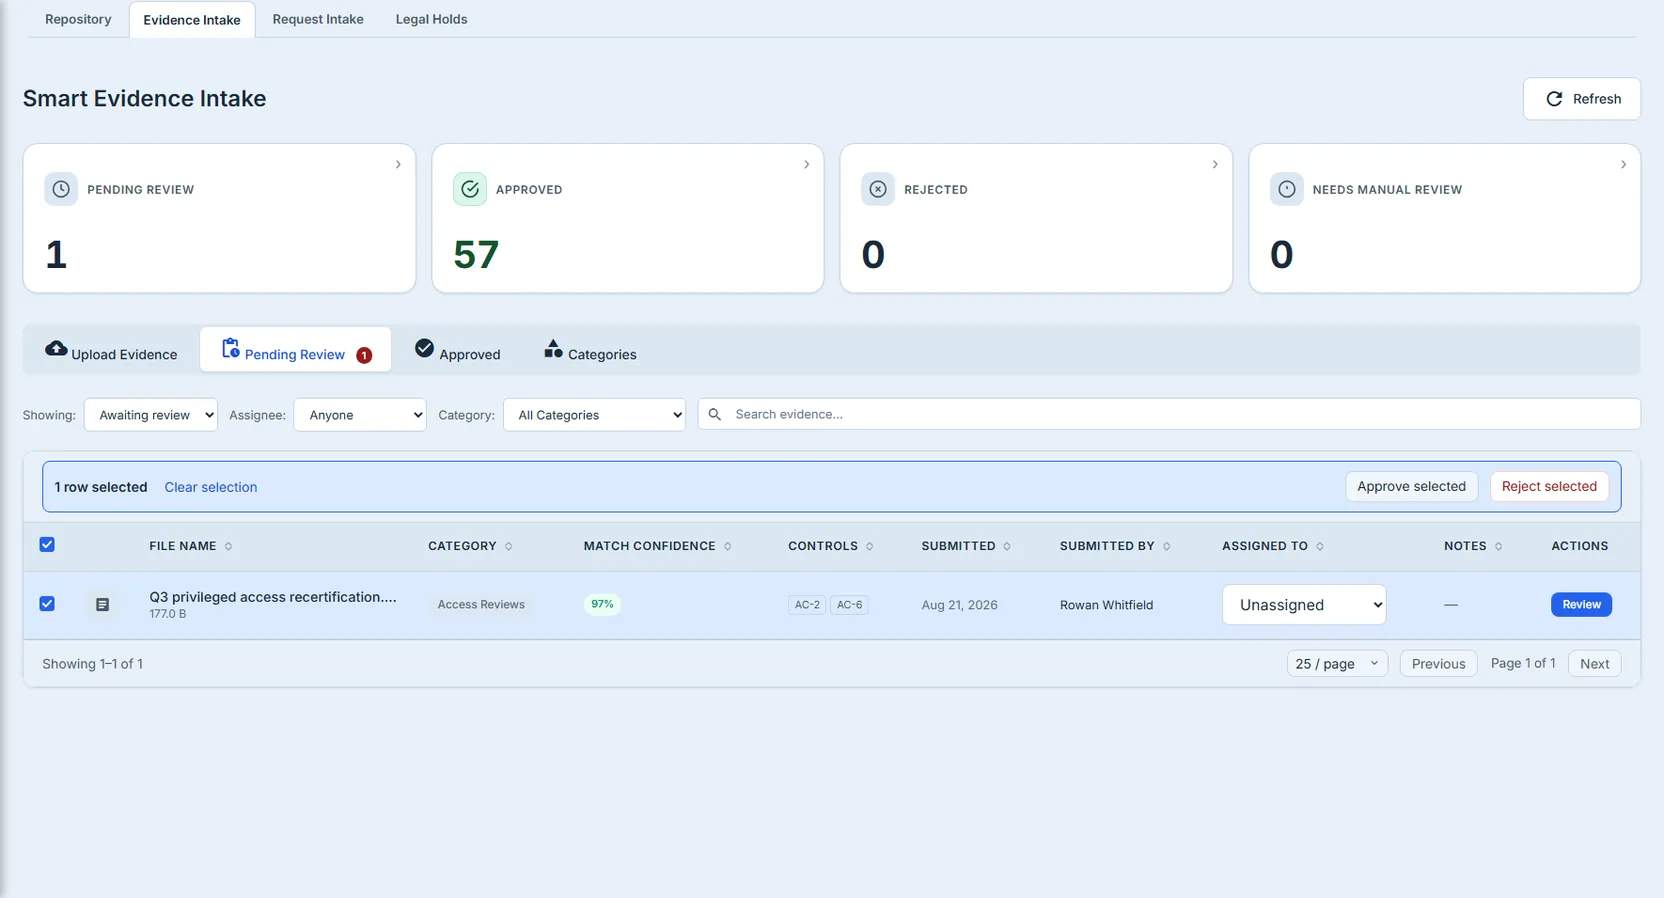
The bulk path does not re-implement the decision. Each selected item runs through the same review the single-item panel calls, so a bulk approval resolves and writes the same control links, records the same reviewer and enforces the same rules — including that a rejection still needs a reason. Each item also reports its own outcome rather than the batch reporting one: if a colleague reviewed one of your selected rows thirty seconds ago, that row comes back as failed and the rest still go through.
Use it for what it is good for — a run of the same kind of artefact, already classified correctly. A suggested mapping you disagree with is still fixed in the per-item panel, because the bulk bar has nowhere to correct one.
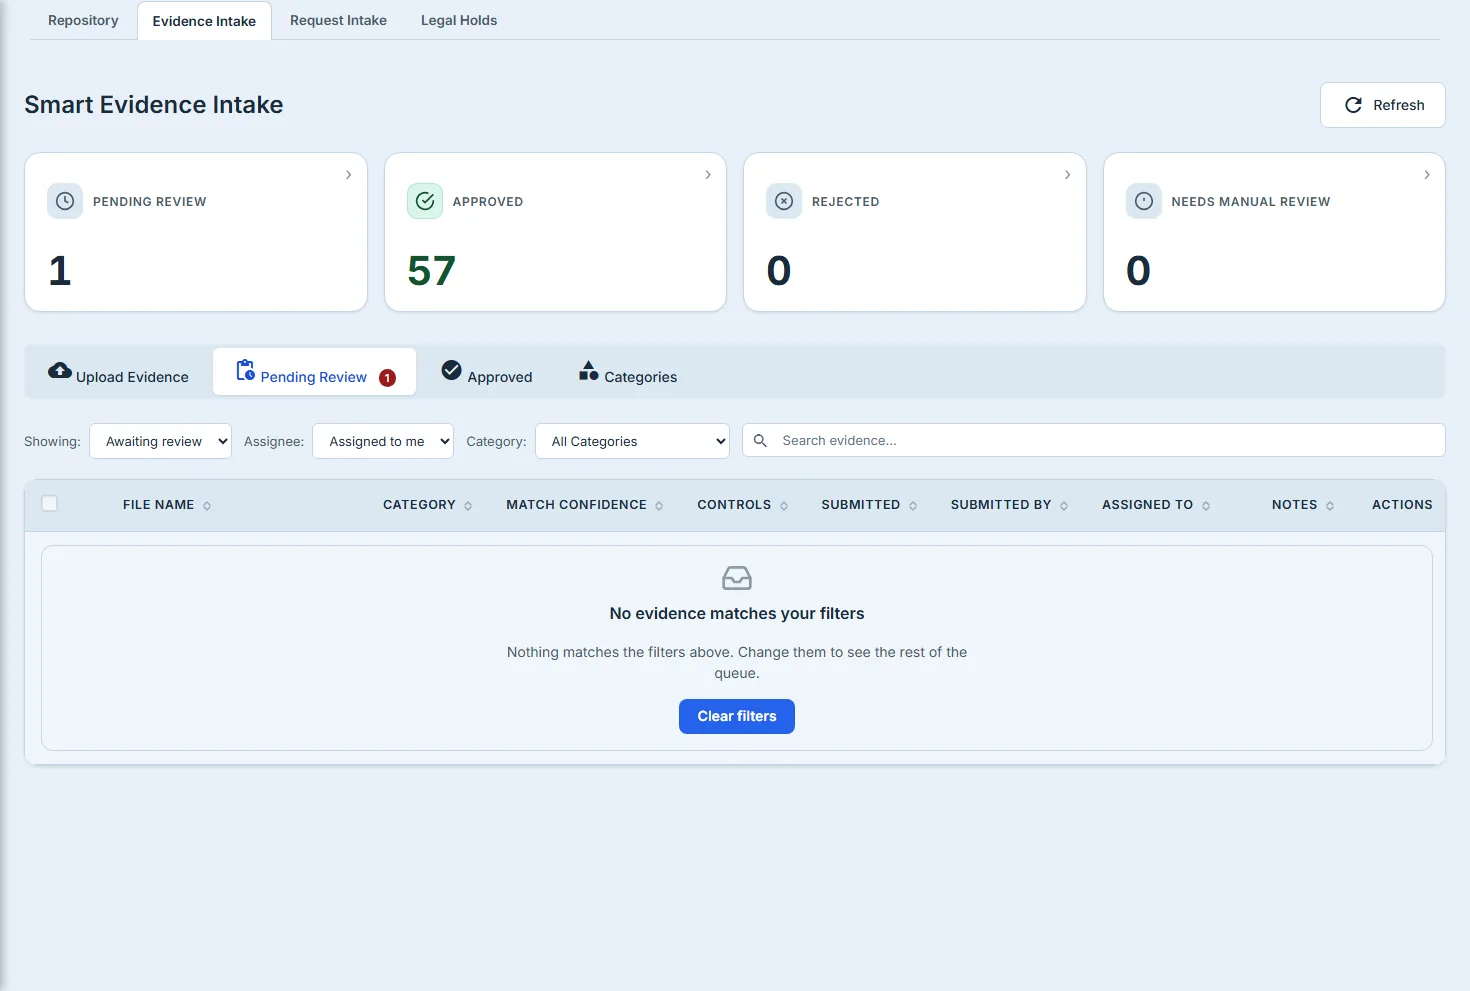
The filters here carry the same honesty rule as the gap page. Filter the queue to something empty and you are told “No evidence matches your filters”, with the filter controls still on screen — because they are the only way back.
Step 5 — Let a system push evidence in
Not all evidence has a person behind it. Talarity exposes a signed inbound endpoint: your build pipeline, your access-review script, your internal tooling — anything that already produces proof — POSTs a JSON payload signed with an HMAC-SHA256 shared secret, and one classified row is written.
Three properties of that endpoint are worth knowing before you wire one up:
- The signature is verified before anything else is read, including before the enabled/disabled check. A caller without a valid secret learns nothing at all — not whether the organisation exists, not whether a webhook is configured. Only a caller that already holds the secret is told the webhook is switched off.
- It carries metadata, not file bodies. The payload is capped at 256 KB, and a file is attached through the existing signed-upload flow and referenced by id.
- Deliveries are deduplicated. Supply a
deliveryIdor let the endpoint hash the body; a replayed identical delivery collapses rather than double-counting.
The row it writes lands in Evidence Collection, alongside everything the connectors pull, tagged Inbound as its source — the same word in the Source filter and on the row’s badge, so you can separate what was pushed to you from what Talarity went and fetched.
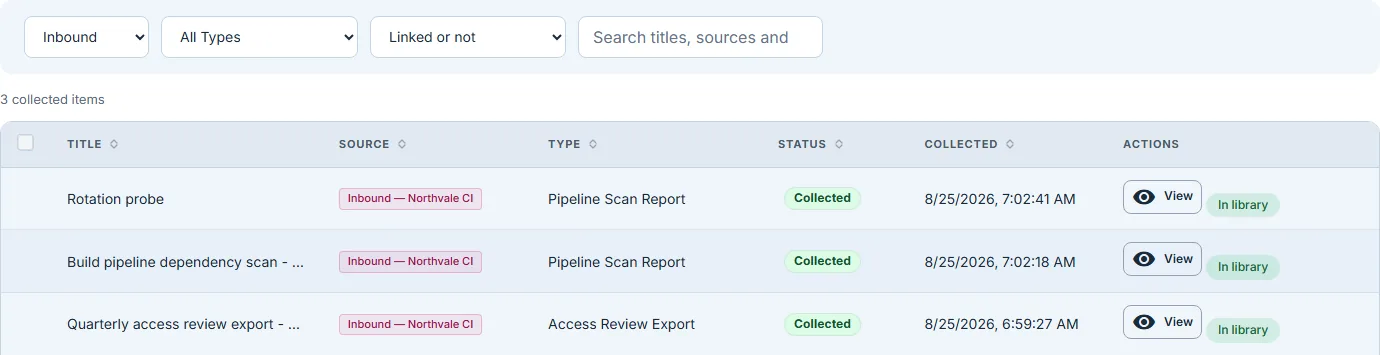
The delivery also notifies whoever is configured to receive compliance notifications — and the destination is keyed to the store the row was written to, not to a fixed page. That sounds like a detail. It was a real defect: the notification pointed everyone at Smart Evidence Intake, whose queries are scoped to a different table, so a reviewer was sent to a page on which their evidence was excluded by construction. The link and the sentence in the notification now derive from the same value, so they cannot drift apart again.
Know which pool each check reads. The
missing,staleandexpiringchecks count evidence reached through control-to-artefact links in the evidence library, and only where the review status is approved or absent — so a rejected intake item does not close a gap, and neither does a pending one. The recipe-driven Insufficient Coverage check reads more widely: it also counts connector- and inbound-collected rows that carry a control id. So a system pushing evidence can satisfy a declared recipe slot; to close a Missing Evidence finding, the artefact has to reach the control through the library.
That last sentence is a requirement, so the Actions column on each collected row is where it gets met. Add to library promotes the row into the evidence library as an approved artefact and writes the control links in the same transaction — both halves of each link, the edge and the artefact’s own record of it — because a promoted artefact that no control points at is in the library and still closes nothing. Once promoted the button is replaced by an In library badge, so the tab tells you at a glance which deliveries have crossed over and which are still staging. Promotion reads every control the delivery named, not just the first: a push carrying five control ids stores the first in one column and the rest in its metadata, and taking the column alone would link one control and silently drop four.
It will also tell you when it has linked nothing. An inbound sender chooses its own control
vocabulary, so a delivery can name AC-1 where your inventory has no such control — the promotion
still succeeds, the artefact is still in the library, and it will still close no gap. Talarity says
so in the confirmation rather than reporting a clean success, and names the identifiers it could not
match, which is usually a mapping to fix at the sending system rather than in Talarity.
Step 6 — Decide when it goes stale
The last part of the loop is the one that makes it a loop. /app/grc/evidence-gaps/settings is where
you set what “current” means.
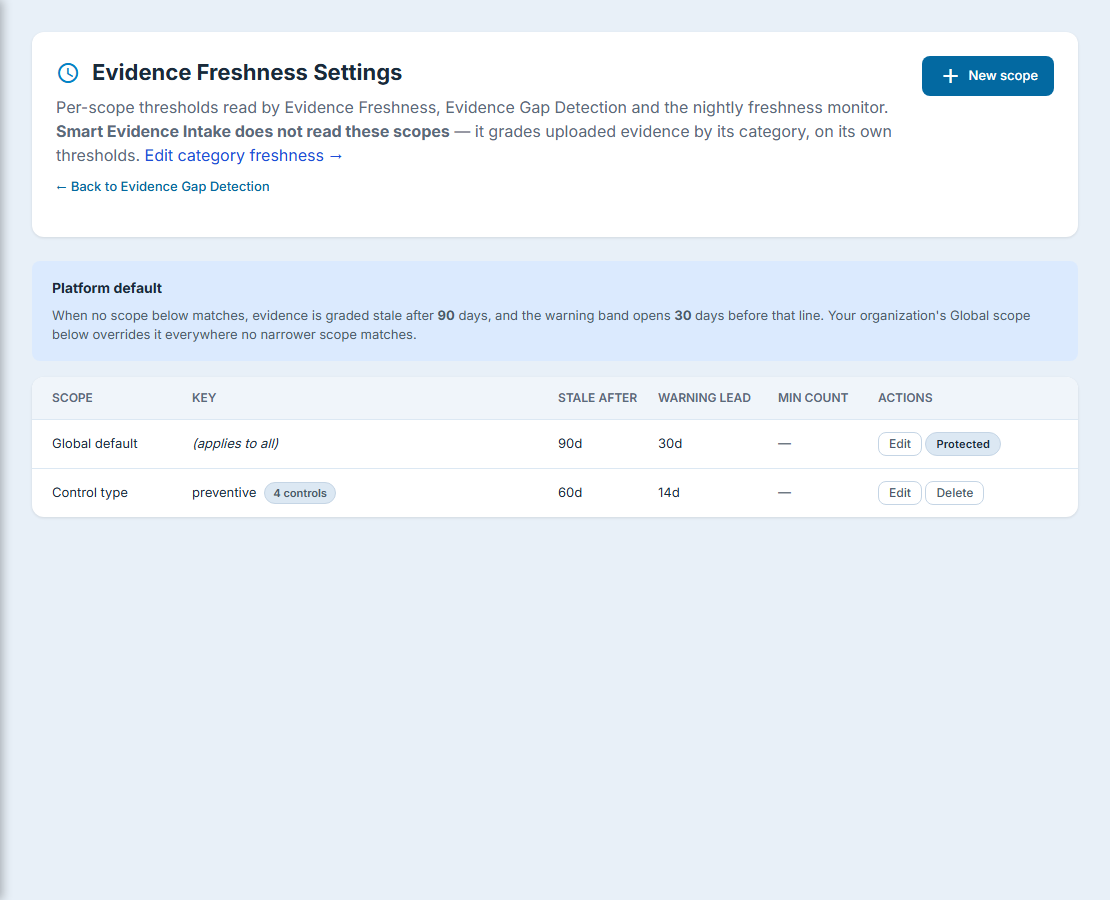
Scopes are added at increasing specificity — Global, Control Type, Framework, Control — and the most specific one wins, with a per-control override on the control itself and a per-artefact policy on the evidence beating both. Those two last overrides are narrower than they sound, and the settings page says so where the article once did not: they replace the stale-after age only. The warning lead and the minimum evidence count keep coming from the winning scope, so a control-level override changes when evidence goes stale without changing how early you are warned about an expiry. Note where Framework sits: it is narrower than Control Type, not wider, so a framework scope overrides a control-type one rather than the other way round. And a control that belongs to several frameworks takes the strictest of the framework scopes that match it — strictest meaning the shortest stale-after age, with that row’s other two numbers travelling along with it rather than being minimised independently. Each scope sets three numbers:
- Stale after (days) — the age at which evidence stops counting. The platform default is 90.
- Warning lead (days) — how far ahead of an expiration date the Expiring Soon finding is raised. The platform default is 30.
- Insufficient: minimum evidence count — optional, and unset by default, which is why that check does not fire until you choose a number.
The platform default is the card above the table, not a row in it — it is the floor the product supplies and there is nothing there to edit or delete. What the table’s first row shows is your organisation’s own Global default, and that row is marked Protected: you can Edit it, but not remove it. Either way the floor stays; you tighten things by adding a narrower scope beneath it, not by taking the floor away.
Pick these by evidence class rather than by feel. A quarterly access review is stale at ninety days almost by definition. An annual penetration test is not, and a global ninety-day rule will raise a finding on it every year, three quarters of which is noise you will train yourself to ignore — which is the actual failure mode of an over-tight threshold.
Back on the intake page, the freshness distribution shows the shape of what you have — but read it knowing it answers a different question from the one you just configured, on a different key.
Two rulebooks, and they do not talk to each other. The scopes above resolve per control — global, framework, control type, control — and they drive the Missing, Stale and Expiring Soon findings on Gap Analysis. The intake page’s distribution grades each artefact on its category instead: a policy counts for a year, a screenshot for ninety days, a log for thirty. Those category numbers are editable on the intake page’s own Categories tab, where you can also add a category the platform does not have — but they are edited there, not here, and the scope table has no category scope, so neither rulebook can express the other. Tightening a scope here does not move the bar on the intake page, and it is not meant to. Treat the distribution as a stock-take of what you hold, and the gap findings as the compliance verdict.
The category rulebook is yours as well
The intake page’s Categories tab is where that second rulebook lives, and it is editable. Each card is an evidence category showing a three-band ladder rather than a single cut-off: a policy document reads “Current for 183 days, then ageing; stale after 365” — so there is a middle band, and an artefact in it is neither fresh nor expired. You set one number, the stale-after age; ageing always begins at half of it, so moving 365 to 180 moves both edges together. Alongside editing a window you can Hide a built-in your programme does not use — it stops being offered on uploads, in the queue filter and in the review panel, while evidence already filed under it keeps its category and its grade — or add a category the platform does not ship. A built-in you have edited says so on the card, with Reset to put it back, and a hidden one sits in its own block below the grid with Show.
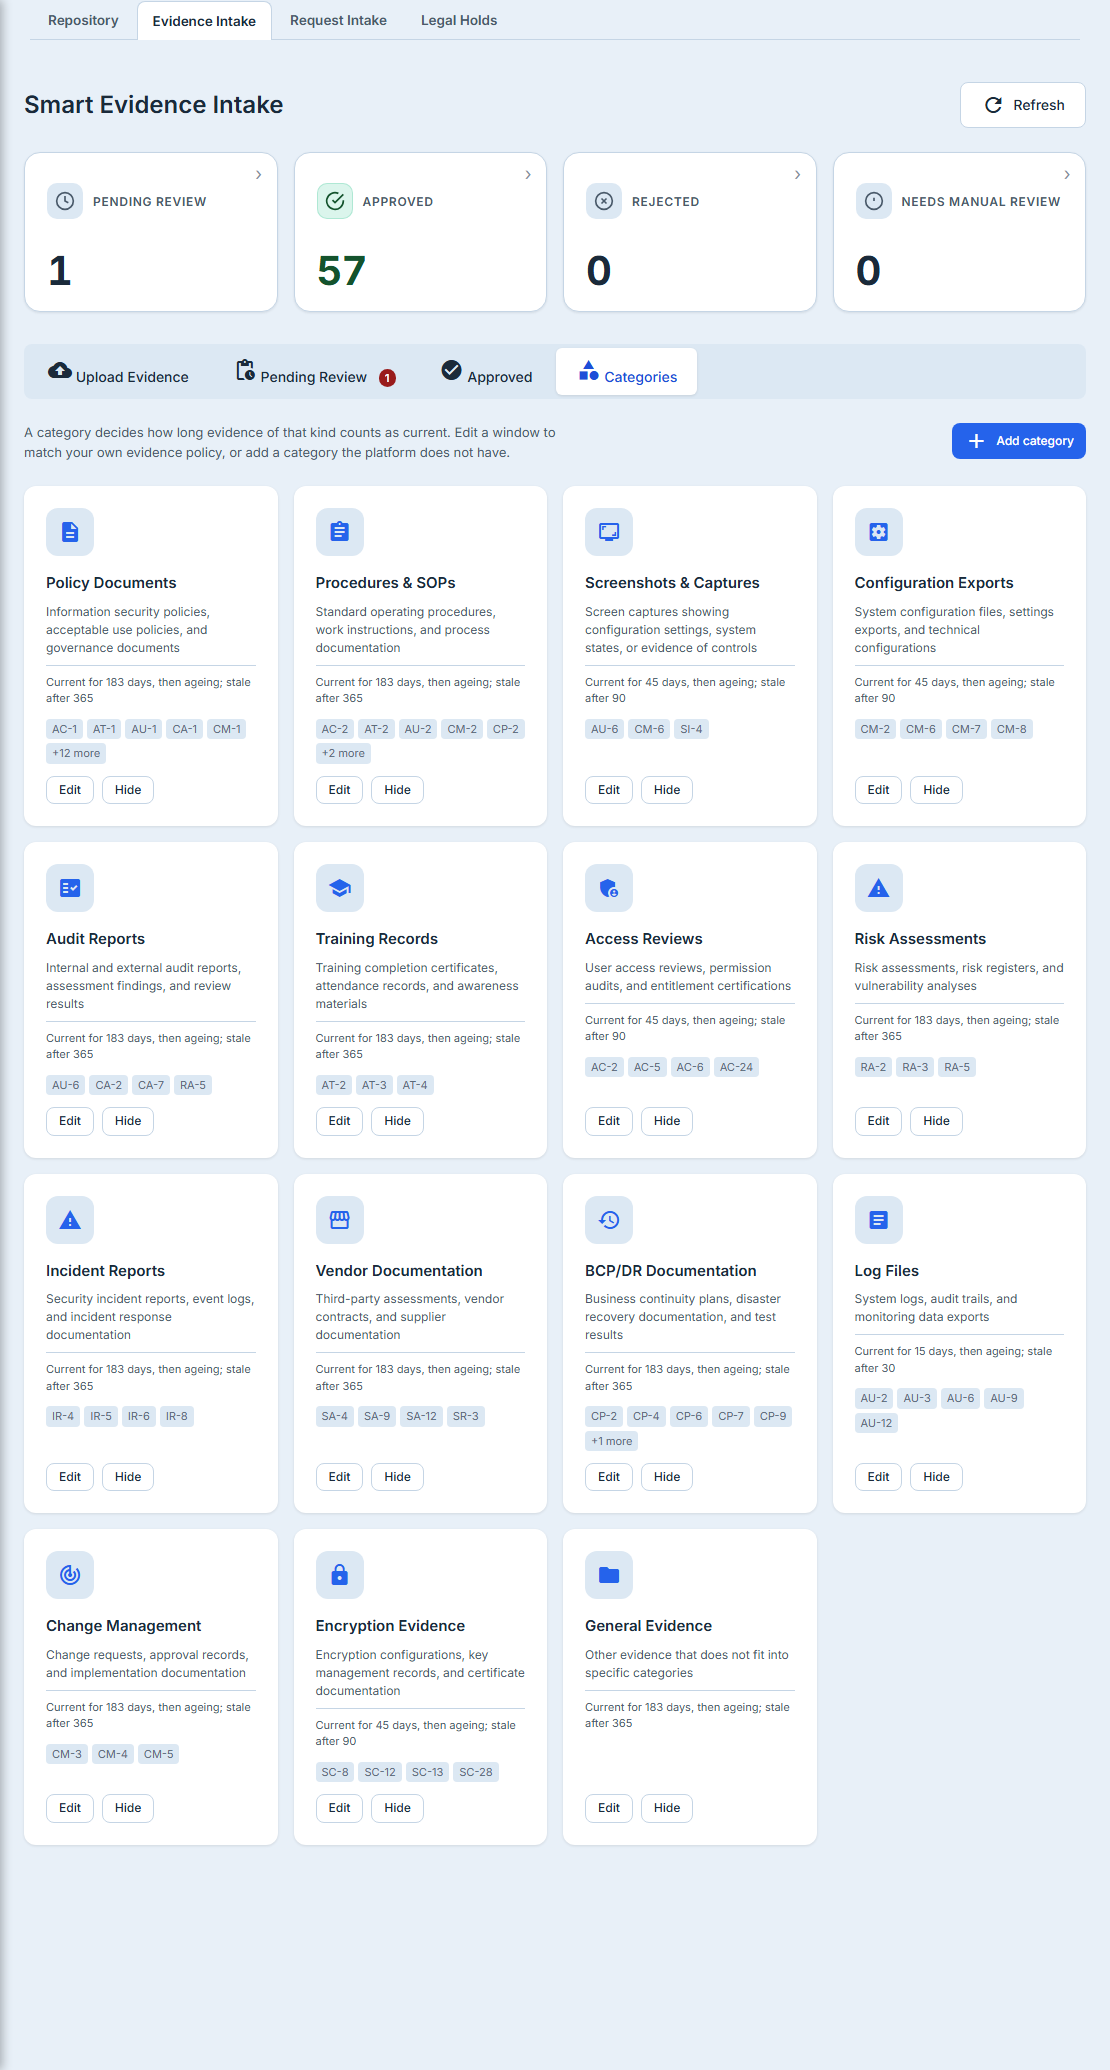
Editing a window here changes how your own evidence is graded, so it is worth deciding by evidence class rather than by feel — the same argument as the scopes above, on a different key. And it stays a different key: a category window moves this page’s distribution and nothing else. It does not move a Gap Analysis finding, because the gap checks never ask what category an artefact is.
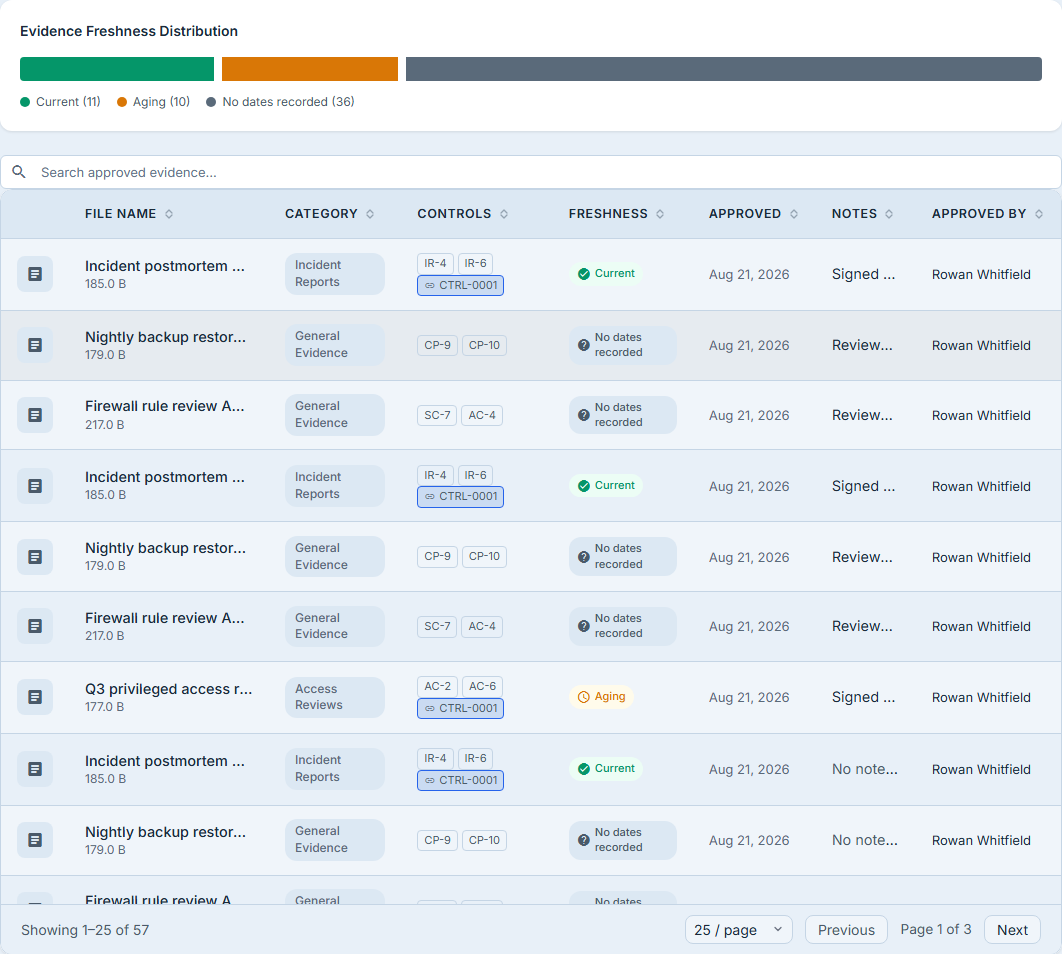
No dates recorded is the segment to watch. Those artefacts are not fresh and they are not stale; they are unmeasurable, and every one of them is a review that skipped the two date fields. It is the cheapest thing on this page to fix and the easiest to leave alone for a year.
Where the gaps show up when you are not looking for them
A detector you have to remember to visit is a report nobody reads. The findings reach four surfaces outside their own page, so the person who has to act on one meets it where they already are.
The first is the control. Open any control and its Evidence tab carries an Evidence gaps (N open of M) card listing the findings raised against that control, each with its severity and its status.
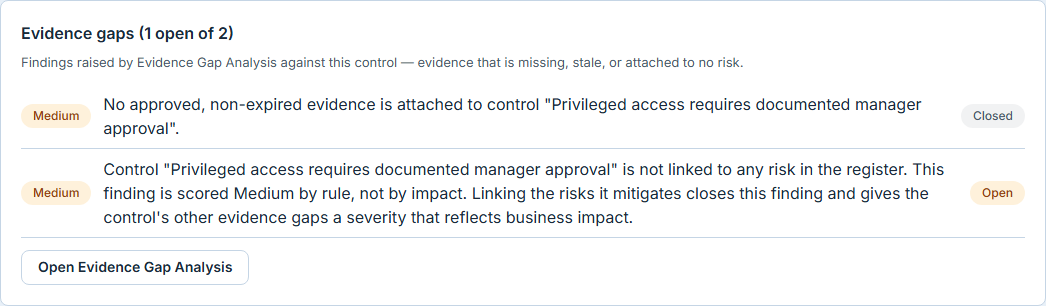
The two numbers in that heading are deliberate: the card counts closed findings as well as open
ones. A control that has had three gaps raised against it and closed is not the same object as a
control nothing has ever examined, and a card that showed only what is open would render the two
identically. The control above has had two findings raised and has closed one, so its heading reads
1 open of 2 — the missing-evidence finding is settled and badged Closed, while the
no-risk-link one is still Open. That difference is the whole point of carrying both numbers: the
history stays legible after the work is done.
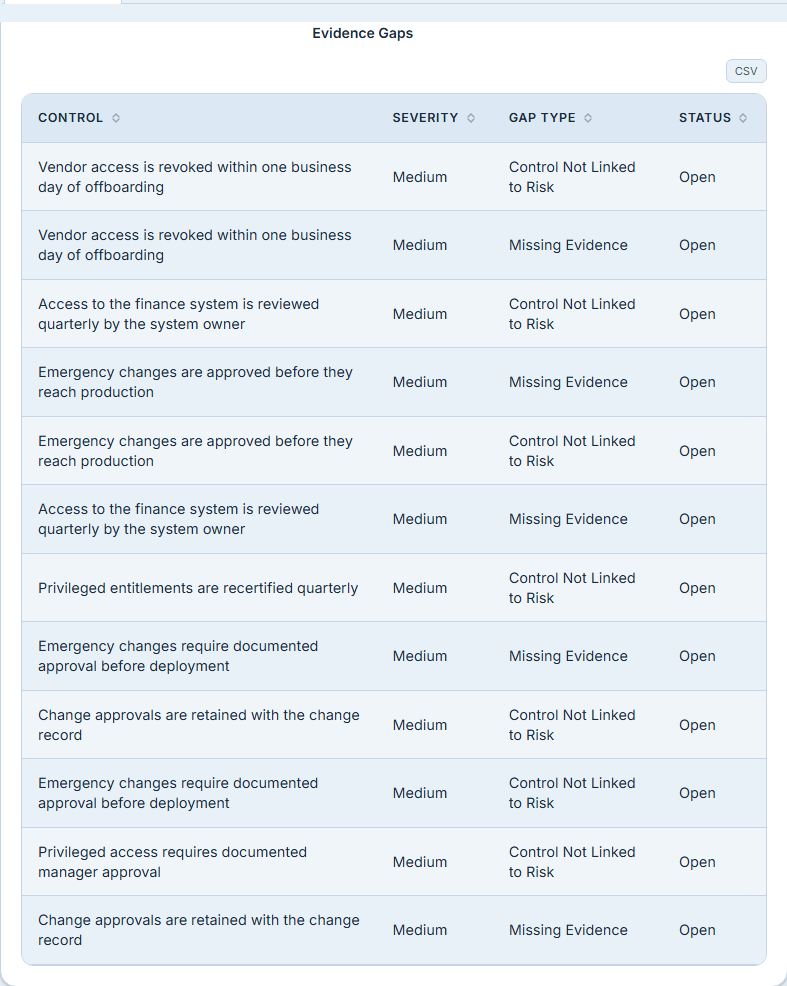
The second is the dashboard. The Audit & Evidence page template carries an Evidence Gaps widget alongside a Controls Without Evidence one, and the pair is worth reading together rather than as two names for the same number. Controls Without Evidence counts active controls with no evidence linked at all. Evidence Gaps counts what the detector raised — of which missing evidence is one type out of five, and on a first run rarely the largest. So the second is normally the larger of the two, and that is not a discrepancy: one control can raise more than one finding, which is visible in the widget below, where the same control statement occupies several rows. In the other widget it would occupy one.
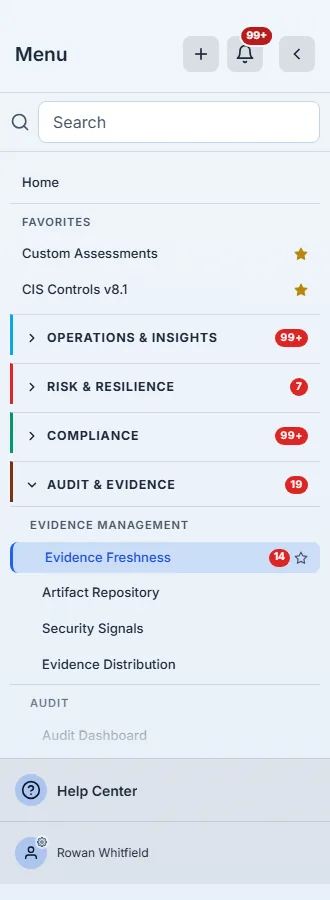
The third is the sidebar, and it is worth knowing exactly what it is counting. There is no Evidence Gap Detection row in the nav — gap detection is a tab under Evidence Freshness, alongside Evidence Collection, Evidence Review, Chain of Custody and Evidence Automation. That is worth reading twice if you have been looking for Evidence Collection in the sidebar since Step 5: it is not a row either, it is the tab beside this one. (The strip on screen shows six pips, not five: Evidence Freshness is the page hosting the strip, so it appears in its own tab bar.) Three of those five carry a count — gap detection, review and custody — and the badge sits on the parent as the sum of them: the open gaps, plus anything awaiting evidence review, plus any custody exceptions. So the sidebar number is a single “this area needs you” figure, not the gap count — open the tab and it will read lower, and nothing is wrong. The per-tab numbers are on the tab strip itself, which is where to look when you want the gap figure specifically.
The fourth is search. Gap findings and collected evidence are both indexed in universal search, so a control number typed into the search box reaches its findings without a route.
All four had one thing to be careful about. Gap findings share a table with the gap rows an assessment produces, and on a real organisation the assessment population is much the larger of the two — so a surface that counted everything the table calls a gap would report a number many times the one on the page. Each of these narrows to this feature’s own findings, and to the accounts you are entitled to see.
Where the deep dives are
This article is the loop. Each surface has its own walkthrough with the detail this one deliberately compresses:
| For the detail on… | Read |
|---|---|
| Every rule the detector runs, how findings are ranked, and why one is about your risk register | Evidence gap detection |
| What the classifier does, what it refuses to do, and what approving changes elsewhere | Smart Evidence Intake |
| Wiring a connector or a signed endpoint, and reading the page when one stops working | Connectors pull, webhooks push |
| The two freshness numbers and which question each answers | Evidence has a shelf life |
| Proving an artefact is the same file you collected | Who touched the evidence |
What you walk away with
- A deterministic gap pass you can re-run any time, whose findings name the number that crossed the threshold rather than an opinion.
- Tiles that always describe the whole organisation and a list that always describes your current question — with the page stating which is which, so a filter can never be mistaken for a clean bill of health.
- A prescribed fix per gap type, opening the control on the tab where that fix happens, plus two honest non-fixes: a recorded outcome with a justification, and a risk acceptance that leaves the gap open until somebody signs.
- A register that can leave the page — the gap list as a CSV carrying the filters and ordering you launched it from, in one file rather than a page at a time, with the work item’s owner, due date and status the page does not show and Not tracked where there is no work item at all.
- A triage queue where the classifier’s suggestions and the mappings you are about to record are visibly different things, every staged mapping is removable before the decision, and a run of similar artefacts can be approved or rejected together through the same review as one at a time.
- A signed inbound endpoint that verifies before it reveals anything, deduplicates replays, and notifies a reviewer at the surface its rows actually appear on.
- Freshness thresholds by scope, so the loop closes: today’s approved artefact becomes next quarter’s Stale Evidence finding, on the schedule you chose rather than the week before fieldwork — plus an evidence taxonomy you own — windows you can change, categories you can hide, show or add, and a reset back to the platform’s.
- Findings where the work already is — on the control’s own Evidence tab, in a dashboard widget beside Controls Without Evidence, on the sidebar badge, and in search.
Run yours this afternoon. Open /app/grc/evidence-gaps and press Run Analysis — the first pass
takes a minute and usually returns more unlinked controls than missing evidence, which is worth
knowing on its own. Set your global freshness scope while you are reading the result. After that the
loop runs itself, and the only thing left to do is work the queue.